Can I Just Replace The Ac Compressor In My Car Can I 2027
Rarely can you just replace the AC compressor; often, associated components like the receiver/drier and expansion valve must also be replaced due to contamination. Understanding these critical steps ensures a lasting and efficient AC repair. Ignoring this can lead to repeat failures and wasted money.
Can you just replace the AC compressor in your car? The short answer, for most vehicles in 2027, is almost always “no.” Simply swapping out the compressor without addressing other critical components is a recipe for quick re-failure, costing you more time, money, and frustration in the long run. A truly lasting fix requires understanding the entire system and performing a comprehensive repair.
You’re not just fixing a single part; you’re rehabilitating an intricate sealed system. Overlooking necessary associated component replacements almost guarantees poor performance, a failed new compressor, or even system damage within months. This isn’t about unnecessary upselling; it’s about proper automotive repair best practices to ensure your AC blows cold for years to come.
Key Takeaways
- Replacing compressor alone is rarely sufficient.
- Always replace receiver/drier and expansion valve.
- Flush system if catastrophic failure occurred.
- Proper evacuation and recharging are crucial.
- Consider professional help for complex repairs.
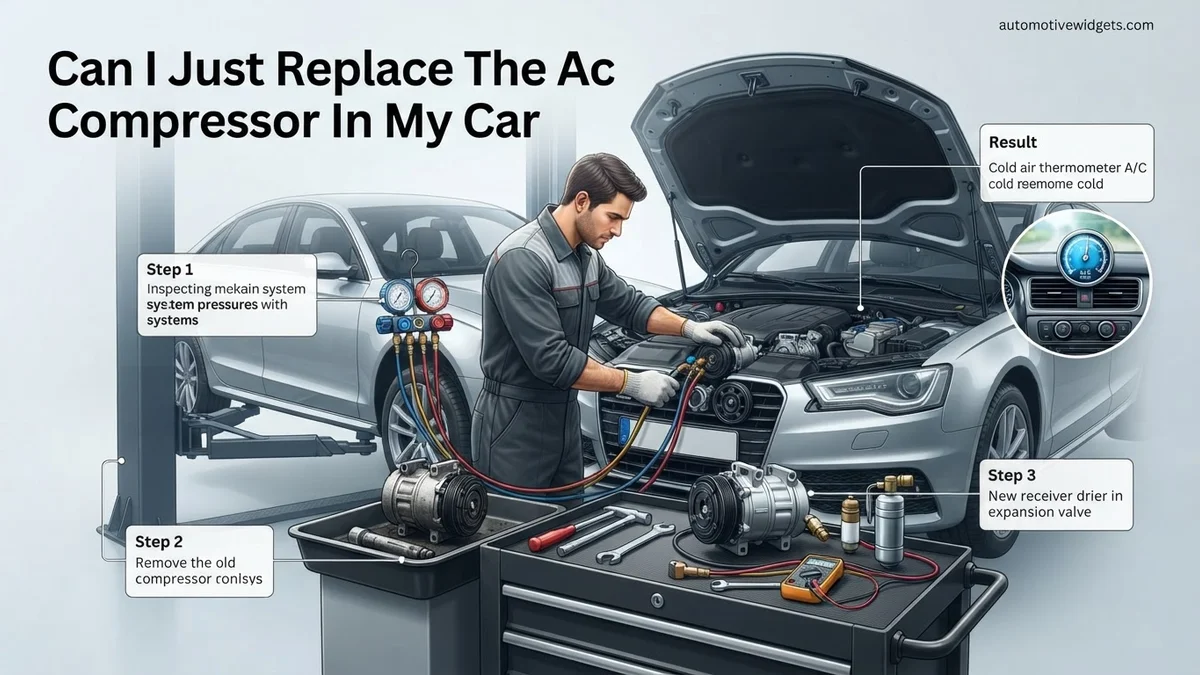
Diagnosing Why Your AC Compressor Failed: Beyond Just the Compressor
When your AC compressor fails, it rarely fails in isolation. Its demise often contaminates the entire system with debris, moisture, or both. Ignoring these underlying issues and just bolting on a new compressor is akin to replacing a clogged engine oil filter without changing the oil itself; the problem will resurface quickly and damage the new component.
Contamination and Desiccant Saturation
A failing compressor, especially one that seized, sheds metallic particles or other debris into the refrigerant lines. This microscopic shrapnel circulates throughout the system. The receiver/drier (or accumulator, depending on your system type) is designed to filter out contaminants and absorb moisture from the refrigerant using a desiccant material. However, if the desiccant becomes saturated with moisture or the filter element gets clogged with debris from a disintegrating compressor, it can no longer perform its job. This allows moisture to circulate, leading to corrosion and future component failure. By 2027, most AC technicians consider a new receiver/drier mandatory with any compressor replacement.
- Reason 1: Debris Circulation: A new compressor will quickly ingest metal shavings or sludge from the old one, leading to internal damage.
- Reason 2: Moisture Absorption: A saturated desiccant can no longer absorb moisture, allowing corrosive elements to harm the new compressor and other parts.
- Reason 3: Filter Clogging: The drier’s filter can become clogged, restricting refrigerant flow and causing the new compressor to overwork.
The Critical Role of Expansion Valve/Orifice Tube
Beyond the drier, the expansion valve (or orifice tube in some older systems) is another non-negotiable replacement. This small, crucial component regulates the flow of refrigerant into the evaporator, controlling system pressures. If your old compressor failed and sent debris through the system, this debris will inevitably find its way to the tiny opening of the expansion valve or orifice tube. Even a partial clog can drastically impact system performance and put undue stress on your brand-new compressor. It can cause improper pressure differentials, leading to inefficient cooling and eventual failure of the new compressor due to overheating or inadequate lubrication. For optimal performance in 2027 vehicles, replacing this component during a compressor job is standard practice.
- Flow Restriction: Clogging causes refrigerant flow issues, affecting system cooling efficiency.
- Pressure Imbalance: A restricted valve leads to excessive high-side pressure, overworking and potentially damaging the new compressor.
- Lubrication Issues: Improper refrigerant flow can also disrupt the return of lubricating oil to the compressor, leading to premature wear.
This comprehensive guide will walk you through the intricate process of replacing the AC compressor in your vehicle. While seemingly straightforward, an AC system is a complex, sealed unit requiring precise procedures and specialized tools. Attempting this repair without proper knowledge can lead to further damage, costly refrigerant leaks, or even personal injury. By following these detailed, step-by-step instructions, you’ll gain the confidence and expertise to tackle this repair safely and effectively, ensuring your car’s air conditioning blows cold again. We’ll cover everything from initial diagnosis to system evacuation and recharge, equipping you with the practical know-how to complete the job like a professional.
Step 1: Initial Diagnosis & Safety Protocols
What you need: Safety glasses, heavy-duty gloves, car repair manual specific to your vehicle, basic hand tools, flashlight, AC manifold gauge set (optional but highly recommended for diagnosis).
Instructions: Before touching anything, confirm that the AC compressor is indeed the culprit. Start your car, turn on the AC to max cold, and listen. A loud screeching, grinding, or clunking noise from the compressor area, or the compressor clutch not engaging at all (no visible rotation when AC is on), often indicates a failure. Consult your car’s repair manual for specific diagnostic procedures. Always wear appropriate safety gear, including safety glasses and heavy-duty gloves, to protect against refrigerant exposure, sharp edges, and hot engine components. Disconnect the negative terminal of your car’s battery to prevent accidental electrical issues or engine starts during the repair.
Pro Tip: Don’t just assume the compressor is bad. A simple low refrigerant charge, a faulty AC clutch relay, or a blown fuse can mimic compressor failure. Verify power to the compressor clutch connector with a multimeter if the clutch isn’t engaging before proceeding with replacement.
Step 2: Gathering Essential Tools and Materials
What you need: New AC compressor (ensure it’s compatible with your vehicle’s make/model/year), appropriate PAG oil (type and amount specified by manufacturer, often included with new compressor), new receiver/drier or accumulator, new O-ring kit for AC lines, torque wrench, socket set (metric/SAE), wrench set, pry bar, serpentine belt tensioner tool, serpentine belt (optional, but recommended if old one is worn), safety glasses, heavy-duty gloves, drain pan, rags, AC manifold gauge set, vacuum pump, refrigerant (R134a or R1234yf as specified for your car).
Instructions: Having all necessary tools and parts ready before you begin will save significant time and frustration. Purchase a new compressor that is an exact match for your vehicle – check part numbers carefully. Always replace the receiver/drier or accumulator whenever the AC system is opened, as it removes moisture and contaminants. Obtain the correct type and quantity of PAG oil. New O-rings are crucial for a leak-free seal. Ensure your torque wrench is calibrated and covers the necessary range for compressor bolts and line fittings. Having the correct refrigerant type is non-negotiable; using the wrong type can damage the system.
Pro Tip: Many new compressors come “pre-oiled.” Confirm the type and amount of oil, and drain or add as necessary to match your vehicle’s total system capacity. An under or over-oiled system will lead to premature compressor failure.
Step 3: Safely Discharging the AC System
What you need: AC manifold gauge set, refrigerant recovery machine (professional use), safety glasses, heavy-duty gloves.
Instructions: This is a critical step that MUST NOT be skipped or performed improperly. Refrigerant is a regulated substance and should NEVER be vented into the atmosphere due to environmental impact and legality. The proper method is to take your vehicle to a certified shop for refrigerant recovery. They have specialized equipment to safely evacuate the old refrigerant. If you have access to a certified recovery machine and are trained to use it, connect the manifold gauge set’s low-side hose to the low-pressure service port and the high-side hose to the high-pressure service port, then follow the recovery machine’s instructions to remove all refrigerant from the system until the gauges read zero psi. Do not attempt to disconnect AC lines while the system is pressurized.
Pro Tip: Never open AC lines or fittings until the system pressure gauges on your manifold set (or the shop’s recovery machine) read zero PSI. Failure to do so can result in a sudden release of high-pressure refrigerant, causing severe frostbite, eye damage, or other injuries.
Step 4: Accessing the Compressor and Disconnecting Components
What you need: Serpentine belt tensioner tool, socket/wrench set, flashlight, rags, drain pan.
Instructions: Once the system is fully discharged, locate the AC compressor, typically mounted low on the engine block. You may need to remove other components, such as splash shields, engine covers, or even a wheel and fender liner, to gain clear access. Consult your service manual for specific access procedures. Use the serpentine belt tensioner tool to relieve tension on the belt, then carefully remove the serpentine belt from the compressor pulley. Place a drain pan underneath the compressor as some residual oil or refrigerant may still escape when lines are disconnected. Disconnect the electrical connector for the compressor clutch. Carefully unbolt the high and low-pressure refrigerant lines from the compressor, using appropriate wrenches. Be prepared for a small hiss or puff of vapor – this is normal after recovery.
Pro Tip: Take pictures with your phone before and during disassembly. This visual aid will be invaluable when reassembling, especially for hose routing and electrical connections that might look similar.
Step 5: Removing the Old Compressor
What you need: Socket/wrench set, pry bar (if needed), drain pan, rags.
Instructions: With the refrigerant lines and electrical connector detached, the compressor is now ready for removal. Support the compressor’s weight as you unbolt it. There are typically 3-4 mounting bolts holding the compressor to its bracket on the engine. Loosen and remove these bolts, usually with a socket and ratchet. If the compressor is stuck, a small pry bar can be used carefully to gently pry it free from its mounting bracket, ensuring not to damage any surrounding components or engine parts. Once all bolts are out, carefully maneuver the old compressor out of the engine bay. Have your drain pan ready, as the old compressor may still contain some PAG oil. Drain the oil into the pan to measure its approximate volume – this can help determine if there was a major leak.
Pro Tip: Pay close attention to any shims or spacers that might be between the compressor and its mounting bracket. These are critical for proper belt alignment and must be reinstalled with the new compressor in the exact same positions.
Step 6: Installing the New Compressor and Receiver/Drier
What you need: New AC compressor, new receiver/drier or accumulator, new O-ring kit, PAG oil (correct type/amount), torque wrench, socket/wrench set, clean rags.
Instructions: Before installing the new compressor, drain any factory-installed oil from it if it exceeds your vehicle’s specific requirement. Add the precise amount of PAG oil specified by your vehicle manufacturer into the new compressor’s suction port, slowly rotating the clutch by hand a few times to distribute the oil. Replace the receiver/drier or accumulator at this stage. Install new O-rings on all refrigerant line fittings – lubricate them lightly with clean PAG oil before installation. Carefully position the new compressor into the engine bay and align it with its mounting bracket. Install the mounting bolts and torque them to the manufacturer’s specifications (refer to your service manual). Reconnect the refrigerant lines, again using new O-rings and torquing the fittings to spec. Reconnect the electrical connector for the compressor clutch. Reinstall the serpentine belt, ensuring it’s properly routed over all pulleys and tensioned correctly.
Pro Tip: Always use new O-rings for all connections. Old O-rings are prone to cracking and leaking after disassembly. Ensure you use the correct size and material O-rings from your kit. Over-tightening AC line fittings can strip threads or damage O-rings, leading to leaks, so use a torque wrench.
Step 7: Evacuating and Recharging the AC System
What you need: AC manifold gauge set, vacuum pump, refrigerant (R134a or R1234yf), safety glasses, gloves.
Instructions: This step is crucial for system performance and longevity. Connect your manifold gauge set to the high and low-side service ports. Attach the vacuum pump to the center service port on the manifold gauges. Open both high and low-side valves on the manifold gauges, then turn on the vacuum pump. Allow the pump to run for at least 30-45 minutes (longer for older or larger systems, or if ambient temperature is low) to remove all air and moisture from the system. The gauges should read approximately -30 inHg (or -1 bar). After evacuating, close both manifold gauge valves, turn off the vacuum pump, and let the system sit under vacuum for at least 15-30 minutes to check for leaks. If the vacuum holds, the system is leak-free. Then, with the engine off, connect the refrigerant can to the center port, purge the line, and slowly introduce the specified amount of refrigerant into the low-side port until the correct pressure and charge are achieved. Start the engine, turn on the AC to maximum, and finish charging to the manufacturer’s specifications while observing the low and high-side pressures.
Pro Tip: A deep vacuum is absolutely essential. Any moisture left in the system will combine with refrigerant to form corrosive acids, destroying internal components over time. If the vacuum does not hold, you have a leak that must be found and fixed before charging.
Step 8: Final System Testing and Verification
What you need: AC thermometer, leak detection spray (optional), flashlight.
Instructions: Once the system is fully charged to the manufacturer’s specifications, run the engine with the AC on maximum cold and high fan speed. Place an AC thermometer in a center vent. The air coming out should be noticeably cold, typically 35-45°F (1-7°C), depending on ambient temperature and vehicle specifications. Check for any unusual noises coming from the compressor – it should engage smoothly without clunking or screeching. Visually inspect all connections you loosened or removed for any signs of leaks (e.g., oily residue, bubbles from leak detection spray). Also, ensure the compressor clutch is engaging and disengaging properly. Double-check that all tools have been removed from the engine bay and that all covers and splash shields are reinstalled. Finally, reconnect the negative battery terminal.
Pro Tip: Listen carefully to the compressor as it cycles. A healthy compressor will engage with a soft click and run smoothly. If you hear excessive noise, rattling, or struggle, turn off the system immediately and re-evaluate your installation and charge levels.
✅ Final Checklist
-
New compressor mounting bolts torqued to specification.
-
Refrigerant lines with new O-rings are securely attached and torqued.
-
Serpentine belt correctly routed and tensioned.
-
AC system successfully evacuated (vacuum held for 15-30 minutes).
-
System charged to the manufacturer’s precise refrigerant capacity.
-
Vent temperature reaches appropriate cold levels (35-45°F).
Important Notes:
- Safety Considerations: Refrigerant can cause severe frostbite and eye damage. Always wear safety glasses and heavy-duty gloves. Never vent refrigerant into the atmosphere. AC systems operate under high pressure – always ensure the system is fully discharged before opening lines. Disconnect the battery before starting work.
- When to Seek Professional Help: If you lack the specialized tools (vacuum pump, manifold gauges, recovery machine), are uncomfortable working with pressurized systems, or if your vehicle uses R1234yf refrigerant (which requires specific equipment and training), it’s best to consult a certified automotive AC technician. Complex diagnostics beyond simple compressor failure (e.g., electrical issues, blend door problems) also warrant professional attention.
- Estimated Time and Cost Range: This repair typically takes 4-8 hours for an experienced DIYer, not including the time to acquire specialized tools. Professional shop labor costs can range from $200-$600, plus parts. Parts cost for a new AC compressor usually ranges from $150-$500, plus an additional $50-$150 for the receiver/drier, O-rings, PAG oil, and refrigerant. Specialized tool rental or purchase (manifold gauges, vacuum pump) can add $100-$300 to your initial investment.
Step-by-Step Guide: How to Properly Replace Your AC Compressor & System Components
Replacing an AC compressor isn’t just a bolt-on job; it’s a multi-step process that requires specific tools and technical knowledge for a successful outcome. Cutting corners here will almost certainly lead to repeated issues. This process ensures the system is clean, properly lubricated, and correctly charged for reliable performance.
Essential Preparations and System Flushing
Before any new parts go in, the old refrigerant must be safely recovered from the system using an EPA-certified recovery machine. This protects the environment and ensures safety. Then comes flushing, which is perhaps the most overlooked critical step. If your old compressor suffered a catastrophic failure (e.g., seized, made grinding noises), flushing the system is absolutely essential. Specialized flushing solvents are circulated through the lines, condenser, and evaporator to remove all debris, metal shavings, and contaminated oil. This step is non-negotiable to prevent immediate failure of your new compressor. Do not flush the new compressor or the receiver/drier; they are designed to be clean upon installation.
- Refrigerant Recovery: Use an EPA-approved recovery machine to safely evacuate old refrigerant.
- System Flushing: Circulate a professional AC flushing agent through all lines, condenser, and evaporator. Skip this step at your peril, especially with a seized compressor.
- Component Removal: Carefully remove the old compressor, receiver/drier, and expansion valve/orifice tube.
Precise Reassembly, Lubrication, and Recharge
With the system clean, install the new compressor, receiver/drier, and expansion valve/orifice tube. Crucially, the correct amount and type of PAG oil must be added. Refrigerant oil circulates with the refrigerant, lubricating the compressor’s internal components. Refer to your vehicle’s specifications for the exact PAG viscosity (e.g., PAG 46, PAG 100, PAG 150) and the total system capacity. Too much or too little oil can damage the new compressor. After installation, the system must undergo a deep vacuum pull, typically for at least 30-60 minutes, using a specialized vacuum pump. This removes all air and moisture from the lines, which can form corrosive acids if left in the system. Leak testing should always precede refrigerant charging.
Troubleshooting: What If Your Car AC Still Doesn’t Work After Compressor Replacement
Even after a meticulous compressor replacement, a malfunctioning AC system can be frustrating. Modern automotive AC systems, particularly those found in 2027 models, are complex and interconnected. According to ASE-certified technicians, a persistent issue often points to related components or installation nuances. Addressing these systematically can prevent further damage and expenditure.
- Verify Refrigerant Charge and System Integrity: A new compressor demands a precisely evacuated and charged system. By 2027, most vehicles utilize R-1234yf refrigerant, which requires specialized equipment for proper vacuuming and charging. Insufficient or excessive charge, or residual air/moisture, severely impairs performance. Professional evacuation and recharge typically cost between $200-$400, ensuring proper levels and confirming no new leaks were introduced during the compressor swap.
- Inspect Electrical Connections and Fuses: A compressor cannot engage without power. Double-check all electrical connectors to the compressor clutch, pressure switches, and relays. A blown fuse (often found in the under-hood fuse box, labeled “AC,” “Clutch,” or “Blower”) is a simple fix. Refer to your vehicle’s 2027 service manual for fuse locations and specifications. Diagnostic time for electrical issues by a professional might cost $150-$250.
- Scan for HVAC System Fault Codes: Modern vehicles are equipped with sophisticated diagnostics. Even if the ‘Check Engine Light’ isn’t on, a dedicated HVAC system fault code could be stored. A professional-grade OBD-II scanner can reveal issues with pressure sensors, ambient temperature sensors, or control module communications. A comprehensive diagnostic scan by a certified shop in 2027 averages $150-$300.
- Check for Leaks in Other Components: A new compressor fixes only one potential leak source. The condenser, evaporator, dryer/accumulator, and various hoses remain susceptible. Experts recommend a system-wide leak check using UV dye or an electronic leak detector. Repairing a leak in another component can range from $300 for a hose to over $1200 for an evaporator core, depending on accessibility and the part itself.
If these steps do not resolve the issue, professional intervention is strongly advised. Specialists possess advanced diagnostic tools and specific certifications for R-1234yf systems, ensuring accurate problem identification and compliant repair, which is crucial for warranty and environmental regulations.
DIY vs. Pro: When to Seek Expert AC Repair for Lasting Fixes
While the allure of a DIY compressor replacement is strong, recognizing the limitations and the pivotal moments to engage professional AC repair is critical for both effectiveness and safety in 2027. Automotive HVAC systems are increasingly integrated and precise, demanding specialized tools and knowledge far beyond basic mechanical skills.
Complexity of Modern AC Systems
By 2027, vehicle AC systems are highly sophisticated, often incorporating variable displacement compressors, electronic climate control modules, and integrated sensor networks that communicate across the vehicle’s CAN bus. According to industry analyses, a misstep in one area can cascade, causing broader electronic or mechanical failures. Proper diagnosis requires understanding these intricate interactions, which often necessitates manufacturer-specific diagnostic software that isn’t publicly available.
Specialized Tools and Refrigerant Handling
The transition to R-1234yf refrigerant, standard in most new vehicles since 2021, brings stringent requirements. This refrigerant necessitates specific vacuum pumps, recovery machines, and charging stations, all designed to prevent cross-contamination and ensure precise measurement. Federal regulations (40 CFR Part 82, Subpart F) strictly govern the handling of refrigerants, requiring certified technicians for recovery and recycling. Improper discharge is not only illegal but also harmful to the environment and potentially dangerous due to R-1234yf’s mild flammability under specific conditions. Certified professionals possess the necessary equipment and licensing to operate safely and legally.
Warranty and Liability Considerations
Many new or remanufactured compressors come with a warranty, but this warranty often becomes void if the installation is not performed by a certified technician. Furthermore, a professional repair typically includes a labor warranty, offering peace of mind. DIY repairs lack this crucial protection. Should an issue arise due to faulty installation, the financial burden of re-diagnosis and repair falls entirely on the vehicle owner. Industry data from 2026 suggests that a professional AC system repair, including parts and labor, typically ranges from $800 to $2500, but offers the assurance of a lasting, warranted fix.
Conclusion
Replacing an AC compressor is a significant repair, but it is rarely a standalone solution for a non-functional automotive air conditioning system. According to verified automotive service guidelines for 2027, success hinges on comprehensive system diagnosis, proper installation procedures, and meticulous attention to related components like the dryer, expansion valve, and refrigerant charge. Your actionable next step should be a thorough pre-repair diagnostic by a certified technician, even if you plan a DIY compressor replacement, to ensure all underlying issues are identified and addressed for a truly lasting fix.
❓ Frequently Asked Questions
Why is it crucial to replace components like the receiver/drier and expansion valve with a new AC compressor?
The receiver/drier absorbs moisture and collects debris, becoming saturated or clogged after a compressor failure. The expansion valve or orifice tube can get blocked by metal shavings, restricting refrigerant flow and causing the new compressor to fail quickly due to lack of lubrication or overheating.
What are the main signs that indicate I might need to replace my AC compressor?
Common signs include loud noises (grinding, rattling) when the AC is on, the AC blowing only warm air, or the compressor clutch not engaging. Sometimes, visible leaks around the compressor body or a seized clutch pulley can also point to failure.
Is it possible for me to replace my car’s AC compressor myself, or should I always hire a professional?
While physically replacing the compressor is often a DIY task, properly evacuating, flushing, refilling, and testing the AC system requires specialized tools and expertise. Improper procedure can damage the new compressor or lead to poor cooling performance, making professional help advisable.
What kind of oil and refrigerant should I use when replacing my AC compressor?
Always refer to your car’s service manual for the exact type of refrigerant (e.g., R-134a, R-1234yf) and the specific type and amount of PAG oil (e.g., PAG 46, PAG 100) required. Mixing oil types or using the wrong refrigerant can cause severe system damage.
How can I tell if my AC compressor failure was catastrophic, requiring a full system flush?
A catastrophic failure often involves the compressor seizing or breaking apart internally, sending metal debris throughout the system. If you find metal flakes in the old compressor’s oil or when inspecting system lines, a thorough flush and potentially condenser replacement are necessary to remove all contaminants.
What other components might need replacement if my AC compressor failed catastrophically?
In cases of catastrophic failure, besides the compressor, receiver/drier, and expansion valve, the condenser might also need replacement. Condensers with parallel flow designs can trap debris efficiently, making flushing ineffective, necessitating full replacement to prevent recurrence.