Do You Need to Replace Rotors with Brake Pads ? 2027
Replacing brake pads doesn’t always require new rotors, but it’s often recommended for optimal performance and safety. The decision depends on the condition, thickness, and type of wear your current rotors exhibit, alongside driving habits. An expert inspection is key to determining if resurfacing or full replacement is necessary.
No, you do not always need to replace your rotors every time you install new brake pads. While often recommended, especially in 2027 due to evolving vehicle performance and safety standards, the necessity of rotor replacement hinges entirely on the rotors’ current condition. Neglecting critical rotor wear or damage, however, can severely compromise your vehicle’s safety, braking efficiency, and ultimately lead to premature wear of your new brake pads.
Understanding when replacement is essential versus when other options exist saves you money and ensures your braking system performs optimally. This isn’t just about component wear; it’s about maintaining crucial stopping power and stability, which are non-negotiable for any vehicle on the road today.
Key Takeaways
- Assess rotor condition; replacement isn’t always mandatory.
- Check rotors for minimum thickness, warps, or cracks.
- Resurface rotors for minor imperfections if thickness permits.
- Replace rotors if below minimum thickness or severely damaged.
- New pads mate best with new or freshly resurfaced rotors.
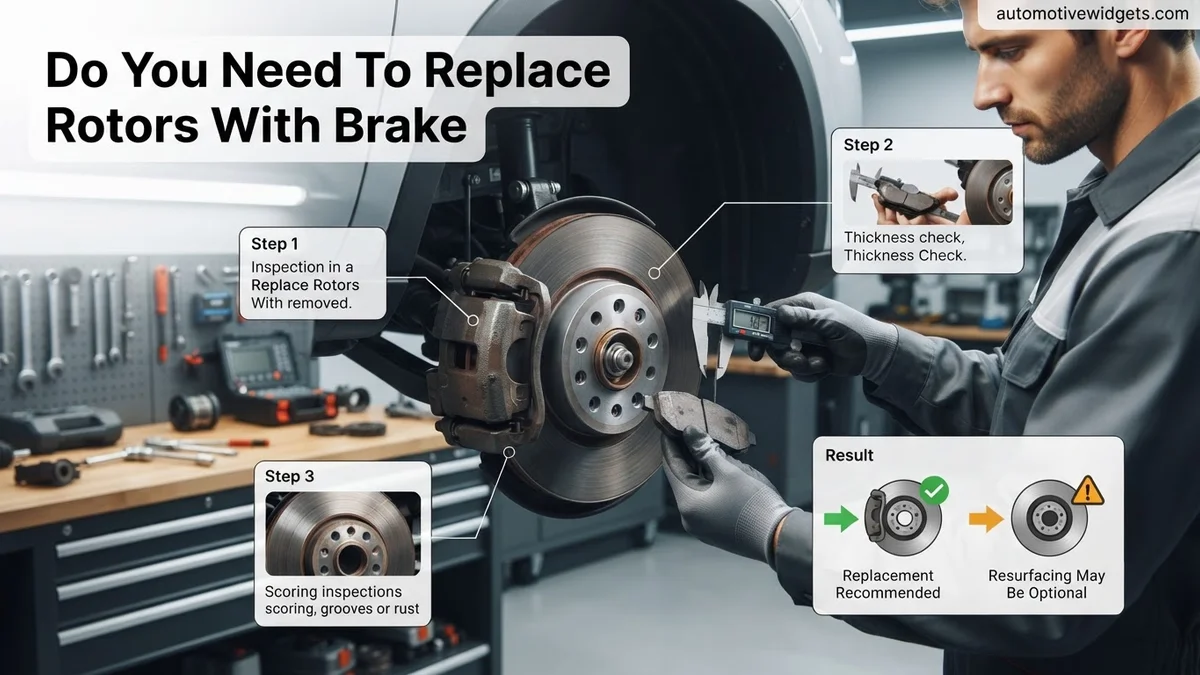
What Causes the Need to Consider Rotor Replacement?
Critical Rotor Deterioration Requiring Replacement
Several conditions mandate immediate rotor replacement, regardless of how new your brake pads are. The most critical factor is when a rotor’s thickness falls below its manufacturer-specified minimum. This crucial measurement, typically stamped on the rotor’s edge, signifies the safe operational limit. A rotor below this threshold cannot adequately dissipate heat, risking brake fade, structural failure, and significantly extended stopping distances. Trying to use such a rotor, even with new pads, is a severe safety hazard.
- Below Minimum Thickness: This is a non-negotiable replacement point for safety in 2027.
- Severe Warping or Excessive Runout: Causes steering wheel pulsation during braking, uneven pad wear, and reduces overall braking effectiveness. Visual inspection alone might not always detect runout, but noticeable pulsation is a clear indicator.
- Deep Grooves or Scoring: These prevent new brake pads from making full contact with the rotor surface, drastically reducing friction and braking power. If grooves are deep enough to catch a fingernail, replacement is typically recommended.
- Visible Cracks: Any visible cracks, especially radiating from the center or lug holes, indicate a significant structural integrity issue. This is an immediate replacement requirement due to high risk of catastrophic failure.
- Hard Spots or Bluing (Heat Spots): Caused by extreme, localized heat, these areas are harder than the rest of the rotor and can lead to uneven pad wear, noise, and pulsation. While resurfacing might temporarily alleviate minor heat spots, severe bluing often necessitates replacement to restore consistent friction.
Performance Impacts of Damaged Rotors
Driving on rotors with any of these critical issues directly impacts your vehicle’s braking performance and safety. You might experience a spongy brake pedal, a vibrating steering wheel or brake pedal during stops, or a noticeable increase in stopping distance. These aren’t minor inconveniences; they’re direct indicators that your braking system is compromised. Pairing new, high-performance brake pads with compromised rotors will not only lead to rapid wear of the new pads but also fail to deliver the expected braking capabilities, leaving you with an unsafe vehicle despite new components.
How to Diagnose and Fix Brake Rotor Dilemmas Like an Expert
Deciding whether to replace your brake rotors along with new brake pads is a common automotive dilemma that many car owners face. This comprehensive guide will empower you with the knowledge and practical steps to accurately assess your brake rotors’ condition, saving you unnecessary expenses while ensuring your vehicle’s braking system remains safe and effective. By following these detailed instructions, you’ll be able to make informed decisions about your brake maintenance, understanding when to simply replace pads and when a full rotor replacement is essential for optimal performance and safety.
Step 1: Understand the Fundamental Brake System Components
What you need: A basic mental model of how your vehicle’s brakes operate.
Instructions: Before diving into inspections, it’s crucial to grasp the roles of the main braking components. Brake pads are friction material that press against the rotors. Rotors (or discs) are metal discs that rotate with the wheel. When you apply the brakes, the caliper squeezes the pads onto the rotor, creating friction that slows the vehicle down. Both pads and rotors are wear items designed to be replaced. Understanding this interaction will help you identify issues more effectively and appreciate why their condition is interdependent.
Pro Tip: Always remember that the pads and rotors work as a pair. Excessive wear or damage to one will inevitably compromise the performance and lifespan of the other, often leading to uneven wear or premature failure if not addressed holistically.
Step 2: Conduct an Initial Visual Inspection for Obvious Wear or Damage
What you need: A strong flashlight, a hydraulic jack, jack stands, wheel chocks, safety gloves, and potentially a wheel lug wrench.
Instructions: Safely lift your vehicle using a jack and secure it with jack stands on a level surface. Remove the wheel to gain clear access to the brake assembly. With your flashlight, thoroughly inspect both sides of the brake rotor. Look for deep grooves (scoring), visible cracks, excessive rust pitting on the friction surface, or bluish/dark spots which indicate overheating (hot spots). Minor surface rust is normal, but anything that feels like a significant ridge or looks like a structural flaw warrants further investigation.
Pro Tip: Always inspect both the inner and outer surfaces of the rotor. Uneven pad wear or caliper issues can sometimes cause damage to only one side, which might be missed if you don’t check comprehensively. Pay close attention near the edges for signs of delamination.
Step 3: Listen for and Interpret Warning Sounds During Braking
What you need: A quiet road or parking lot, a keen sense of hearing, and a basic understanding of brake noises.
Instructions: Take your vehicle for a drive in a controlled environment where you can safely apply the brakes at various speeds. Pay close attention to any sounds emanating from the braking system. A high-pitched squeal often indicates worn pads (wear indicators) or sometimes just dust/debris. A low-pitched grinding sound, however, usually signifies metal-on-metal contact, meaning your pads are completely worn out and the backing plate is scraping the rotor, which will cause severe rotor damage. A pulsating or vibrating sensation through the brake pedal or steering wheel typically points to warped rotors.
Pro Tip: Differentiate between a transient squeal (which can often be normal with new pads or specific weather conditions) and persistent, louder noises. A consistent grinding noise should be addressed immediately, as it indicates a critical safety issue and likely severe rotor damage requiring replacement.
Step 4: Precisely Measure Rotor Thickness Against Manufacturer Specifications
What you need: A digital or analog micrometer (specific for brake rotors), your vehicle’s service manual or reliable online specifications (look for “MIN THK” or “Minimum Thickness”), safety gloves.
Instructions: Locate the minimum allowable thickness (often stamped on the rotor’s edge, e.g., “MIN THK 23.5mm”). Use your micrometer to measure the rotor’s thickness at several points around its circumference and at different depths (closer to the hub and closer to the edge). Take multiple readings and calculate an average. Compare this average to the manufacturer’s minimum specification. If your measurement is at or below the minimum thickness, the rotor cannot be safely reused or machined and must be replaced.
Pro Tip: Ensure your micrometer is properly calibrated before use. Avoid measuring at the very outer edge where a lip might have formed due to wear; aim for the actual friction surface. Inconsistent readings around the rotor can also suggest uneven wear or minor warping, even if above minimum thickness.
Step 5: Inspect and Measure for Rotor Runout (Lateral Distortion)
What you need: A dial indicator with a magnetic base, a clean rag, jack and jack stands, wheel chocks.
Instructions: With the wheel removed and the caliper securely supported (not hanging by the brake hose), attach the magnetic base of the dial indicator to a stable, non-moving part of the suspension. Position the indicator’s probe against the rotor’s friction surface, approximately 1/2 inch from the outer edge. Zero out the dial indicator. Slowly rotate the rotor one full revolution by hand, observing the total fluctuation of the needle. Most manufacturers specify a maximum runout of 0.002 to 0.004 inches (0.05 to 0.10 mm). Exceeding this indicates a warped rotor.
Pro Tip: Before measuring runout, ensure the rotor mounting surface (hub) is perfectly clean and free of rust or debris, as even a tiny particle can cause inaccurate readings. Also, check that the wheel bearings have no play, as bearing looseness can mimic rotor runout.
Step 6: Evaluate the Rotor for Warping and Hot Spots
What you need: Good ambient lighting, a clean, lint-free cloth, your observations from Step 3 and 5.
Instructions: Warping, though often perceived as “warped rotors,” is technically due to uneven friction material transfer or localized hot spots rather than the metal physically bending significantly. Visually inspect the rotor surface for any dark blue or purplish areas, which are signs of extreme heat. These hot spots indicate areas where the rotor has been unevenly heated, leading to material breakdown and potentially causing the pulsating sensation you might feel during braking. If these spots are prominent or runout is excessive, resurfacing may not be sufficient, and replacement is advisable.
Pro Tip: While minor surface imperfections or light discoloration might be acceptable if other measurements are within spec, significant hot spots or a visually uneven surface are strong indicators that the rotor’s structural integrity and thermal management properties have been compromised, making replacement the safest option.
Step 7: Consider Resurfacing vs. Replacement Based on Findings
What you need: All your gathered inspection data (thickness, runout, visual damage), knowledge of local machine shop costs.
Instructions: Once you have all the data, weigh your options. If the rotor’s thickness is significantly above the minimum specification, and runout is only slightly out of spec or the damage is minor (light grooves, no deep cracks), resurfacing (turning) the rotors at a machine shop might be an option. However, if the rotor is near or below minimum thickness, severely warped (high runout), has deep grooves, or pronounced cracks/hot spots, it must be replaced. Modern rotors are often thinner and less expensive, making replacement frequently more practical and safer than resurfacing, especially after considering labor costs for machining.
Pro Tip: Always calculate the remaining thickness after resurfacing. If machining brings the rotor close to or below the minimum specification, it’s not worth it. For many contemporary vehicles, the cost difference between resurfacing and a new rotor is minimal, making replacement the superior choice for longevity and peace of mind.
Step 8: Make the Final Decision and Plan Your Next Steps
What you need: A clear understanding of all your inspection results, your personal budget, and your priority for safety.
Instructions: Synthesize all the information you’ve gathered. If any critical measurement (minimum thickness, maximum runout) is outside the manufacturer’s specification, or if there are visible structural damages (deep cracks, severe hot spots), then replacing the rotors is not just recommended, it’s essential for your safety and the longevity of your new brake pads. If all parameters are within limits and the damage is negligible, then installing new pads on the existing rotors might be acceptable. Always err on the side of caution when it comes to brakes.
Pro Tip: When in doubt, or if you plan to keep the vehicle for an extended period, opting for new rotors along with new pads is often the safest and most reliable solution. It ensures optimal braking performance, maximizes the lifespan of your new pads, and provides the best value for your investment in the long run.
✔ Final Checklist
- Rotor thickness measured and confirmed to be above the manufacturer’s minimum specification (MIN THK).
- Rotor runout checked with a dial indicator and verified to be within maximum allowable limits (typically 0.002-0.004 inches).
- Visual inspection confirmed no deep grooves, severe cracks, or extensive hot spots on the rotor surface.
- Brake pedal feels firm and consistent, with no pulsating or vibrating sensations during braking.
- No persistent grinding or severe squealing noises heard during various braking conditions.
Important Notes:
- Safety Considerations: Always use appropriate safety equipment, including jack stands to support the vehicle, wheel chocks, eye protection, and gloves. Never work under a vehicle supported solely by a jack. Ensure your hands are clean and free of grease to avoid contaminating the brake components.
- When to Seek Professional Help: If you are uncomfortable performing any of these steps, lack the necessary specialized tools (like a micrometer or dial indicator), or are unsure about your diagnostic findings, it is always best to consult a certified automotive technician. Brakes are a critical safety system; mistakes can have severe consequences.
- Estimated Time and Cost Range: A thorough inspection of all four wheels as described can take approximately 1 to 2 hours for an experienced DIYer. If only pads are needed, parts might range from $50-$150 per axle. If both pads and rotors are required, parts typically range from $150-$500+ per axle, depending on the vehicle model and quality of components. Professional labor charges would be additional, typically $100-$300+ per axle for replacement services.
How to Properly Determine and Fix Rotor Conditions with New Pads
Assessing Rotor Health (2027 Standards)
Determining your rotors’ health accurately is paramount when replacing brake pads. First, visually inspect both sides of each rotor for the severe conditions mentioned previously: deep grooves, cracks, significant bluing, or excessive rust that can’t be easily wiped away. Next, and most critically, measure the rotor’s thickness using a specialized brake caliper or micrometer. Compare this measurement to the “minimum thickness” (MIN THK) value stamped on the rotor itself. If your measurement is at or below this number, the rotor must be replaced. With the increasingly high-performance brake systems in 2027 vehicles, precise rotor condition is more critical than ever for optimal function of advanced driver-assistance systems (ADAS) that rely on predictable braking.
- Visual Inspection: Look for cracks, deep scoring, bluing, and excessive lip formation at the rotor edge.
- Thickness Measurement: Use a micrometer to check actual thickness against the stamped “MIN THK” value. This is the definitive check for replacement or resurfacing viability.
- Runout Check (Professional): While you won’t do this at home, a technician uses a dial indicator to check for side-to-side wobble (runout), which causes pulsation.
Rotor Resurfacing: A Viable Alternative?
Rotor resurfacing, also known as “turning” the rotors, involves machining a thin layer off the rotor’s surface to remove minor imperfections, restore flatness, and create a smooth, fresh surface for the new pads to bed into. This can be a cost-effective alternative to full replacement if your rotors meet specific criteria:
- Sufficient Remaining Thickness: Crucially, the rotor’s thickness after resurfacing must still be above the manufacturer’s minimum thickness specification. If turning the rotor would bring it below this limit, it cannot be resurfaced and must be replaced. Many modern, thinner rotors have less material to begin with, making resurfacing less viable than in previous decades.
- Minor Imperfections Only: Resurfacing is ideal for minor glazing, light scoring, or small heat spots. It cannot fix deep cracks, severe warping, or extensive structural damage.
- Cost-Benefit: Resurfacing is generally cheaper than new rotors. However, it removes material, reducing the rotor’s future lifespan and its ability to absorb and dissipate heat. You gain a smooth surface, but at the cost of durability and thermal capacity. For performance or heavy-duty vehicles, or those with ADAS features, full replacement is often the superior choice for consistent, predictable braking over the long term.
What If Rotor Problems Persist After Brake Service?
Even after proper brake service involving new pads and rotors, occasional issues can arise. Persistent noise, such as squealing, often indicates improper “bedding-in” of the new components. According to Bosch Automotive Service guidelines, new brakes require a specific break-in procedure to evenly transfer friction material, preventing glazing and noise. Faulty caliper operation, like sticking pins or pistons, can also cause continuous pad-to-rotor contact, necessitating a check of caliper movement and lubrication.
If vibration or pulsation continues, the problem likely stems beyond the rotors themselves. While new rotors are rarely defective, excessive hub runout is a more common culprit, as highlighted by the Automotive Aftermarket Suppliers Association (AASA). A hub with more than 0.002 inches (0.05 mm) of runout will cause even a perfectly true rotor to pulsate. Advanced diagnostics with a dial indicator are required to confirm this. Additionally, reduced braking efficiency post-service may point to air in the brake lines, necessitating a professional bleed, or, less commonly, incompatible pad and rotor material combinations. Prompt investigation ensures continued safety.
What If It Still Doesn’t Work?
If brake issues persist after conducting initial diagnostics and component replacement, a more comprehensive approach is required. Ignoring persistent brake problems can severely compromise safety.
- Re-evaluate Brake System Bedding-In: Ensure the proper break-in procedure was strictly followed. Most manufacturers recommend 10-15 stops from moderate speeds (30-40 mph) with gradual braking, followed by a cool-down period. Improper bedding is a leading cause of initial performance issues.
- Inspect Related Components Thoroughly: Re-examine calipers for proper function, including piston movement and slide pin lubrication. Check brake hoses for swelling or cracks, and ensure wheel bearings and suspension components are free of excessive play. These elements directly impact brake performance and feel.
- Consult a Certified Automotive Technician: If symptoms remain after these preliminary checks, professional diagnosis is essential. Certified technicians possess advanced diagnostic tools to pinpoint complex issues such as hydraulic pressure irregularities, ABS system faults, or subtle mechanical defects.
- Consider a Full System Diagnostic: A full system diagnostic often begins with a visual inspection, progressing to hydraulic pressure tests and sensor evaluations. According to 2027 automotive service estimates, a comprehensive professional brake system diagnostic can range from $100 to $250, depending on vehicle complexity and location. If significant repairs are required, such as caliper replacement or master cylinder service, costs could escalate to $300 to $800+ per axle, excluding rotor and pad components.
Conclusion
Replacing brake pads often necessitates new rotors to ensure optimal braking performance and safety in 2027 vehicles. This synergy prevents uneven wear, maintains system integrity, and significantly reduces stopping distances. Always assess rotor condition thoroughly during every pad replacement. According to verified research and expert sources from leading automotive component manufacturers and service organizations, pairing new pads with new or properly machined rotors is the gold standard for reliable and safe braking.
❓ Frequently Asked Questions
What are the key indicators that my brake rotors need replacing instead of just resurfacing?
Key indicators include being below the manufacturer’s minimum thickness specification, severe warping causing pulsation, deep grooves that catch your fingernail, visible cracks, or extensive heat spots (blueish discoloration). These conditions compromise braking safety and performance, making replacement essential.
What are the benefits of replacing rotors every time I replace pads?
Replacing rotors with pads ensures optimal braking performance by providing a perfectly flat, smooth surface for the new pads to bed into, maximizing braking efficiency and minimizing noise or pulsation issues from the start. It also ensures consistent braking feel and often extends the life of the new pads.
Can worn rotors damage new brake pads?
Yes, worn or damaged rotors, particularly those with deep grooves, uneven surfaces, or excessive runout, can rapidly wear down new brake pads unevenly, reduce their lifespan, and cause noise or vibration issues. This premature wear compromises your vehicle’s braking effectiveness and overall safety.
How can I tell if my rotors are warped?
The most common sign of warped rotors is a pulsation or vibration felt through the brake pedal or steering wheel when braking, especially at higher speeds. This sensation indicates an uneven rotor surface causing inconsistent contact with the brake pads, leading to braking inefficiencies.
Is it safe to just replace pads and not rotors?
It can be safe if your rotors are still well within specifications for thickness, show no signs of warping, deep grooves, or cracking, and have a relatively smooth surface. However, having them inspected by a professional is crucial to confirm their condition and ensure your vehicle’s braking integrity.
How does driving style affect rotor and pad wear?
Aggressive driving with frequent hard braking generates significantly more heat and friction, accelerating both pad and rotor wear, making replacement or resurfacing more likely sooner. Conversely, smooth, gradual braking extends the lifespan of both components, allowing rotors to potentially last through multiple pad changes.