1. Aftermarket oil pressure gauges are easy to install and can be a great addition to your car or truck. 2. Installation usually consists of three main steps: attaching the gauge to the vehicle, running the wiring harness, and connecting the power wire. 3. Most aftermarket oil pressure gauges will come with detailed instructions on how to install them.
4. If you’re not comfortable installing the gauge yourself, many professional mechanics would be happy to do it for you.
- Select an appropriate location for the gauge
- The oil pressure gauge should be installed in a location that is easily visible to the driver so that they can keep an eye on it while driving
- Disconnect the negative battery terminal to avoid any electrical shorts
- Locate the oil pressure sending unit and unscrew it using a wrench
- Be careful not to strip the threads
- Install the aftermarket oil pressure gauge in its place and screw it in tight with a wrench
- Again, be careful not to strip the threads
How Do You Install an Oil Pressure Gauge Line?
An oil pressure gauge is a handy tool that can be used to keep track of your engine’s oil pressure. The oil pressure gauge line connects the oil pressure sensor to the gauge, allowing it to accurately display the readings. Here’s a quick guide on how to install an oil pressure gauge line:
1. Start by disconnecting the negative battery terminal to avoid any electrical shorts. 2. Locate the engine’s oil sending unit, which is usually located on the side of the block near the oil filter housing. 3. Unscrew the sending unit and remove it from its location.
Some units may have a plug or cap that needs to be removed before unscrewing the entire unit. 4. Take note of the orientation of the old sending unit so you can install the new one in the same way. 5. Install your new sending unit in its place and screw it in until it’s snug.
Be careful not to over-tighten as this could damage threads. Reconnect any plugs or caps that were removed earlier. 6..
Place your new oil pressure gauge line onto yournew sending unit making sure that the line is positionedin sucha waythat no kinksor bendswilloccurwhenyou put everythingbackinto place lateron 7..Now takeyourgaugelineandrouteitoverto whereyou want to gauge installed making sure to clear any moving partsor hot surfaces It’s generally best to consult your vehicle’smanualfor specific routinginformation 8..Once you’re happy with routing of line, cutto lengthleavingapproximately 3/4″extra justincase 9..
Using either double flared yoke or compression fitting (depending on what came withyourgauge), install tubing into gauge 10..Tightentubingjointsnicelybutdon’toverdothis or you may crack tubing 11..Reconnectbatterytoterminal 12..
Startengineandcheckfor proper operation of gauge Ifeverythinglooksgood, give yourself apatonthe back-you’vejust install edan oil pressure gauge to line!
Where is Oil Pressure Gauge Fitted to the Engine?
An oil pressure gauge is a device that measures the pressure of the oil in an engine. It is usually fitted to the engine block, near the oil filter.
Which is Better Mechanical Or Electrical Oil Pressure Gauge?
Assuming you are talking about which is better for a car:
A mechanical oil pressure gauge uses a physical connection between the gauge and engine to measure pressure. They are typically more accurate than electrical gauges, but can be affected by factors like vibration.
An electrical oil pressure gauge uses an electronic sensor to measure pressure. They can be less accurate than mechanical gauges, but are not as affected by things like vibration.
How Do You Hook Up a Pressure Gauge?
A pressure gauge is a handy tool that can be used to measure the amount of pressure in a system. There are two main types of pressure gauges: digital and analog. Each type has its advantages and disadvantages, so it’s important to choose the right one for your needs.
Here’s a quick rundown on how to hook up a pressure gauge: Digital Pressure Gauge 1. Attach the digital pressure gauge to the system using the appropriate fittings.
Make sure that the connections are secure and there are no leaks. 2. Turn on the power to the digital pressure gauge. The display will show 0 psi if everything is working properly.
3. Slowly open the valve on the system until you reach the desired pressure reading. The digital display will update automatically as soon as there is a change in pressure. 4. When you’re finished, close the valve and turn off the power to the digital pressure gauge.
Disconnect all fittings before removing it from the system.
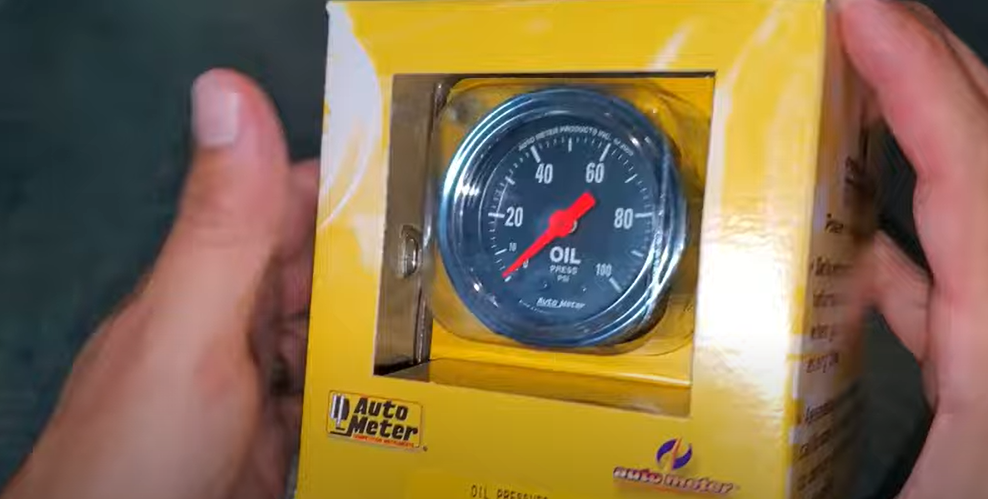
Oil Pressure Gauge Install
Electric Oil Pressure Gauge Kit
An electric oil pressure gauge is a handy tool that can be used to monitor the health of your engine. It can be used to check for leaks, measure engine oil pressure, and even diagnose engine problems. This guide will show you how to install an electric oil pressure gauge in your vehicle.
How to Install Oil Pressure Gauge on Tractor
If your tractor doesn’t have an oil pressure gauge, you can easily install one yourself. It’s a good idea to do this so you can keep an eye on your engine’s oil pressure and make sure it’s running properly. Here’s how to install an oil pressure gauge on your tractor:
1. Start by disconnecting the negative battery cable from the battery. This will prevent any electrical shorts from occurring while you’re working on the tractor. 2. Next, locate the oil pressure sending unit on the engine block.
It will be a round brass fitting with a wire attached to it. Use a wrench to loosen the nut that secures the sending unit in place, then remove it and discard it. 3. Take the new oil pressure gauge and screw it into the opening where the sending unit was located.
Be sure to tighten it securely so there are no leaks. 4. Reconnect the negative battery cable to the battery, then start up the tractor and let it idle for a few minutes. Check the gauge to make sure it’s reading correctly; if not, adjust as necessary until it does.
Bosch Oil Pressure Gauge
If you’re driving a Bosch car, then you know the importance of having a functioning oil pressure gauge. This small but mighty tool helps to keep your engine running smoothly by monitoring the levels of oil pressure in the system. If the gauge starts to drop, it’s time to add more oil.
But what happens if your Bosch oil pressure gauge suddenly stops working? While this can be alarming, there are a few potential causes and solutions. First, check to see if the fuse has blown.
If so, replace it with a new one and see if that solves the problem. If the fuse is not the issue, then there may be an electrical problem with the gauge itself. In this case, you’ll need to take it to a mechanic or auto shop for further diagnosis and repairs.
Lastly, another possibility is that there is an issue with your car’s engine oil level sensor. This sensor communicates with the oil pressure gauge to give you an accurate reading. If it’s not working properly, then your gauge will likely give false readings (either high or low).
The best way to fix this is by taking your car into a professional for service.
How to Install Oil Pressure Gauge Chevy 350
If you’re looking to install an oil pressure gauge on your Chevy 350, there are a few things you need to know first. Here’s a quick guide on how to do it:
1. Locate the sending unit.
This is usually located on the side of the engine block near the oil filter.
2. Disconnect the negative battery cable to prevent any electrical shorts.
3. Using a wrench, loosen the line going to the sending unit and remove it.
Be careful not to damage the threads.
4. Install your new gauge in line with the sending unit using Teflon tape or pipe sealant on all threads to prevent leaks. Reconnect the negative battery cable and start your engine.
Check for proper operation of your new gauge before driving.
Conclusion
If you want to keep a closer eye on your engine’s oil pressure, installing an aftermarket gauge is a relatively easy process. Start by disconnecting the battery and finding a suitable location for the gauge.
It’s important to avoid areas where there might be excessive heat or vibration. Once you’ve found a spot, drill a hole and run the wire for the sensor through it. Then, use thread sealant to secure the sensor.
Next, connect the wires from the sensor to the gauge itself. Make sure that all connections are tight and secure.
Finally, reconnect the battery and turn on the ignition (without starting the engine).
The gauge should now be operational!

Leave a Reply