If your car has an oil cooler, you will need to install it before you can start using the car. Here is a step-by-step guide on how to install an oil cooler: 1. Find the location of the oil filter and unscrew it.
2. Remove the old oil cooler from its location. 3. Install the new oil cooler in the same location as the old one. 4. screw the oil filter back on.
- Start by disconnecting the negative battery cable to prevent any electrical shorts
- Drain the oil from your car using the drain plug at the bottom of the oil pan
- Remove any skid plates or other obstacles that are in the way of accessing the oil filter housing and cooler lines
- Using a wrench, remove the oil filter housing and discard the old filter
- Remove the old cooler lines from their fittings at the engine block, being careful not to damage them
- 6Install your new oil cooler line fittings onto the block, then connect your new cooler lines to them
-
7Fill up your car with fresh motor oil, then start it up and check for leaks around all of your new fittings and connections
What is the Best Way to Mount an Oil Cooler?
Assuming you would like tips on how to install an oil cooler: Oil coolers are devices used to dissipate heat away from the engine oil. They are usually located near the front of the vehicle so that they can take advantage of incoming airflow.
Most modern vehicles come with an oil cooler installed from the factory, but some engines may not have one or it may need to be replaced due to damage. When installing an aftermarket oil cooler, there are a few things to keep in mind. The first is finding a location for the cooler that will get good airflow.
This is usually in front of the radiator or intercooler, but somewhere where air can flow freely around it. The second thing to consider is what type of lines will be used to connect the cooler to the engine. A rubber hose is fine for most applications, but a braided stainless steel line is better if your vehicle will see track use or high temperatures.
Finally, you’ll need to decide how you want to mount the cooler. There are several options available, including universal mounting brackets and custom-fit kits specific to your vehicle make and model. Whichever method you choose, make sure that all connections are secure and there are no leaks before starting your engine!
How Do I Install an Oil Cooler in My Car?
If your car didn’t come with an oil cooler from the factory, or if you’re looking to upgrade your current cooling system, there are a few things you need to know before you start shopping for an aftermarket oil cooler. In this blog post, we’ll walk you through the process of installing an oil cooler in your car, from choosing the right one for your needs to connecting it properly. When it comes to choosing an oil cooler for your car, there are two main types: air-cooled and liquid-cooled.
Air-cooled oil coolers use fins and vents to dissipate heat, while liquid-cooled oil coolers use circulating coolant fluid to transfer heat away from the engine. Both types of coolers have their pros and cons, so it’s important to choose the one that’s best suited for your particular application. Once you’ve selected the right oil cooler for your car, the next step is to install it.
The installation process will vary depending on whether you have an air-cooled or liquid-cooled system. However, both types of installations typically follow these same basic steps: 1) Remove the old oil cooler (if applicable).
This step is only necessary if you’re replacing an existing Cooler. If not skip ahead to Step 2. 2) Install the new Cooler using supplied mounting hardware following manufacturer instructions.
. Make sure that all connections are tight and secure according to specifications..
3) Fill the Cooler with the recommended type of fluid.. Be sure not to overfill as this could cause problems.
. 4) bleed any trapped air out of lines by opening bleeder valves until only fluid flows out.. Close valves when finished.. 5) Start the engine and check for leaks at all connections.. If no leaks are present then Congratulations! You have successfully installed your new Oil Cooler!
Is It Hard to Change an Oil Cooler?
If you’re not mechanically inclined, then changing an oil cooler may seem like a daunting task. However, it’s not that difficult and only takes a few minutes to do. Here’s a step-by-step guide on how to change an oil cooler:
1. Park your car on level ground and engage the emergency brake. Put a jack under the car and raise it until the oil pan is accessible. 2. Remove the oil drain plug from the bottom of the pan and allow the used oil to drain out into a catch basin.
Once all of the oil has drained, replace the drain plug and tighten it securely. 3. Locate the old oil cooler and unscrew it from its mounting bracket using a wrench or socket set. Carefully remove any debris or old gasket material from around the opening where the cooler was mounted.
4. Install the new oil cooler in its place, making sure to use a new gasket or sealant if necessary (consult your car’s owner manual for specifics). Tighten all screws or bolts securely before moving on to Step 5. 5.
Fill up your car’s engine with fresh motor oil, following all manufacturer recommendations regarding type and quantity..
Should I Install an Engine Oil Cooler?
If you’re thinking about installing an engine oil cooler, there are a few things you should consider. Here’s what you need to know about engine oil coolers, and whether or not you should install one in your vehicle. What is an Engine Oil Cooler?
An engine oil cooler is a device that helps to cool the oil in your engine. The oil cooler consists of a radiator-like device that is connected to the engine with hoses. The purpose of the engine oil cooler is to keep the oil in your engine from overheating.
Why Would I Need an Engine Oil Cooler? There are a few reasons why you might want to install an engine oil cooler in your vehicle. If you live in a hot climate or do a lot of driving in hot weather, your engine oil can start to break down and degrade quickly.
This can lead to increased wear on your engine and decreased performance overall. An engine oil cooler can help to mitigate these effects by keeping the oil temperature lower and preventing breakdown. Additionally, if you do any racing or other high-performance driving, an engine oil cooler can be beneficial as well.
Keeping the oil temperature lower, reduces stress on the engine and helps protect against damage caused by heat build-up. Ultimately, whether or not you need an engine oil cooler depends on how you use your vehicle and what kind of climate you live in. If you frequently drive in hot weather or do any kind of high-performance driving, then an engine oil cooler could be a good investment.
How to Install Oil Cooler on Motorcycle
Installing an oil cooler on your motorcycle can help prolong the life of your engine and keep it running cooler, even on the hottest days. Here are step-by-step instructions for installing an oil cooler on a motorcycle: 1. Drain the oil from your motorcycle’s engine using the drain plug located at the bottom of the engine.
Catch the draining oil in a pan so that you can recycle it later. 2. Remove the old oil filter using an oil filter wrench. Be careful not to damage the housing while removing the filter.
3. Install the new oil filter by hand, being careful not to overtighten it. Then add fresh motor oil to your engine, filling it to the proper level indicated in your owner’s manual. 4. To install the oil cooler, first locate a suitable spot on the frame of your motorcycle where the cooler will not come into contact with any moving parts or hot surfaces such as exhaust headers.
Secure the mounting bracket for the cool to this location using bolts or other fasteners appropriate for the materials involved. Many aftermarket coolers come with universal mounting brackets that can be secured with zip ties or similar fasteners if more permanent installation is not desired. 5.”Plumb” the cooling lines from the outlet side of the youngest and to are the turning point, being sure to avoid any areas where the motion of the bike could kink or damage hoses or the lines.
Oil Cooler Thermostat
If your car has an oil cooler, there’s a good chance that it also has an oil cooler thermostat. This little device helps to regulate the temperature of the oil in your engine, keeping it from getting too hot or too cold. Here’s what you need to know about oil cooler thermostats.
Oil coolers are used in engines to help keep the oil at a consistent temperature. The thermostat helps to regulate the flow of oil through the cooler so that it doesn’t get too hot or too cold. If the oil gets too hot, it can break down and cause engine damage.
If it gets too cold, it can thicken and cause poor lubrication.
The thermostat is located between the engine and the oil cooler, and it consists of a housing with a spring-loaded valve inside. When the engine is first started, the valve is closed so that all of the oil goes through the cooling system before reaching the engine.
As the engine warms up, the valve begins to open so that less cooled oil is sent through and more warmed oil is allowed into the engine.
There are two main types of oil cooler thermostats: mechanical and electronic. Mechanical thermostats use a spring-loaded valve to control how much oil flows through the cooler while electronic ones use a sensor to monitor engine temperature and adjust accordingly.
Electronic thermostats are more accurate than mechanical ones but they’re also more expensive.
Engine Oil Cooler Kit
If you’re looking for a way to keep your engine oil cooler, a kit is the way to go. There are many different types and brands of kits available, but they all serve the same purpose: to circulate coolant around the engine oil to keep it from overheating.
Most kits come with everything you need for installation, including hoses, clamps, and fittings.
Some even come with a thermostat to help regulate the temperature. Installation is usually pretty straightforward, although it’s always a good idea to consult your owner’s manual or a professional mechanic before diving in.
Once installed, an engine oil cooler kit will help extend the life of your engine by keeping the oil at a consistent temperature.
This can be especially helpful if you live in an area with extreme temperatures, or if you do a lot of driving in stop-and-go traffic.
Mishimoto Oil Cooler
Mishimoto Oil Cooler
If you are looking for an oil cooler that will keep your engine running cooler, then the Mishimoto oil cooler is a great option. This oil cooler is designed to increase the cooling capacity of your engine, and it does this by using a larger core and more efficient fins.
The Mishimoto oil cooler also includes an aluminum shroud that helps to protect the core from damage. This oil cooler is a great choice for those who want to improve the cooling performance of their engine, and it is also a good choice for those who want to protect their engine from damage.
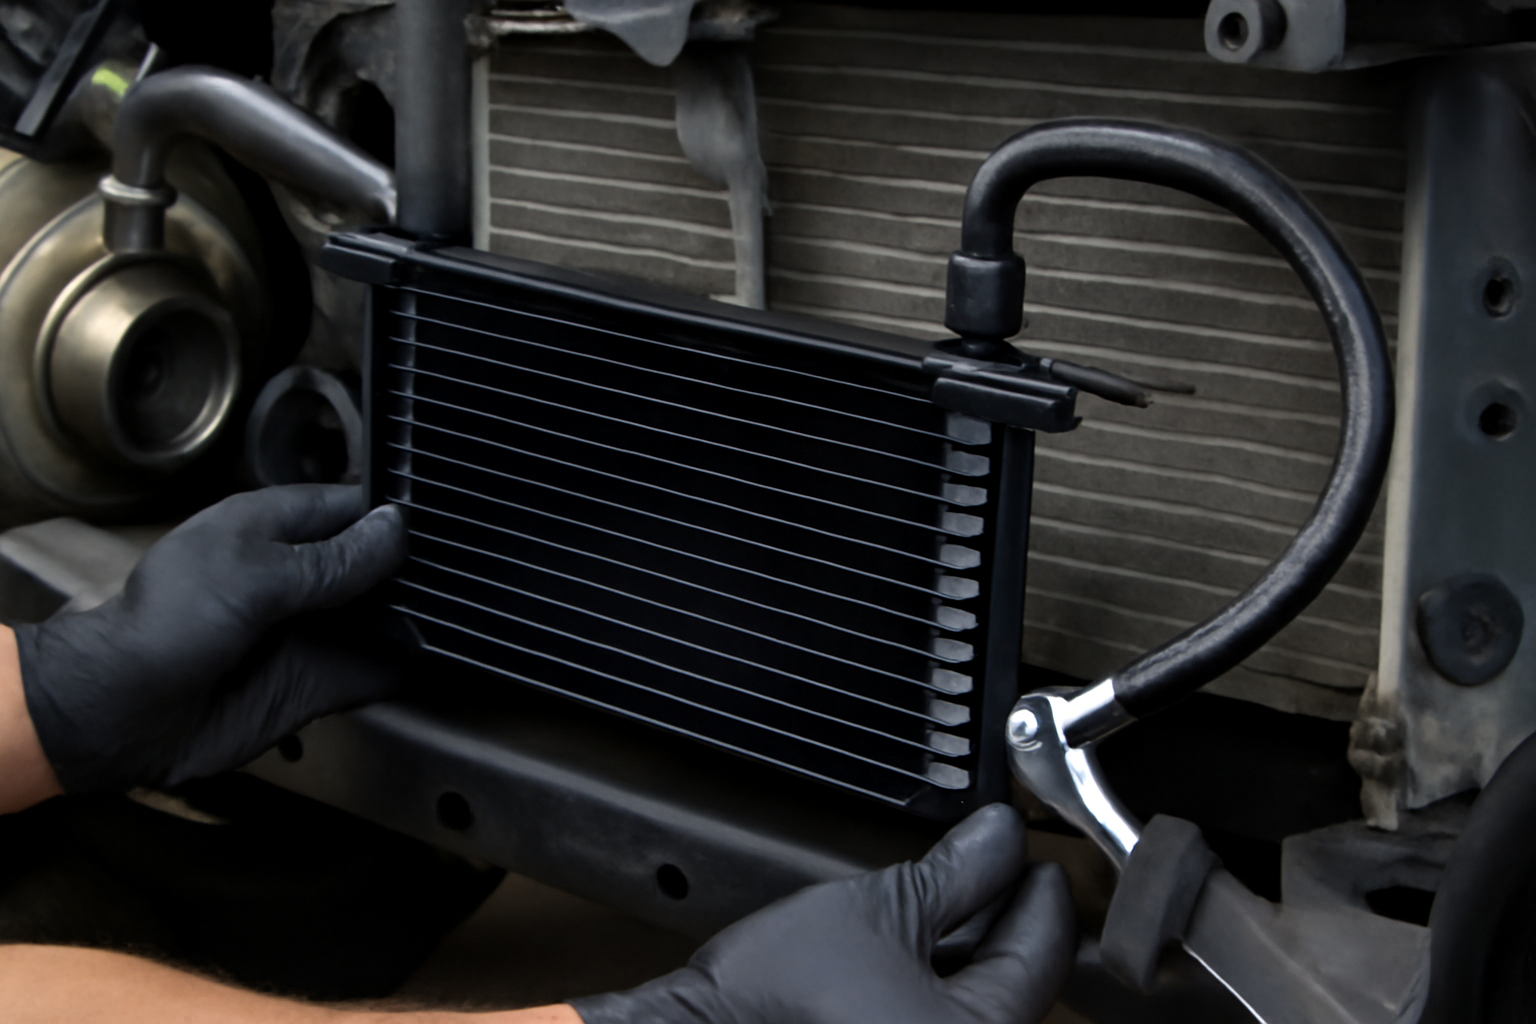
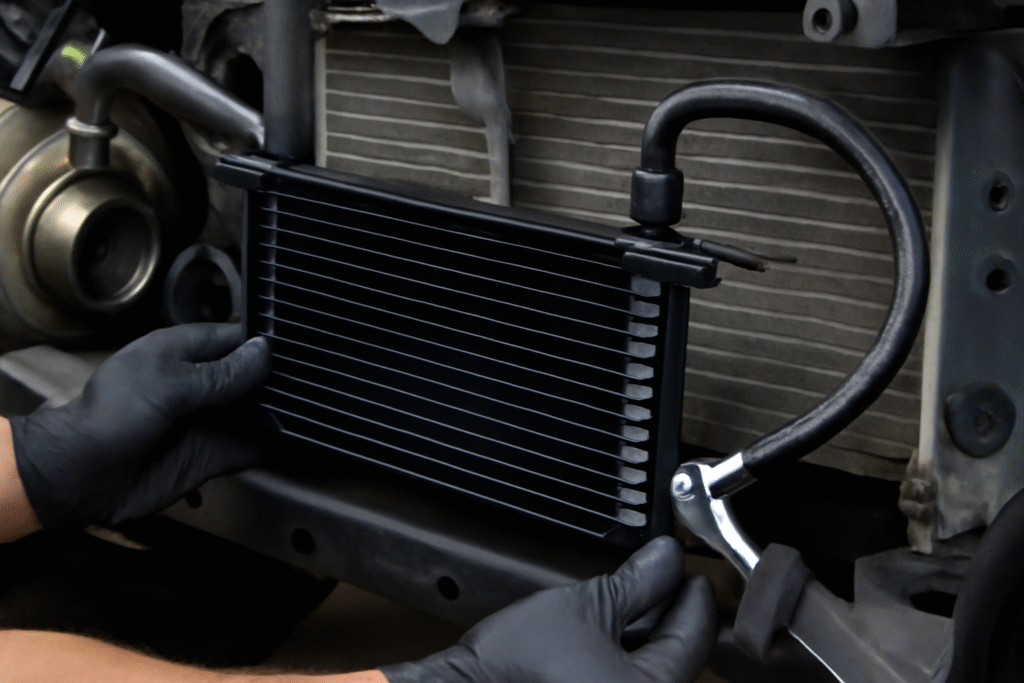
How to Install an OIL COOLER
Conclusion
If your car is overheating, one potential culprit could be an oil cooler. An oil cooler helps to dissipate heat away from the engine oil, keeping it at a consistent temperature. If the oil cooler is not functioning properly, the engine oil can overheat and break down, leading to engine damage.
Luckily, installing an oil cooler is a relatively easy process that you can do at home with a few tools. To start, you’ll need to purchase an oil cooler kit specific to your vehicle’s make and model. Once you have the kit, open up the hood of your car and locate the engine block.
The block will have a spot for the oil filter housing – this is where you will attach the new oil cooler. Unscrew the old housing and screw in the new one, being careful not to overtighten it. Finally, reattach any hoses or wires that may have been dislodged during removal of the old housing.
Start up your car and check for any leaks – if all looks good, you’re good to go!
Leave a Reply