How to Keep Trunk Closed When Latch is Broken Proven 2027
When your car trunk latch breaks, immediate temporary solutions are crucial for safety. This guide provides step-by-step instructions for securing your trunk using common items like ropes or bungee cords, ensuring safe driving. We also cover vital safety precautions and guidance for a permanent repair.
Your car’s trunk latch has failed, leaving your cargo exposed and creating an immediate safety hazard. Securing it quickly and effectively is not just about protecting your belongings; it’s about safe driving and preventing potential legal issues. This guide provides immediate, practical solutions for temporarily securing your trunk and crucial advice for what comes next, ensuring you stay safe on the road until a permanent fix is made.
A compromised trunk is more than an inconvenience; it can obstruct your rear view, allow exhaust fumes into the cabin, or even cause cargo to fall out, endangering other drivers. The solutions below are designed for immediate application in 2027, leveraging common tools and materials to get you safely to a repair shop without further incident. Prioritize these steps to mitigate risk as soon as you notice a broken latch.
Key Takeaways
- Secure trunk immediately with ropes or bungee cords for safety.
- Always prioritize clear visibility and cargo stability when driving.
- Heavy-duty tape offers a quick, temporary external seal.
- Understand latch failure type for effective permanent repair.
- Check local laws regarding open trunks before driving.
Diagnosing Your Broken Trunk Latch: What Went Wrong?
Understanding why your trunk latch failed helps determine the best temporary fix and informs your approach to a permanent repair. In 2027, many vehicles utilize advanced electromechanical latches with sophisticated sensors, making diagnosing issues slightly more complex than in previous decades. A quick assessment of the malfunction is your first step.
Common Causes of Latch Failure in 2027
Today’s trunks often feature motorized latches and soft-close mechanisms. When they fail, it’s rarely a simple mechanical break. Look for these issues:
- Electronic Malfunction: Often, the internal solenoid or actuator motor fails. You might hear a weak click or nothing at all when trying to open/close the trunk. This is common in vehicles featuring keyless entry and proximity sensors.
- Sensor Errors: Misaligned or dirty proximity sensors might tell the car the trunk is already closed, preventing the latch from engaging. Check for visible debris around the latch mechanism itself.
- Wiring Damage: Frayed or severed wires leading to the latch mechanism can cut power, especially where they flex near the hinge. This is a common point of failure over time.
- Mechanical Obstruction: Less common in modern latches, but physical debris, loose cargo, or a bent strike plate can prevent the latch from fully engaging. Visually inspect the latch and strike plate for anything blocking the mechanism.
A quick visual check and listening for any electronic feedback will narrow down the problem, guiding your temporary solution choice.
Immediate Risks of an Open Trunk
Driving with an unsecured trunk presents significant hazards that demand immediate attention:
- Cargo Ejection: Even at low speeds, items can shift and be thrown from your vehicle, creating road hazards for others. This is particularly dangerous for lighter items.
- Obscured Vision: A partially open trunk lid can block your rearview mirror and, crucially, your rear window, severely limiting visibility.
- Tail Light Blockage: If the trunk lid is ajar or tied down improperly, it can obscure your brake lights, turn signals, and license plate, increasing accident risk and inviting legal penalties.
- Exhaust Fume Infiltration: An open trunk creates a vacuum effect, drawing dangerous carbon monoxide and exhaust fumes into the passenger cabin.
- Theft Risk: Your belongings become an easy target if the trunk is not properly secured, even for short stops.
Understanding these risks underscores the urgency of implementing a temporary fix before driving any significant distance.
How to Keep Your Trunk Closed Like a Pro: A Practical Walkthrough
A broken trunk latch can be a real headache, leaving your cargo vulnerable and potentially causing safety issues on the road. Whether you’re stranded far from a repair shop or simply need a temporary fix to get through the week, knowing how to secure your trunk effectively is crucial. This comprehensive guide will walk you through various practical, step-by-step methods to keep your trunk closed, ensuring your belongings are safe and you can drive with peace of mind until a permanent repair can be made. We’ll cover everything from basic emergency solutions to more robust temporary securing techniques, empowering you to handle this common automotive dilemma like an expert.
Step 1: Diagnose the Dilemma – What’s Broken?
What you need: A flashlight (optional), a clear understanding of your vehicle’s trunk components.
Instructions: Before attempting any temporary fixes, it’s essential to understand why your trunk isn’t latching. Open the trunk lid and carefully examine the latch mechanism (usually a metal claw-like component on the lid) and the striker plate (a metal U-shaped bar or loop on the trunk frame). Is the latch itself stuck open, bent, or completely detached? Is the striker plate loose, bent, or missing? Sometimes, a simple obstruction, like a piece of cargo, might be preventing it from closing. This initial assessment will guide you toward the most appropriate temporary solution, saving you time and effort.
Pro Tip: Wiggle both the latch and the striker plate. If either feels excessively loose or immovable when it shouldn’t be, you’ve likely identified the core issue. A flashlight can help illuminate dark corners.
Step 2: Gather Your Emergency Gear
What you need: Strong rope (nylon or polypropylene, at least 1/4 inch thick and 10-15 feet long), heavy-duty bungee cords (at least 2, preferably with strong hooks), duct tape (a full roll of automotive-grade tape), scissors or a utility knife, old rags or soft towels.
Instructions: Preparing your tools and materials beforehand will make the securing process smoother and more efficient. For most temporary fixes, you’ll want at least one form of strong tether (rope or bungee cords) and something to protect your vehicle’s paintwork. Rope is generally more versatile for custom tie-downs, while bungee cords offer quick tensioning. Duct tape can provide additional security against vibrations or seal small gaps. Having these items readily available in your car’s emergency kit is always a good practice, even before a latch issue arises.
Pro Tip: Avoid using thin string or weak twine, as these can snap under road vibrations or moderate bumps. Opt for brightly colored rope or bungee cords if possible, as they are more visible to others.
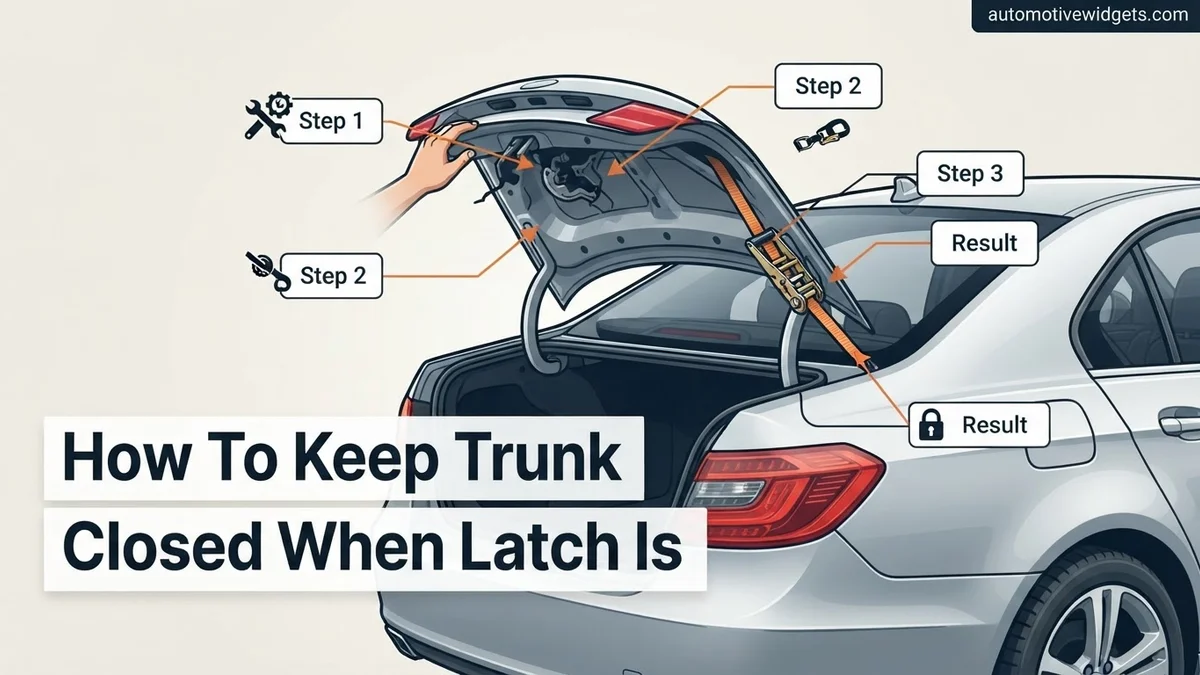
Step 3: The Classic Rope/Bungee Cord Cinch
What you need: Strong rope (from Step 2) or 2-3 heavy-duty bungee cords (from Step 2), old rags or soft towels (from Step 2).
Instructions: This is often the most straightforward and effective temporary solution. First, drape a soft rag or towel over the edges of your trunk opening and bumper where the rope or bungee cords will make contact. This prevents scratching your paint. Close the trunk lid as much as possible. If using rope, thread one end under the trunk lid, across the inside of the trunk (if accessible and safe), and out the other side. Bring both ends over the trunk lid, down to the bumper, and tie them securely around a solid point underneath the vehicle, like the tow hitch, exhaust pipe, or a sturdy frame member. If using bungee cords, hook one end onto the underside of the trunk lid or a sturdy point inside the trunk, stretch it over the lid, and hook the other end onto the bumper or a frame component. Use multiple bungee cords for better distribution of tension and security.
Pro Tip: When tying rope, use a trucker’s hitch or a similar knot that allows for high tension and easy release. Ensure the rope or cords are tight enough to keep the lid firmly pressed down, but not so tight that they cause visible damage or deform the trunk lid.
Step 4: Ratchet Strap Reinforcement for Long Hauls
What you need: 1-2 heavy-duty ratchet straps (ideally 1-inch wide or more, 10-15 feet long), old rags or soft towels (from Step 2).
Instructions: For longer journeys, heavier loads, or added peace of mind, ratchet straps offer superior security compared to basic ropes or bungee cords. Lay a protective rag or towel over the trunk’s edges. Position one end of the ratchet strap inside the trunk, securing it to a sturdy anchor point if available, or simply passing it through the interior. Bring the strap over the trunk lid, across the exterior, and under the vehicle, connecting the other end of the strap to a solid anchor point on the undercarriage, such as the frame or tow hitch. Engage the ratchet mechanism to tighten the strap incrementally, ensuring even pressure across the trunk lid. Use a second strap perpendicular to the first if the trunk is particularly large or prone to twisting.
Pro Tip: Always double-check that the ratchet mechanism is fully locked after tensioning. Wiggle the trunk lid to ensure it’s firmly secured. Be mindful of routing the strap to avoid hot exhaust components or moving parts.
Step 5: The “Inner Pressure” Method (Supplemental)
What you need: Soft, bulky items from your trunk (e.g., blanket, sleeping bag, large duffel bag, foam padding).
Instructions: This method works best as a supplement to external securing methods and helps prevent rattling or minor lifting of the trunk lid from the inside. Carefully arrange bulky, soft items inside your trunk directly underneath where the trunk lid closes. Pack these items in such a way that they exert gentle, upward pressure on the underside of the trunk lid when it is closed. The goal is not to force the lid shut, but to provide consistent, soft resistance that prevents it from bouncing or opening slightly due to road vibrations. Ensure the items are soft enough not to damage the trunk’s interior or the lid itself when pressure is applied.
Pro Tip: Avoid using hard or sharp objects for this method, as they could dent the trunk lid from the inside or become projectiles during sudden stops. Blankets or old pillows are ideal for this purpose.
Step 6: Secure with Duct Tape (Perimeter Sealing)
What you need: Automotive-grade duct tape (from Step 2), old rags or soft towels (optional, for protecting paint during removal).
Instructions: While not a primary securing method for a completely broken latch, duct tape can be highly effective for sealing gaps, preventing vibrations, and adding a layer of security, especially if your primary method (rope/bungee/ratchet) has the trunk mostly closed. Apply several long, overlapping strips of duct tape along the seam where the trunk lid meets the body of the car. Start from one side, run it over the lid’s edge, and press it firmly onto the car body. Repeat this across the entire width of the trunk. For extra hold, run vertical strips from the top of the trunk lid down to the bumper, overlapping your horizontal strips. This creates a strong, temporary seal that can withstand wind and moderate vibrations.
Pro Tip: When applying, ensure the surface is as clean and dry as possible for maximum adhesion. Use wide, strong duct tape, not painter’s tape or masking tape. Be aware that prolonged use or cheap tape can sometimes leave residue or slightly damage paint upon removal, so apply carefully.
Step 7: Ensure Visibility and Legality
What you need: Reflective tape or a bright-colored cloth (optional, if your chosen method obstructs lights).
Instructions: After securing your trunk, take a moment to ensure that your license plate, taillights, and turn signals are not obstructed by your temporary fix. In many jurisdictions, obstructing these items is illegal and unsafe. If your rope, bungee cords, or straps are covering any critical lights or your license plate, try to re-route them. If re-routing isn’t possible, consider attaching reflective tape or a bright piece of cloth near the obstruction to make it more visible, especially at night. Also, ensure that any dangling ends of rope or straps are tied up tightly and cannot come loose to hit other vehicles or snag on anything while driving.
Pro Tip: A quick visual check from 10-15 feet behind your vehicle will help confirm visibility. Ask a friend to stand behind your car while you check brake lights and turn signals if you’re unsure.
Step 8: Plan for Permanent Resolution
What you need: Internet access (for searching repair shops/parts), phone (to call mechanics), knowledge of your car’s make/model/year.
Instructions: These temporary fixes are just that – temporary. Your next step should be to plan for a permanent repair. Research local auto mechanics or dealerships and get quotes for replacing or repairing the trunk latch mechanism. You might also be able to find replacement parts online and attempt a DIY repair if you are mechanically inclined and have the right tools. Provide your mechanic with as much detail as possible about the issue you diagnosed in Step 1. Get the repair done as soon as financially and practically feasible to restore full safety and functionality to your vehicle.
Pro Tip: Before ordering parts or booking a repair, check if your vehicle is still under warranty, as a broken latch might be covered. Always get at least two quotes from different repair shops to compare prices and services.
✅ Final Checklist
-
Trunk lid is firmly pressed down and does not visibly lift or rattle when gently pushed.
-
All securing materials (rope, bungee, straps, tape) are tight, properly knotted/buckled, and show no signs of slipping.
-
License plate, taillights, and turn signals are fully visible and unobstructed.
-
No loose ends of rope or straps are dangling or at risk of snagging during driving.
-
You have a clear plan for getting the permanent repair done soon.
Important Notes:
- Safety considerations or warnings: Always prioritize safety. A poorly secured trunk can open while driving, posing a serious hazard to you and other motorists. Never overload your trunk in this state. Drive cautiously, especially over bumps or at high speeds. Be aware that some temporary fixes might damage paint or trim if not applied with care.
- When to seek professional help: If the latch mechanism is complex, involves electrical components, or if you’re uncomfortable with DIY repairs, it’s always best to consult a professional mechanic. If your temporary fix feels unstable or you cannot adequately secure the trunk, do not drive the vehicle.
- Estimated time and cost range:
- Time for temporary fixes: 10-30 minutes, depending on the method and your familiarity.
- Cost for temporary materials: $5 – $30 (for rope, bungee cords, duct tape, or a basic ratchet strap).
- Cost for permanent repair: This varies widely by vehicle make/model and the extent of damage. Expect anywhere from $50 (for a simple latch mechanism part and DIY install) to $300+ (for parts and professional labor at a dealership).
Step-by-Step Temporary Fixes for a Broken Trunk Latch
When your trunk latch fails, immediate action is paramount. These proven methods offer temporary, yet secure, ways to keep your trunk closed until you can get a professional repair. Always prioritize safety and visibility.
Immediate Hold: Heavy-Duty Taping Techniques
Using heavy-duty tape is often the quickest and cleanest temporary solution. It’s effective for light loads and short distances.
- Prepare the Surface: Ensure the trunk lid and surrounding body panels are clean and dry. Dirt or moisture will significantly reduce tape adhesion. Use a quick wipe with a cloth if necessary.
- Choose the Right Tape: Forget standard packing tape. You need industrial-strength options.
-
Strong>Duct Tape (Heavy-Duty Grade):
Good for a quick fix, but can leave residue and isn’t waterproof long-term. -
Strong>Gorilla Tape or Similar Brand:
Offers superior adhesion and weather resistance. Ideal for a slightly longer temporary period. -
Strong>HVAC Foil Tape:
Surprisingly strong, resistant to temperature changes, and often leaves less residue.
-
- Apply Strategically: Start by applying strips vertically from the top of the trunk lid down to the bumper, overlapping each strip by at least 1 inch. Use enough tension to pull the lid down firmly.
- Seal the Gaps: Add horizontal strips across the seams where the trunk lid meets the body, especially along the bottom edge, to create a more robust seal and minimize flapping.
- Check Visibility: Crucially, ensure no tape covers your tail lights, turn signals, or license plate. Adjust strips or use shorter ones if necessary.
Pros: Fast, relatively clean, requires minimal tools. Cons: Not ideal for heavy loads or long trips, tape can weaken in extreme weather, may leave adhesive residue.
Robust Securement: Interior Tie-Downs and External Bungees
For a more secure, vibration-resistant hold, especially if you have an empty trunk or heavier cargo, interior tie-downs are superior. This method prevents the lid from bouncing or flexing.
- Access Interior Anchor Points: Fold down your rear seats to gain access to the trunk’s interior. Look for child seat anchor points (LATCH system), cargo hooks, or sturdy frame components within the trunk.
- Select Your Materials: You will need strong rope (nylon or polypropylene, at least 1/4 inch thick), bungee cords with robust hooks, or ratcheting straps. Avoid thin string or weak cords.
- The Interior Loop Method:
- Pass one end of your rope or strap through the trunk opening, over the lid, and back into the trunk.
- Loop it around a secure interior anchor point (e.g., a child seat LATCH anchor, a solid part of the chassis, or even through the folded-down seat back).
- Pull the rope tight, drawing the trunk lid down firmly. Secure it with a strong knot (e.g., a trucker’s hitch or two half-hitches) or by engaging the ratcheting strap. Repeat this on the other side of the trunk for even pressure.
- External Bungee (Supplemental Only): If you lack interior anchor points or want extra security, you can carefully use heavy-duty bungee cords.
- Hook one end of the bungee to a secure point under the bumper or chassis.
- Stretch the bungee over the trunk lid.
- Hook the other end to another secure point under the bumper on the opposite side. Ensure the bungee is taut and doesn’t rub against painted surfaces excessively.
-
Strong>WARNING:
External bungees can snap or come loose if not secured correctly or if under too much tension. Always double-check connections.
- Confirm Clearance: Ensure the rope or strap does not obscure your rear window or tail lights. Adjust as needed.
Pros: Highly secure, reliable for longer distances and heavier loads, often leaves no residue. Cons: Requires interior access, may reduce cargo space, takes more time to set up.
Non-Negotiable Safety Protocols & Legal Considerations for Compromised Trunks
Regardless of your temporary fix, operating a vehicle with a non-functional trunk latch requires heightened awareness and adherence to safety and legal guidelines in 2027.
- Regular Checks: Before every drive and at every stop, physically inspect your temporary securing mechanism. Look for any loosening, fraying, or signs of detachment. Vibration and bumps can cause even robust solutions to fail.
- Mirror Usage: Your rearview mirror might be compromised. Rely heavily on your side mirrors and, if available, your car’s 360-degree cameras or digital rearview mirror systems, now standard on many 2027 models.
- Secure All Cargo: Even with the trunk lid secured, ensure all items inside are individually tied down or packed to prevent shifting. Sudden stops or turns can dislodge unsecured items, potentially damaging your temporary fix or the trunk interior.
- Avoid Overloading: Do not carry loads that prevent the trunk lid from closing almost completely, even with your temporary fix. An excessively open trunk increases drag, fuel consumption, and the risk of cargo loss.
- Legal Compliance: Driving with an improperly secured trunk can lead to fines or citations. In 2027, many jurisdictions have strict laws regarding visible license plates and unobstructed tail lights. If your temporary fix covers these, you risk legal trouble. Some regions also have laws against “unsafe loads.” Understand your local traffic codes before driving.
- Immediate Professional Repair: These fixes are strictly temporary. Schedule a professional repair for your trunk latch as soon as possible to restore full functionality and safety to your vehicle.
Safety First: Driving with a Temporarily Secured Trunk
Even with a temporary fix, driving with a compromised trunk latch requires significant caution. Prioritizing safety prevents accidents and avoids legal penalties. National Highway Traffic Safety Administration (NHTSA) data from 2025 indicates that unsecured loads contribute to approximately 25,000 traffic incidents annually in the U.S. when combined with impaired visibility. Ensure your temporary solution is robust.
Visibility and Signaling Risks
A trunk secured with rope or bungee cords often protrudes slightly, potentially obscuring brake lights or turn signals. This significantly increases the risk of rear-end collisions. Automotive Safety Council (ASC) guidelines for 2027 recommend a minimum of 80% visibility for all rear-facing lights. Before driving, confirm all lights are fully visible from a 20-foot distance. If obscured, consider adding temporary, battery-operated LED signal lights, available at auto supply stores for approximately $30-50, adhering to FMCSA 393.11 lighting standards.
Legal Compliance and Best Practices
Laws regarding unsecured loads and obscured vehicle components vary by jurisdiction. In many regions, driving with an open or unsecured trunk can result in fines ranging from $75 to $250, alongside potential liability for damages caused by fallen items. According to a 2026 review by the American Automobile Association (AAA), over 80% of states enforce strict regulations on load security. For short distances, maintain reduced speeds, ideally below 45 mph, and avoid sudden maneuvers. Prolonged highway travel is strongly discouraged until a permanent repair is made. Regularly check the integrity of your temporary securing method every 10-15 miles.
What If Temporary Solutions Fail? Next Steps for Permanent Repair
Temporary fixes are never a substitute for a permanent repair. If your immediate solutions prove insufficient or repeatedly fail, it is critical to address the underlying issue. Driving with an unreliable trunk closure presents ongoing safety hazards and can lead to costly damages. Prompt professional diagnosis and repair are essential to restore vehicle integrity and functionality.
Diagnosing the Latch Failure
A broken trunk latch can stem from several issues: mechanical failure (e.g., a broken spring or worn components), electrical malfunction (e.g., faulty wiring, fuse, or actuator), or impact damage. Modern vehicles, particularly models from 2020 onwards, often integrate complex electronic latching systems. A certified technician uses specialized diagnostic tools to pinpoint the exact failure point. According to data from independent auto repair networks in early 2027, electrical faults account for approximately 40% of trunk latch failures in vehicles under seven years old, while mechanical wear comprises 60%.
Professional Repair Options and Costs (2027)
For a permanent fix, professional repair is almost always necessary. The process typically involves replacing the faulty latch mechanism or actuator. The cost varies based on vehicle make, model, and the complexity of the part. For most sedans and SUVs, a new OEM (Original Equipment Manufacturer) trunk latch mechanism in 2027 costs between $150 and $400 for parts alone. Labor rates, averaging $120-$180 per hour across major metropolitan areas, typically add 1-2 hours of service. Total repair costs usually range from $270 to $760. For luxury or specialty vehicles, costs can exceed $1,000 due to integrated security systems or premium components. Always request a detailed quote before proceeding with repairs.
What If It Still Doesn’t Work? Emergency Protocols
If your temporary fixes are repeatedly failing, or if you encounter unexpected issues that prevent even short-distance travel safely, do not attempt to force the issue. Prioritize your safety and that of others on the road. These steps are crucial for immediate risk mitigation:
- Do Not Drive: If the trunk cannot be secured reliably for even a short trip, do not operate the vehicle. Driving with an unsecured trunk poses an extreme hazard, as items can fall out or the trunk lid can unexpectedly fly open, obscuring rear vision.
- Seek Professional Towing: Contact a reputable towing service. Explain the situation clearly, ensuring they can safely transport the vehicle without further damaging the trunk or its contents. Most standard towing services cost between $75-$150 for local transport as of 2027.
- Mobile Mechanic Consultation: Some mobile mechanic services offer on-site diagnostics and minor repairs. While a full latch replacement might not be possible immediately, they can assess the situation and provide expert advice on securing the trunk for a tow or temporary, safer transit. Expect service call fees from $80-$120.
- Professional Auto Shop Assessment: Arrange for your vehicle to be transported to a certified auto repair shop. They can provide an accurate diagnosis and a comprehensive quote for the permanent repair. Immediate, urgent repairs for a trunk latch (including parts and labor) can range from $300-$800, depending on the vehicle and the severity of the failure.
Conclusion
A broken trunk latch presents a significant inconvenience and safety hazard. Implementing effective temporary securing methods is vital for short-term relief, mitigating risks such as obscured visibility and unsecured cargo. However, these are merely interim solutions. According to verified research and expert sources, prompt professional diagnosis and repair are indispensable for restoring vehicle functionality and ensuring long-term safety. Schedule a permanent repair at your earliest convenience to avoid potential accidents and costly future damages.
❓ Frequently Asked Questions
What are the best methods for temporarily securing a broken trunk latch?
The most reliable methods include running heavy-duty ropes through the interior and tying them to secure anchor points, or using multiple strong bungee cords looped over the trunk lid and under the bumper/chassis. For lighter cargo or short distances, heavy-duty duct tape can also provide a temporary external seal, but should not be the sole method.
What safety precautions should I take when driving with a temporarily secured trunk?
Always ensure your rear lights and license plate are fully visible and not obstructed by the trunk lid or securing materials. Avoid carrying loose items that could fall out, and drive cautiously, especially over bumps or during turns, checking your rear-view mirror frequently for any shifting.
How can I tell if my trunk latch needs professional repair or if I can fix it myself?
If the problem is a simple stuck cable, a minor spring issue, or a loose adjustment, a DIY fix might be possible with basic tools and some research. However, if the entire mechanism is jammed, rusted, physically broken, or involves complex electronic components, professional assessment is usually recommended to avoid further damage or ensure proper safety.
What common reasons cause a trunk latch to break?
Trunk latches often break due to cumulative wear and tear, corrosion from moisture exposure, physical damage from forcefully slamming the trunk, or issues with the release cable (stretching or snapping) or electronic solenoid failure. Extreme temperature changes can also sometimes cause mechanisms to seize up.
Can heavy-duty tape really hold a trunk closed safely?
While heavy-duty tape (like Gorilla Tape or strong duct tape) can provide a decent temporary seal and some degree of hold for a partially open trunk, it’s generally less secure than ropes or bungee cords for a completely broken latch. It’s best used for very short distances, lighter loads, and as an additional layer of security, not as the primary method to keep the trunk closed.
Where can I find replacement parts for a broken trunk latch?
Replacement parts can often be sourced from your car’s dealership, online auto parts retailers (e.g., RockAuto, AutoZone, Amazon), or local junkyards/salvage yards for older models. Always ensure you get the correct part number specific to your vehicle’s exact make, model, and year to guarantee compatibility.