An electric oil pressure gauge is a device that measures the pressure of the oil in your car’s engine. It is an important part of your car’s overall health and performance, and it is essential to know how to wire it correctly. The process is actually quite simple, and all you need is a few tools and supplies.
With a little bit of patience, you can easily wire your own electric oil pressure gauge.
- Disconnect the negative battery cable to prevent an electrical shock
- Remove the oil pressure sending unit with a wrench by unscrewing it from the engine block
- Clean the threads on the engine block with a wire brush to ensure a tight seal when you screw in the new sending unit
- Apply Teflon tape to the threads of the new sending unit before screwing it into place
- Reconnect the negative battery cable and start up your engine
- The oil pressure gauge should now be working correctly
Where Do You Connect the Oil Pressure Gauge?
If your car has an oil pressure gauge, it will most likely be located on the dashboard. The oil pressure gauge is connected to the engine via a metal tube called an oil line. This line runs from the engine to the back of the gauges, where it is then connected to the oil pressure sensor.
The sensor monitors the pressure in the line and sends a signal to the gauge, which then displays the reading.
How Does a 2 Wire Oil Pressure Sensor Work?
A 2-wire oil pressure sensor is a very simple device that measures the pressure of the oil in an engine. The sensor itself is nothing more than a small diaphragm that is connected to a wire. When the engine’s oil pressure increases, the diaphragm expands, and this causes a change in resistance in the wire.
This change in resistance is then converted into a voltage signal by the sensor’s amplifier circuit and sent to the engine control unit (ECU). The ECU uses this information to determine if the engine’s oil pressure is within normal operating range. If it detects that the pressure is too low, it will activate a warning light on the dashboard of most cars.
In some cases, it may also automatically shut off the engine to prevent damage.
How Does an Electronic Oil Pressure Gauge Work?
An electronic oil pressure gauge is a device that measures the pressure of the oil in an engine. The indicator typically consists of a sensor that is mounted on the engine block and a display unit that is mounted on the dashboard of the vehicle. The sensor measures the pressure of the oil and sends a signal to the display unit, which then displays the pressure readings.
The electronic oil pressure gauge is an essential tool for monitoring the health of an engine. It can help identify problems such as low oil pressure, which a variety of issues, such as a leaky gasket or worn bearings can cause. Low oil pressure can lead to engine damage, so it is essential to keep an eye on the readings from the gauge.
How Do You Wire an Oil Temp Gauge?
If you’re looking to add an oil temperature gauge to your car, you’re in luck. It’s a relatively simple process that anyone with basic automotive knowledge can do. Here’s a step-by-step guide on how to wire an oil temp gauge.
1. Find a suitable location for the gauge. You’ll need to drill a hole in the dash or somewhere else to mount the gauge. Keep in mind that you’ll need to run wires from the back of the indicator to this location, so make sure there is enough space and that the area is accessible.
2. Once you have chosen a location, drill a pilot hole and then use a larger drill bit to widen it to the size of the mounting bracket for your particular gauge. 3. Next, install the sending unit for the oil temp sensor. This will usually be located near the engine, either on top of the block or on one of the cylinder heads.
Make sure that it is correctly sealed so that oil cannot leak out and contaminate other parts of your vehicle. 4. Now it’s time to connect the wiring harness from your gauge sending unit to where you installed it in Step 2. Start by connecting one end of the positive wire (usually red) to terminal “A” on the sending unit.
Then connect one end of the ground wire (usually black)to terminal “B.” Finally, attach the remaining ends of both wires together on the backside of the dashboard panel using butt connectors or solder and heat shrink tubing for a more permanent connection. If you are running multiple gauges, make sure to bundle their respective wiring together so as not to confuse them when routing them through the dashboard opening.
Also, take care not to pinch or kink any of the wires, as this could cause electrical problems down the road . 5 . Re-install all panels and trim pieces and test your new gauge before hitting the road!
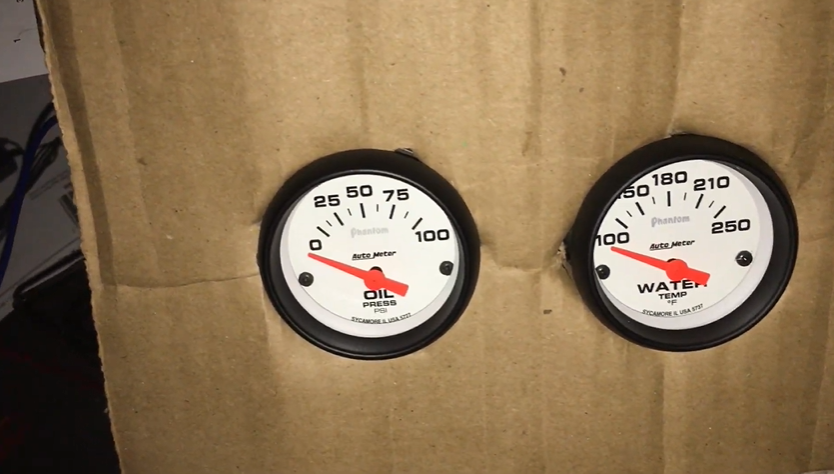
Oil Pressure Gauge Install
Vdo Oil Pressure Gauge Installation Instructions
If you’re looking to add an oil pressure gauge to your vehicle, there are a few things you’ll need to do to ensure proper installation. First, find a spot on your dash or console that will allow easy viewing of the gauge. You’ll then need to run the power wire from the battery through an inline fuse and to the back of the indicator.
Once that’s done, connect the ground wire to a clean metal surface on your car. Finally, connect the sending unit’s wire to the engine block using a tap connector. With everything hooked up, turn on your ignition and check that the needle moves when you start your engine.
If it doesn’t, double-check all your connections before trying again.
Autometer Oil Pressure Gauge Install
If you’re looking to install an Autometer oil pressure gauge in your vehicle, there are a few things you need to know. First, you’ll need to determine where you want to place the gauge. The most common location is on the dashboard, but some people also like to install them under the hood.
Once you’ve decided on a location, you’ll need to drill a hole for the sender unit. Be sure to use a drill bit that’s slightly smaller than the diameter of the sender unit so it will fit snugly in place. Next, it’s time to wire up the gauge.
If your vehicle doesn’t have an existing oil pressure sending unit, you’ll need to install one before wiring up the gauge. Once everything is wired up and in place, it’s time to test it out. Start your engine and let it idle for a few minutes while monitoring the reading on the gauge.
If everything looks good, congratulations! You’ve successfully installed an Autometer oil pressure gauge in your vehicle!
How to Install an Oil Pressure Gauge on a Chevy 350
If you’re looking to add an oil pressure gauge to your Chevy 350, here’s a quick guide on how to do it.
First, you’ll need to purchase an oil pressure sending unit. This can be found at most auto parts stores.
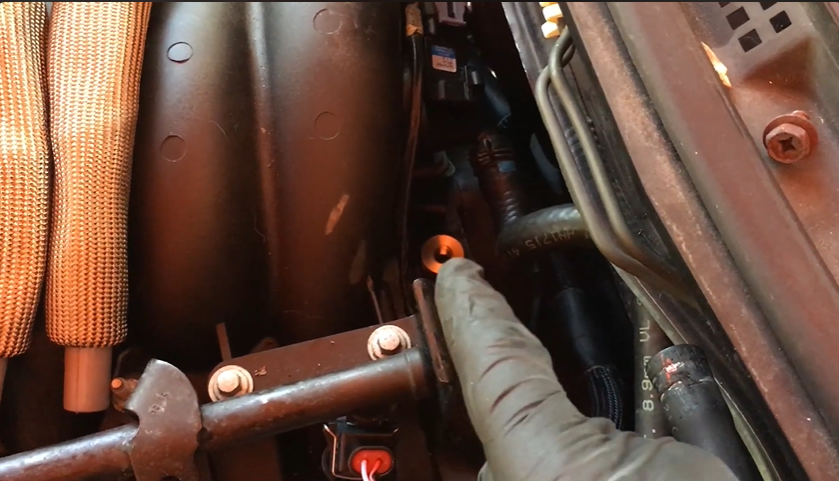
Next, locate the oil pressure port on the engine block. It will be located near the oil filter housing.
Using a wrench, loosen the fitting and screw in the sending unit.
Be sure not to overtighten it. Finally, connect the wire from the sending unit to the terminal on the back of the gauge. Start up the engine and check that the needle is reading correctly.
If not, adjust accordingly.
How to Install an Oil Pressure Gauge on a Tractor
If you’re like most tractor enthusiasts, you understand the importance of monitoring your engine’s oil pressure. An oil pressure gauge can help alert you to potential problems before they become serious, and can also help you keep an eye on how well your tractor is running overall. Here’s a quick guide on how to install an oil pressure gauge on your tractor.
1. Begin by disconnecting the negative battery cable from your tractor’s battery. This will help prevent any accidental electrical shorts during the installation process. 2. Next, locate the engine’s oil pressure sending unit.
This is usually located near the front of the engine, on or near the oil filter housing. In some cases, you may need to remove a few pieces of engine shrouding to access it. 3. Once you’ve found the sending unit, use a wrench to loosen and remove its retaining nut or bolts (depending on its design).
Be careful not to drop anything into the engine! 4. With the retaining nut or bolts removed, carefully pull out the old sending unit and discard it properly. Some units may have a small amount of residual oil inside them – be sure to clean this out before proceeding further.
5 . Now it’s time to install the new oil pressure gauge sending unit in its place… again being careful not to drop anything into the engine! Start by lightly threading in the new unit by hand until it’s snug against its mount, then use a wrench to tighten it down securely according to its manufacturer’s torque specification.
Reconnect any wiring harnesses or other components that may have been removed during disassembly, then proceed to step 6. If your particular model doesn’t require re-wiring or re-assembly here, feel free to skip ahead. 6 Reconnect the negative battery cable to the battery, then start up the tractor and allow it to idle for several minutes while monitoring the new oil pressure gauge.
If everything looks good, congratulations – you’ve just installed a vital piece of equipment that will help keep your tractor running strong for years to come!
Conclusion
If you’re looking to wire an electric oil pressure gauge, there are a few things you’ll need to keep in mind. First, you’ll need to identify the power source for the indicator. This can either be the battery or an ignition-switched circuit.
Once you’ve done that, connect the ground wire to a clean metal surface on the engine block. Then, run the power wire to the fuse box and connect it to a fuse that’s rated for at least 10 amps. Finally, connect the sending unit wire to the oil pressure sender unit.
With everything hooked up, your electric oil pressure gauge should now be operational.

Leave a Reply