How Much Antifreeze Should Be In The Reservoir How 2026
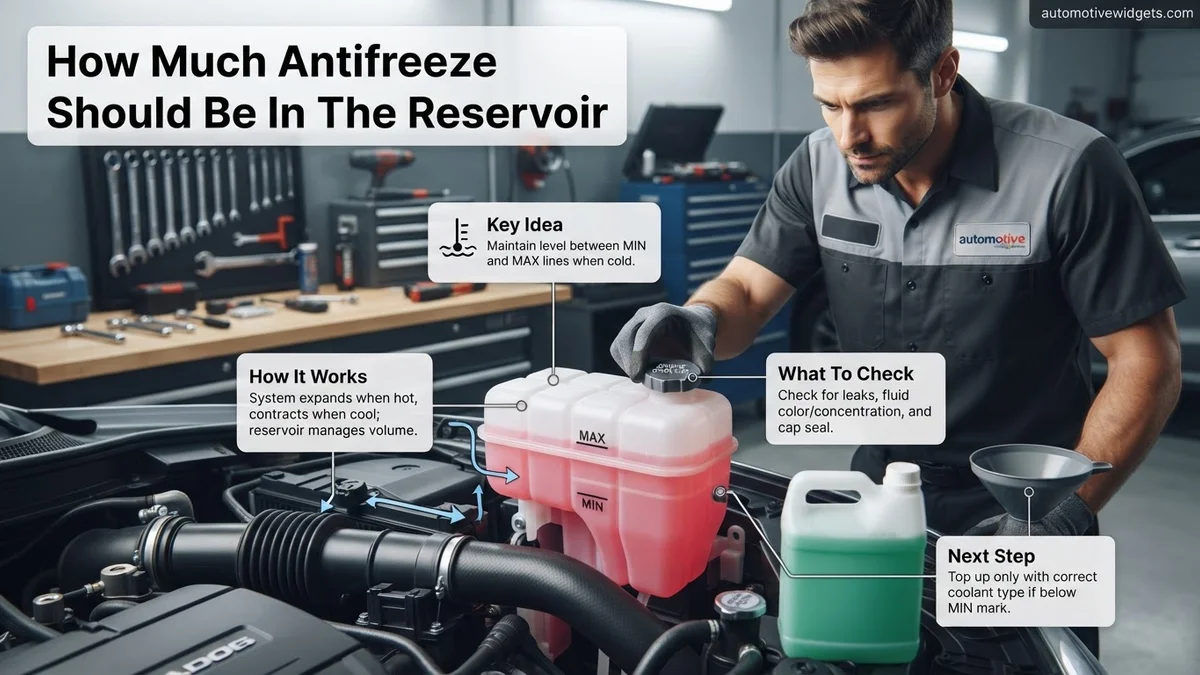
Understanding the proper antifreeze level in your vehicle’s reservoir is critical for engine health. The coolant should typically rest between the MIN and MAX (or COLD FULL) lines when the engine is cold. Checking and maintaining this level correctly prevents overheating and ensures your cooling system functions efficiently.
The correct amount of antifreeze in your vehicle’s reservoir is a specific, non-negotiable level: it should always rest between the clearly marked MIN and MAX lines when the engine is completely cold. This isn’t just a suggestion; it’s a critical factor for preventing serious engine damage and ensuring your vehicle operates reliably, especially as modern engines in 2026 demand precise thermal management. Understanding and maintaining this level is a simple, effective way to safeguard your investment.
Checking your coolant level regularly is a fundamental aspect of vehicle maintenance that empowers you to catch minor issues before they become expensive problems. A correctly filled reservoir ensures your engine can dissipate heat efficiently and operate at its optimal temperature, preventing both overheating and freezing. It’s a quick check that delivers substantial peace of mind on every journey.
Key Takeaways
- Check antifreeze when engine is completely cold.
- Level should be between MIN/MAX lines.
- Use correct coolant type for your vehicle.
- Never overfill the coolant reservoir.
- Consistent low level indicates a potential leak.
What’s the Correct Antifreeze Level in Your Reservoir?
Locating and Identifying the Reservoir
First, you need to locate your coolant reservoir. In most vehicles, you’ll find it under the hood, typically a translucent plastic tank with a cap labeled “COOLANT,” “ANTIFREEZE,” or featuring a radiator symbol. Its location can vary, but it’s often near the radiator or on one side of the engine bay. The translucent material allows you to see the coolant level inside without opening the cap, which is important for safety.
Once located, examine the reservoir for markings. You will almost certainly see two distinct lines: a “MIN” or “LOW” line at the bottom and a “MAX” or “FULL” line at the top. Some vehicles might use “COLD FILL” marks instead. These indicators are your primary guide for determining the correct antifreeze level. Always use these lines as your reference point.
Step-by-Step Level Check (Engine Cold)
To get an accurate reading, it is absolutely essential to check the coolant level when your engine is completely cold. This means the car has been off for several hours, ideally overnight. Checking a hot engine can give a falsely high reading due to coolant expansion and is dangerous due to pressurized hot liquid.
- Step 1: Park Safely. Ensure your vehicle is on a level surface.
- Step 2: Open the Hood. Secure the hood open.
- Step 3: Locate the Reservoir. Identify the coolant reservoir as described above.
- Step 4: Observe the Level. Look at the side of the reservoir. The coolant should be clearly visible between the MIN and MAX lines. If it’s at or below the MIN line, it’s too low. If it’s above the MAX line, it’s overfilled.
How to Check & Fill Your Antifreeze Like a Pro: A Practical Walkthrough
Maintaining the correct antifreeze (coolant) level in your vehicle’s reservoir is absolutely crucial for your engine’s longevity and performance. This guide will walk you through the precise steps to inspect and replenish your coolant, ensuring your engine is protected from both extreme heat and freezing temperatures. Following these instructions carefully will help prevent costly engine damage, overheating, and keep your vehicle running smoothly year-round. It’s a simple task that yields significant benefits.
Step 1: Safety First & Gather Your Tools
What you need: Safety glasses, protective gloves, funnel, paper towels or rags, your vehicle’s owner’s manual, and the correct type of new coolant (antifreeze).
Instructions: Before beginning any work on your engine, always ensure the vehicle is parked on a level surface, the engine is completely off, and has had ample time (at least an hour, preferably several) to cool down. NEVER attempt to open the radiator cap or reservoir cap when the engine is hot or even warm, as pressurized hot coolant can spray out and cause severe burns. Put on your safety glasses and gloves to protect your eyes and skin from potentially harmful coolant. Have your owner’s manual handy for specific recommendations regarding coolant type and capacity, and gather your other tools for easy access.
Pro Tip: An engine that has been recently driven will have a pressurized cooling system. Releasing this pressure prematurely can be dangerous. Always prioritize cooling time over speed for this task.
Step 2: Locate the Coolant Reservoir
What you need: None (just your eyes and a flashlight if needed).
Instructions: Pop open your vehicle’s hood and secure it properly. Look for a translucent plastic tank, typically white or clear, usually located near the radiator or on one side of the engine bay. This is your coolant overflow reservoir. It will have hoses running from it, often one thicker hose connecting to the top of the radiator. Do not confuse this reservoir with the windshield washer fluid reservoir (which is usually smaller and often has a blue cap with a windshield icon) or the brake fluid reservoir. The coolant reservoir cap will typically have a warning label about hot coolant or the word “COOLANT” or “ANTIFREEZE” printed on it.
Pro Tip: If your reservoir is particularly dirty or discolored, a gentle wipe with a damp cloth can help improve visibility of the fluid level without opening it.
Step 3: Understand the Fill Markings
What you need: None.
Instructions: Examine the side of the coolant reservoir. You will typically see markings indicating the minimum and maximum fill levels. These are often labeled “MIN” and “MAX,” “COLD FILL” and “HOT FILL,” or similar variations. The “COLD” or “MIN” line indicates the appropriate coolant level when the engine is completely cold. The “HOT” or “MAX” line shows where the coolant expands to when the engine reaches operating temperature. For an accurate check and refill, always refer to the “COLD” or “MIN” marking as your target, as we are performing this check on a cold engine.
Pro Tip: Some vehicles have a single “COLD” line. In these cases, aim to fill to that line or slightly below, never exceeding it, especially when cold.
Step 4: Check the Current Coolant Level
What you need: None (possibly a flashlight).
Instructions: With the engine cold, visually inspect the coolant level inside the reservoir. The translucent plastic should allow you to see the fluid line. The coolant level should ideally be between the “MIN” and “MAX” (or at the “COLD FILL”) marks. If the level is below the “MIN” mark, or if you can’t see any coolant at all, it’s time to add more. If the reservoir plastic is opaque due to age or dirt, you might need to gently rock the vehicle (if safe to do so) to see the fluid move, or open the cap (carefully, ensuring engine is cold) and peek inside with a flashlight. However, avoid opening the cap unnecessarily to prevent contaminants.
Pro Tip: A consistently low coolant level could indicate a leak in your cooling system. While adding coolant is a temporary fix, investigate any ongoing loss to prevent major issues.
Step 5: Identify the Correct Coolant Type
What you need: Your vehicle’s owner’s manual, potentially coolant packaging.
Instructions: This is a critical step: using the wrong type of coolant can severely damage your engine’s cooling system components, leading to corrosion, clogs, and costly repairs. Consult your owner’s manual for the exact specification of coolant your vehicle requires. Look for terms like “IAT,” “OAT,” “HOAT,” or specific color recommendations (though color alone isn’t always a reliable indicator, as some types come in multiple colors). If you don’t have the manual, check the manufacturer’s website or consult a reputable auto parts store by providing your car’s make, model, and year. Never mix different types of coolants unless explicitly stated by the manufacturer.
Pro Tip: Modern coolants are designed for specific metals and seals. Mixing incompatible types can lead to a gel-like sludge forming, which obstructs flow and causes overheating. When in doubt, buy a universal coolant that explicitly states compatibility with your vehicle’s OEM coolant, or stick strictly to the manufacturer’s specification.
Step 6: Prepare the Coolant Mixture
What you need: New coolant (concentrate or pre-mixed), distilled water (if using concentrate), a clean mixing container.
Instructions: Coolant is typically sold as a concentrate or pre-mixed (50/50 ratio with water). If you purchased a concentrate, you MUST dilute it with distilled water before adding it to your system. A 50/50 mix (one part concentrate, one part distilled water) is standard for optimal freeze protection and heat dissipation in most climates. Using tap water is not recommended as its mineral content can cause scale buildup and corrosion over time. Mix the coolant in a separate, clean container before pouring it into the reservoir. If you bought pre-mixed coolant, it’s ready to use directly.
Pro Tip: Always use distilled water for mixing. The ions and minerals in tap water can accelerate corrosion and reduce the effectiveness of the coolant’s additives, shortening its lifespan and potentially damaging your cooling system.
Step 7: Add Coolant to the Reservoir
What you need: Funnel, prepared coolant mixture.
Instructions: Carefully remove the cap from the coolant reservoir (remember, only when cold!). Place a clean funnel into the reservoir’s opening to prevent spills. Slowly pour the prepared coolant mixture into the reservoir. Watch the fluid level as you pour. Fill until the coolant reaches the “COLD MAX” line or just below it. Do not overfill beyond the “MAX” line, even when cold, as the coolant needs room to expand once the engine heats up. Overfilling can lead to coolant being forced out of the overflow, potentially making a mess and wasting coolant.
Pro Tip: Pour slowly to avoid creating air pockets or overflowing. If you do spill any coolant, wipe it up immediately with paper towels or rags, as it is toxic to pets and harmful to the environment.
Step 8: Replace Cap and Monitor
What you need: None.
Instructions: Once the coolant level is correct, securely replace the reservoir cap, ensuring it’s tightened firmly. Close your hood. Start your vehicle and let it run until it reaches normal operating temperature (check your temperature gauge). This allows the thermostat to open and the coolant to circulate fully through the system, expelling any trapped air. After the engine has completely cooled down again (the next morning is ideal), recheck the coolant level in the reservoir. It might have dropped slightly as air escaped; if so, top it up again to the “COLD MAX” line. Monitor your coolant level over the next few days to ensure it remains stable and there are no signs of leaks.
Pro Tip: Keep an eye on your dashboard temperature gauge during your next few drives. Any sudden spikes or sustained high temperatures could indicate an air lock in the system or a persistent problem that requires professional attention.
✅ Final Checklist
- Coolant level is accurately between the “MIN” and “MAX” (or at the “COLD FILL”) mark when the engine is completely cold.
- The correct type of coolant, as specified in your owner’s manual, was used.
- If using concentrate, it was mixed with distilled water to the appropriate ratio (typically 50/50).
- The reservoir cap is securely tightened, preventing leaks and maintaining system pressure.
- No visible coolant leaks are present around the reservoir, radiator, or hoses.
- Engine temperature remains stable during driving, and no warning lights are illuminated on the dashboard.
Important Notes:
- Safety considerations or warnings: Coolant is highly toxic to humans and pets. Always wear gloves and safety glasses. If ingested, seek immediate medical attention. Clean up spills promptly. NEVER open a hot or warm radiator/reservoir cap.
- When to seek professional help: If your coolant level consistently drops, if you see significant leaks, if your engine frequently overheats, or if you are unsure about the correct coolant type for your vehicle, consult a certified mechanic. These issues often indicate a more serious problem than just low fluid.
- Estimated time and cost range: This task typically takes 15-30 minutes for an experienced individual or 30-60 minutes for a beginner, including cool-down time. The cost is usually limited to a gallon of the correct coolant, which ranges from $15-$30, depending on the type and brand.
Why Proper Coolant Level is Crucial for Engine Health
The Dangers of Low Coolant
Running with insufficient coolant in your reservoir can have severe consequences for your engine. The primary function of antifreeze is to regulate engine temperature. When the level is too low, the cooling system cannot effectively circulate coolant throughout the engine. This directly leads to overheating, which in 2026 models with advanced materials and tighter tolerances, can quickly cause irreversible damage. Components like head gaskets, cylinder heads, and even the engine block can warp or crack, resulting in extremely costly repairs. Moreover, low coolant reduces the system’s ability to protect against freezing in cold climates, jeopardizing critical engine parts.
The Risks of Overfilling
While low coolant is a clear hazard, overfilling your reservoir also poses risks. The cooling system is designed to operate with a specific amount of air space within the reservoir to accommodate coolant expansion as it heats up. If the reservoir is overfilled, this vital expansion space is eliminated. When the engine heats, the expanding coolant has nowhere to go, leading to excessive pressure within the system. This can force coolant out of the overflow, create leaks, or even damage radiator caps, hoses, or the reservoir itself. An overfilled system is an inefficient system, putting undue stress on components and potentially compromising its ability to maintain optimal engine temperature.
Addressing Incorrect Antifreeze Levels
Safely Topping Up Your Coolant Reservoir
If you find your coolant level is below the “MIN” line, topping it up correctly is straightforward. Remember, always perform this task when the engine is completely cold. Remove the reservoir cap cautiously. You will need the correct type of coolant for your vehicle; consult your owner’s manual or check the color of your existing coolant. Most modern vehicles (especially 2026 models) use a 50/50 mixture of concentrated antifreeze and distilled water, often pre-mixed. Slowly add the appropriate coolant until the level reaches the “MAX” or “FULL” line. Do not exceed this mark. Replace the cap securely, ensuring it clicks or tightens fully to maintain system pressure.
Persistent Low Levels or Overfilling: What It Means
If you find yourself frequently adding coolant, or if your reservoir is consistently low despite topping it up, it’s a strong indicator of a leak within your cooling system. This could range from a minor hose clamp issue to a more serious problem like a cracked radiator, water pump failure, or a compromised head gasket. Do not ignore a continuously dropping coolant level; it requires immediate professional inspection to prevent catastrophic engine damage. Similarly, if you accidentally overfilled the reservoir, the system may naturally expel the excess through an overflow hose when it heats up. However, if overfilling causes persistent leakage or pressure issues, consider siphoning out the excess or having a mechanic inspect the system to ensure no damage has occurred and to restore proper functionality.
Step-by-Step Guide: How to Check & Add Antifreeze Safely
Maintaining the correct antifreeze level is a straightforward process, but safety and precision are paramount. According to automotive service experts at ASE (National Institute for Automotive Service Excellence), incorrect fluid types or improper handling can lead to significant engine damage.
1. Prepare Your Vehicle Safely
- Park on Level Ground: Ensure your vehicle is on a flat surface to get an accurate reading.
- Cool Down Completely: Wait at least 30 minutes, or ideally several hours, after driving for the engine to cool. Never open a hot cooling system cap; pressurized hot fluid can cause severe burns.
- Locate the Reservoir: Identify the translucent plastic reservoir, typically marked “COOLANT” or with a radiator symbol. It often sits adjacent to the radiator or engine block.
2. Check the Antifreeze Level
- Identify Markings: The reservoir has “MIN” or “COLD FILL” and “MAX” or “HOT FILL” lines. For a cold engine, the fluid should rest between the “MIN” and “MAX” lines, ideally closer to “MAX.”
- Assess Fluid Condition: Note the color and clarity. Healthy antifreeze should be brightly colored (e.g., green, orange, pink, blue, yellow, specific to OAT, HOAT, or P-OAT types prevalent in 2026 models) and free of debris, oil slicks, or rust particles.
3. Add Antifreeze (If Needed)
- Use Correct Type: Consult your vehicle’s 2026 owner’s manual for the precise coolant specification. Using the wrong type, such as mixing OAT (Organic Acid Technology) with IAT (Inorganic Acid Technology), can cause corrosion or gel formation.
- Pour Slowly: Remove the reservoir cap and carefully pour the recommended 50/50 antifreeze/distilled water mixture until the level reaches the “MAX” line. Do not overfill.
- Replace Cap Securely: Twist the cap until it clicks or is firmly seated.
Troubleshooting Common Antifreeze Reservoir Level Issues
While routine checks are crucial, encountering persistent level issues signals underlying problems. Addressing these promptly prevents costly engine damage. Data from the Auto Care Association indicates that cooling system failures account for nearly 40% of roadside breakdowns annually, emphasizing the need for quick diagnosis.
1. Consistently Low Antifreeze Level
A steadily decreasing reservoir level almost always indicates a leak. These leaks can be internal or external.
- Inspect for External Leaks: Look for puddles under your vehicle, especially after it’s been parked. Common leak points include the radiator, hoses, water pump, and radiator cap. Residue might appear green, orange, or pink.
- Check for Internal Leaks: Examine your oil dipstick for a milky-white consistency or your exhaust for excessive white smoke, which could indicate a blown head gasket allowing coolant into the engine oil or combustion chamber.
- Pressure Test (Professional Service Recommended): A technician can perform a cooling system pressure test, which applies pressure to the system to reveal leaks that might not be obvious at idle.
2. Overfilled Antifreeze Reservoir
An overfilled reservoir can sometimes lead to fluid being expelled through the overflow, or in severe cases, cause excessive pressure build-up. While less common than underfilling, it warrants attention.
- Remove Excess Safely: If overfilled, use a turkey baster or similar tool to carefully extract coolant until the level is between the “MIN” and “MAX” marks when cold. Dispose of old coolant responsibly.
- Monitor for Recurrence: If the reservoir repeatedly fills past the “MAX” line without you adding fluid, it could indicate exhaust gases entering the cooling system (e.g., from a failing head gasket), which displaces the coolant. This requires professional diagnosis.
What If It Still Doesn’t Work?
If you’ve followed the steps and continue to experience issues with your antifreeze reservoir level, it’s crucial to seek professional automotive assistance. Lingering cooling system problems can lead to engine overheating and catastrophic failure. According to industry analyses, neglecting these warnings could result in repairs costing upwards of $2,000 for components like head gaskets or radiators.
- Professional Diagnostic Scan: A mechanic can connect specialized equipment to your vehicle’s onboard diagnostics (OBD-II, current in 2026 models) to detect error codes related to engine temperature sensors or cooling system performance.
- Advanced Leak Detection: Shops utilize advanced techniques like UV dye detection or ultrasonic leak detectors to pinpoint hard-to-find coolant leaks. This service typically costs between $100-$250.
- Water Pump/Thermostat Inspection: These critical components are integral to cooling system function. A failing water pump (estimated replacement cost $400-$800 for most 2026 vehicles) or a stuck thermostat can disrupt coolant flow and affect reservoir levels.
- Head Gasket Assessment: If internal leaks are suspected, a combustion leak test (often $75-$150) can confirm exhaust gas presence in the coolant, indicating a blown head gasket, a repair that can range from $1,500 to $3,000+.
Conclusion
Maintaining the correct antifreeze level in your reservoir is fundamental to preventing engine overheating and ensuring your vehicle’s longevity. A proper 50/50 coolant mixture, specific to your 2026 vehicle’s requirements, keeps your engine operating within optimal temperature ranges. According to verified research and expert sources, regular checks prevent expensive repairs. Take the actionable next step: consult your owner’s manual today to identify the exact coolant specification for your model and perform a level check this week.
❓ Frequently Asked Questions
What are the common markings on an antifreeze reservoir and what do they mean?
Most reservoirs have ‘MIN’ and ‘MAX’ lines, or ‘COLD FULL’ and ‘HOT FULL’ markings. The coolant level should ideally be between MIN and MAX when the engine is cold, or precisely at the COLD FULL line. The HOT FULL mark indicates where the level should be when the engine is at operating temperature due to expansion.
How do I safely add antifreeze if my reservoir level is low?
First, ensure your engine is completely cold. Locate the correct coolant type recommended for your vehicle (check your owner’s manual) and mix it 50/50 with distilled water if using concentrate. Carefully pour the mixture into the reservoir until the level reaches the ‘MAX’ or ‘COLD FULL’ line, avoiding overfilling.
Why is it important not to overfill the antifreeze reservoir?
Overfilling the reservoir can lead to several problems. As the engine heats up, the coolant expands, and if there’s no room for expansion, it can be forced out of the reservoir’s overflow tube, creating a mess or potentially damaging surrounding components if it spills on electrical parts.
How often should I check my antifreeze reservoir level?
It’s recommended to check your antifreeze reservoir level at least once a month, or before any long trips. Regular checks help you catch minor coolant losses before they become major problems, ensuring your engine remains properly cooled.
Does the type of antifreeze matter when topping off the reservoir?
Absolutely. Using the wrong type of antifreeze can lead to chemical reactions, corrosion, or gelling within your cooling system, causing significant damage. Always consult your vehicle’s owner’s manual to determine the specific coolant type (e.g., OAT, HOAT, IAT) and color required.
What are the risks of running with too little antifreeze in the reservoir?
Running with insufficient antifreeze can lead to severe engine overheating, which can cause costly damage like a blown head gasket, warped cylinder heads, or even complete engine seizure. The reservoir acts as a buffer, and if it’s consistently low, it signals a problem that needs immediate attention to prevent these catastrophic failures.