How To Know If Your Rotors Need To Be Replaced How to 2027
Understanding when your brake rotors need replacement is essential for vehicle safety and performance. Vibrations, unusual noises, and visual wear are critical indicators. This guide provides a detailed approach to help you identify these signs effectively, ensuring your braking system remains reliable.
Knowing when your vehicle’s brake rotors need replacement is crucial for your safety and the overall performance of your braking system. In 2027, with increasingly integrated vehicle safety systems, maintaining optimal braking components is more critical than ever. Ignoring worn rotors can lead to significantly extended stopping distances, unpredictable braking, and potentially expensive damage to other brake components like calipers and pads. Catching the signs early ensures you maintain control and avoid further complications on the road.
You don’t need to be a professional mechanic to identify common indicators of failing rotors. Paying attention to how your car feels and sounds during braking can tell you a lot. This guide focuses on the specific symptoms you’ll encounter and how you can visually and tactilely inspect your rotors to determine if they’re due for replacement.
Key Takeaways
- Identify rotor wear through brake pedal pulsations or steering wheel vibrations.
- Listen for grinding, squealing, or scraping noises during braking.
- Visually inspect rotors for deep grooves, cracks, or discoloration.
- Check for a pronounced ‘lip’ on rotor edges, indicating significant wear.
- Address any warning signs promptly to maintain safe vehicle operation.
Understanding Rotor Wear: Common Symptoms & Warning Signs
Your vehicle’s rotors are under immense stress every time you slow down. Recognizing the early symptoms of wear or damage can prevent more serious issues and maintain your car’s safety profile in 2027 traffic conditions.
Vibration Through Steering Wheel and Pedal
- Steering Wheel Vibration: If your steering wheel shakes or shudders noticeably when you apply the brakes, especially at higher speeds, it’s a strong indicator of warped or unevenly worn front rotors. This happens because the brake pads grab an inconsistent, wavy surface.
- Brake Pedal Pulsation: Feeling a rhythmic pulsing or thumping sensation through your brake pedal means the rotor surface is no longer smooth and flat. This is often described as the pedal pushing back against your foot and typically signals warpage on any of your vehicle’s rotors.
- Vehicle Shaking: In severe cases of rotor warpage, the entire vehicle may vibrate or shudder during braking. This is often a progression from initial steering wheel or pedal vibrations and requires immediate attention.
Audible Cues: Squeals, Grinds, and Increased Stopping Distance
- Squealing or Chirping: While often associated with worn brake pads, a persistent high-pitched squeal can also indicate glazed or scored rotors that are not allowing the pads to bed properly. It can be a sign that the rotor surface has hardened or become uneven.
- Grinding Noises: A harsh, metallic grinding sound during braking is a critical warning. This typically means the brake pads have worn completely through their friction material, and the metal backing plate is now directly contacting the rotor. This causes rapid rotor damage and significantly impairs braking effectiveness.
- Increased Stopping Distance: If you notice your vehicle taking longer to come to a complete stop, your braking system’s efficiency is compromised. Worn or damaged rotors, which cannot dissipate heat effectively or provide a consistent friction surface, contribute directly to this dangerous symptom.
How to Diagnose Rotor Wear Like an Expert
Your vehicle’s brake rotors are arguably one of its most critical safety components. Working in conjunction with your brake pads, they convert kinetic energy into heat, slowing and stopping your car. Neglecting their condition can lead to reduced braking performance, increased stopping distances, and dangerous situations. This comprehensive guide will empower you to expertly assess your rotors, helping you determine if they’re due for replacement and ensuring your vehicle remains safe and responsive on the road.
Step 1: Understand the Basics of Brake Rotors
What you need: A basic understanding of automotive brake systems (no tools required).
Instructions: Before diving into diagnostics, it’s crucial to understand what brake rotors are and how they function. Rotors are the large, circular metal discs attached to your wheel hubs. When you press the brake pedal, the brake calipers clamp the brake pads onto these rotors, creating friction that slows the wheels. Most modern vehicles use “vented” rotors, which have internal channels to dissipate heat more efficiently. Solid rotors are typically found on the rear wheels of smaller cars or older models. Their primary job is to provide a smooth, flat surface for the pads to grip and to manage the immense heat generated during braking.
Pro Tip: Rotors are designed to dissipate extreme heat. Any significant compromise to their surface or thickness directly reduces this critical ability, potentially leading to brake fade (loss of braking power due to overheating) and increased stopping distances. Understanding this function highlights the importance of keeping them in top condition.
Step 2: Listen for Auditory Warning Signs
What you need: Your hearing, a quiet road, and careful attention while driving.
Instructions: Pay close attention to any unusual sounds emanating from your wheels when you apply the brakes. A persistent, high-pitched squealing noise often indicates worn brake pads (which should also be checked simultaneously) or improper pad installation, but can sometimes be a precursor to rotor issues if pads are completely gone. A harsh, metallic grinding sound, however, is a critical warning sign that your brake pads are completely worn down, and metal components are now scraping directly against your rotors. This causes rapid rotor damage and significantly impairs braking effectiveness. A pulsating or thumping noise during braking can also indicate a warped rotor.
Pro Tip: Do not ignore any persistent or unusual braking noises. A grinding sound means you’re literally destroying your rotors with every brake application and creating a severe safety hazard. Address it immediately; it’s often the most obvious indicator that significant brake work, including rotor replacement, is overdue.
Step 3: Feel for Vibrations and Pulsations
What you need: Your hands on the steering wheel, your foot on the brake pedal, and experience driving your vehicle.
Instructions: While driving, gently and then firmly apply the brakes. Pay close attention to how the brake pedal and steering wheel feel. If you notice a pulsing sensation in the brake pedal, similar to a heart beat or a rapid thumping, or if the steering wheel shudders or vibrates, particularly under moderate to heavy braking, it’s a strong indicator of warped or unevenly worn rotors. This occurs because the rotor surface is no longer perfectly flat, causing the brake pads to grip and release intermittently as the rotor spins. These sensations often become more pronounced at higher speeds or during heavier braking, as increased heat exacerbates the imperfections.
Pro Tip: Vibrations that are felt primarily in the brake pedal usually point directly to rotor issues. If the vibration is felt more predominantly in the steering wheel, it can sometimes indicate front rotor issues, but also other suspension or wheel balance problems, so a comprehensive inspection is warranted.
Step 4: Conduct an Initial Visual Inspection (Wheels On)
What you need: Flashlight, a clean rag, a safe, level parking area.
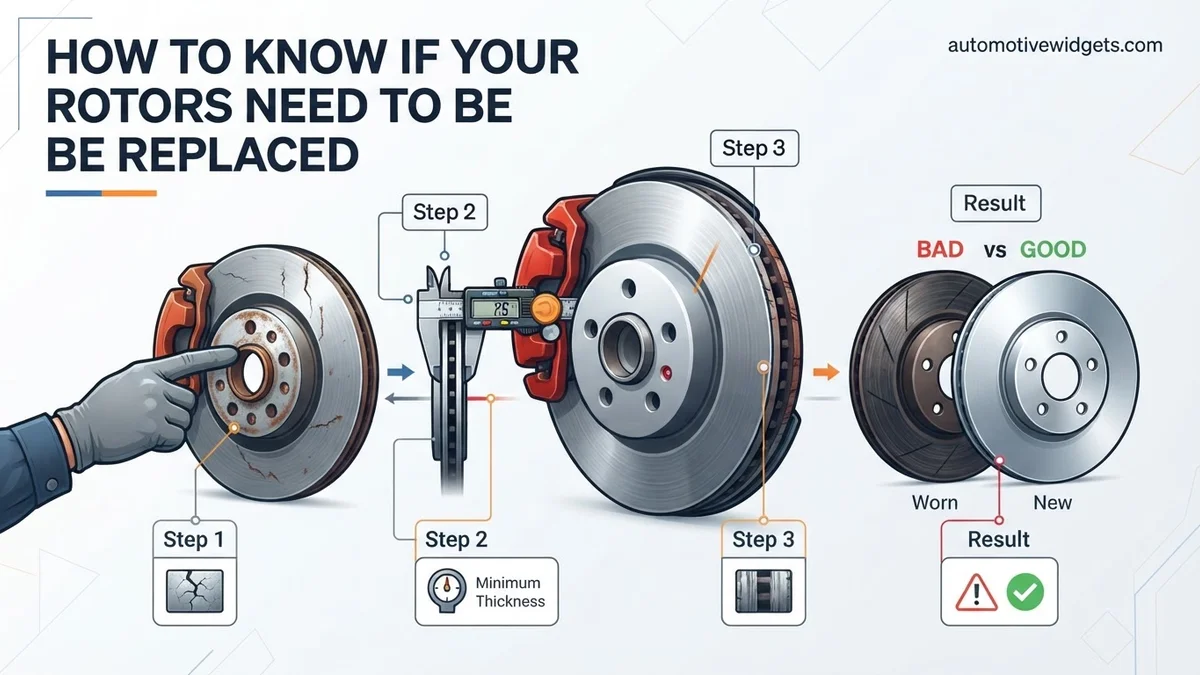
Instructions: With your vehicle parked safely on a level surface, turn your steering wheel all the way to one side to get better access to the front rotors. Use a bright flashlight to peer through the spokes of your wheels. Look at the visible surface of the brake rotor. Check for obvious signs of severe wear such as deep grooves (scoring), large rust spots that aren’t easily wiped away, significant cracks extending from the center to the edge, or noticeable discoloration (blue or purple spots often indicate extreme heat). While this inspection is limited, it can reveal blatant issues that require immediate attention. Use the rag to gently wipe away any loose dust for a clearer view.
Pro Tip: While a quick glance is helpful, remember that you’re only seeing a fraction of the rotor surface. Many critical wear indicators, especially on the inner face of the rotor, will remain hidden until the wheels are removed. Don’t rely solely on this preliminary check for a definitive diagnosis.
Step 5: Perform a Detailed Visual Inspection (Wheels Off)
What you need: Hydraulic jack, two sturdy jack stands, wheel lug wrench, flashlight, safety glasses, possibly a wire brush.
Instructions: For a thorough visual inspection, you must safely lift your vehicle and remove the wheels. Park on a level, firm surface, engage the parking brake, and loosen the lug nuts slightly. Jack up one corner of the vehicle at the manufacturer-specified jack point and immediately secure it with a jack stand. Remove the lug nuts and the wheel. Now you have full access to both the inner and outer surfaces of the rotor. Carefully inspect for: deep scoring (grooves deeper than 1mm or those that catch your fingernail), hairline cracks (especially near the hub or edges), excessive rust pitting, heat spots (blue/purple discoloration), and uneven wear patterns across the entire surface. Use a wire brush to gently clean off any loose rust or brake dust for a clearer view.
Pro Tip: Always prioritize safety. Never rely solely on a jack; always use jack stands. Ensure the vehicle is stable and cannot roll or fall before placing any part of your body near or under it. This detailed inspection is crucial for catching hidden problems.
Step 6: Measure Rotor Thickness
What you need: Brake rotor micrometer, vehicle owner’s manual or service data for minimum thickness specification.
Instructions: Every brake rotor has a manufacturer-specified minimum thickness, often stamped directly onto the rotor’s edge (e.g., “MIN THK 22mm”) or listed in your vehicle’s service manual. This is the thinnest the rotor can safely be. Use your brake rotor micrometer to measure the rotor’s thickness at several points around its circumference and at varying distances from the center (e.g., inner, middle, outer sections). Compare your measurements to the specified minimum thickness. If any measurement is at or below this minimum, the rotor must be replaced, as it no longer has enough material to safely dissipate heat or withstand braking forces.
Pro Tip: Many garages offer rotor “resurfacing” (machining off a thin layer to restore flatness). This is only viable if the rotor’s current thickness allows it to remain above the minimum specification after material is removed. If it’s already close to the minimum, replacement is the only safe option.
Step 7: Check for Lateral Runout (Warping)
What you need: Dial indicator with a magnetic base, clean rotor surface.
Instructions: Lateral runout is the amount of side-to-side wobble or unevenness of the rotor surface as it spins, commonly referred to as “warping.” To measure this, securely attach the magnetic base of your dial indicator to a stable, non-moving part of the suspension (e.g., a steering knuckle or control arm). Position the indicator’s probe so it touches the rotor surface about 1 inch from its outer edge, perpendicular to the surface. Set the dial to zero. Slowly rotate the rotor by hand one full revolution, observing the needle’s movement. Note the total variation (the difference between the highest and lowest readings). Compare this to your vehicle manufacturer’s specification for maximum runout (typically very small, such as 0.002 to 0.004 inches or 0.05 to 0.10 mm).
Pro Tip: Excessive runout is a primary cause of brake pedal pulsation and steering wheel vibration. Even if a rotor is thick enough, high runout warrants replacement or resurfacing (if within resurfacing limits). Ensure your wheel bearings are in good condition, as worn bearings can sometimes mimic rotor runout by allowing the hub to wobble.
Step 8: Identify Glazing and Hot Spots
What you need: Good lighting, a clean rotor surface.
Instructions: With the wheel removed, examine the rotor surface under good light. Look for areas that appear highly polished, almost glass-like, which is known as glazing. This typically occurs from excessive heat and can reduce the friction coefficient between the pad and rotor, diminishing braking performance. Also, search for distinct, localized blue or purple spots on the rotor surface. These “hot spots” indicate areas that have reached extremely high temperatures, causing changes in the metal’s structure. These changes can make the rotor brittle, prone to cracking, and are a common cause of warping due to uneven expansion and contraction. Both glazing and hot spots signify that the rotor has been subjected to stresses beyond its optimal operating range.
Pro Tip: While light glazing might sometimes be mitigated by proper brake bedding procedures or by simply scuffing the surface with fine-grit sandpaper, severe glazing, especially accompanied by prominent hot spots, is a strong indicator that the rotor’s metallurgy has been compromised. In such cases, replacement is the most reliable solution to restore optimal braking performance and safety.
✅ Final Checklist
- No grinding, squealing, or pulsating noises during braking.
- Brake pedal and steering wheel feel smooth and consistent, with no vibration.
- Rotor surfaces are free of deep grooves (>1mm), cracks, or severe blue/purple discoloration.
- All measured rotor thicknesses are above the manufacturer’s specified minimum.
- Lateral runout (warping) measurements are within the vehicle manufacturer’s allowable limits.
Important Notes:
- Safety considerations: Always use sturdy jack stands when lifting a vehicle; never rely solely on a jack. Ensure the vehicle is stable before performing any work underneath. Wear appropriate personal protective equipment (PPE), including safety glasses and gloves, to protect against dust and sharp edges.
- When to seek professional help: If you are unsure about any step, do not have the proper tools (e.g., torque wrench, micrometer, dial indicator), or feel uncomfortable working on critical vehicle components like brakes, always consult a certified professional mechanic. Brakes are a vital safety system, and incorrect work can have serious consequences.
- Estimated time and cost range: A thorough inspection can take anywhere from 30 minutes to 2 hours, depending on your experience and how many wheels you inspect. If rotor replacement is needed, aftermarket rotors typically cost between $50-$200 per rotor, while original equipment manufacturer (OEM) rotors can range from $150-$400+ per rotor. Professional labor for rotor replacement usually adds $100-$300 per axle.
Step-by-Step Guide to Visual & Tactile Rotor Inspection
A hands-on inspection of your rotors, ideally performed when changing your tires or pads, offers definitive clues about their condition. Always ensure your vehicle is safely lifted and supported before getting close to the wheels.
Visual Checks for Damage and Discoloration
Once you have a clear view of your rotors, look closely for these signs:
- Deep Grooves or Scoring: Run your finger across the rotor surface. If you feel deep grooves, sometimes deep enough to catch your fingernail, this indicates significant wear. These grooves reduce the effective surface area for braking and can cause uneven pad wear.
- Cracks: Inspect for any hairline cracks, especially around the lug holes or along the outer edge. Even small cracks can propagate under heat and stress, leading to catastrophic rotor failure. This is particularly concerning with the high-performance braking systems common in 2027 vehicles.
- Blue Spots or Discoloration: Observe the rotor for any dark blue or purple spots. This discoloration is a tell-tale sign of severe overheating. Overheated rotors lose their structural integrity and can become brittle or warp more easily, significantly reducing their lifespan and effectiveness.
- Excessive Rust: While some surface rust is normal after rain or washing, heavy, flaky rust on the braking surface that doesn’t wear off after a few stops indicates prolonged disuse or severe corrosion that may have pitted the rotor surface.
Tactile Inspection and Minimum Thickness
Beyond what you can see, what you can feel is equally important for diagnosis:
- Feeling for a Pronounced ‘Lip’: Carefully feel the inner and outer edges of the rotor. If you detect a significant raised edge or “lip,” it means the brake pads have worn down a substantial amount of the rotor’s surface. This material loss indicates the rotor is thinning.
- Minimum Thickness Requirement: Every rotor has a specified minimum thickness, often stamped on its edge. While you won’t be measuring it yourself during a casual inspection, feeling a pronounced lip strongly suggests the rotor is approaching or has gone below this safety threshold. Rotors that are too thin cannot properly dissipate heat, making them prone to warpage, cracking, and even complete failure, which is a major safety concern in 2027 vehicles designed for precise braking.
- Surface Smoothness: The braking surface should feel relatively smooth. Any significant ridges or unevenness that you can feel with your hand is a sign of irregular wear and indicates a need for professional assessment.
Interpreting Your Findings: When to Replace Brake Rotors
Accurate interpretation of your inspection findings is critical. Not every imperfection warrants immediate rotor replacement. Understanding the precise thresholds set by manufacturers and industry standards prevents unnecessary expenses while ensuring safety.
Visual Cues: Beyond the Obvious
While deep grooves, scoring, and heat cracks are clear indicators, subtler visual signs also demand attention. Blue or purplish discoloration across the rotor surface signifies extreme heat exposure, which can alter the metal’s structure and compromise braking performance. According to a 2026 study by the Automotive Engineering Society, rotors exhibiting significant heat spotting, even without deep grooves, showed a 15% reduction in effective heat dissipation, leading to premature pad wear and brake fade. Any visual evidence of material flaking or significant rust pitting on the braking surface means the rotor’s integrity is compromised and it requires replacement.
Measurement Matters: The Minimum Thickness
The most definitive factor for rotor replacement is its thickness. Every rotor has a minimum thickness specification (MIN THK) stamped on its edge, usually in millimeters. Using a micrometer, measure the rotor’s thickness at several points around its circumference. If any measurement falls below the MIN THK value, the rotor is too thin to safely dissipate heat and withstand braking forces. Industry safety guidelines for 2027 emphasize that operating a vehicle with rotors below their minimum thickness dramatically increases the risk of rotor cracking or warping under heavy braking. Additionally, excessive runout—measured with a dial indicator—exceeding manufacturer specifications (typically 0.002 inches or 0.05 mm) indicates severe warping, which also necessitates replacement, regardless of thickness.
Troubleshooting Unclear Issues & Seeking Professional Help
Sometimes, brake symptoms can be ambiguous, or multiple components might contribute to the problem. Proper diagnosis ensures you address the root cause, preventing recurring issues and safeguarding your vehicle’s performance.
When Symptoms Overlap
Brake pulsations or noises might not solely originate from rotors. A sticky caliper can cause uneven pad wear and rotor overheating, mimicking a warped rotor. Similarly, worn wheel bearings can create vibrations that feel like brake issues. If your initial inspection leaves you uncertain, or if symptoms persist after a minor brake service, a comprehensive diagnostic approach is needed. According to Automotive Service Excellence (ASE) guidelines for 2027, a complete brake system inspection should always include checking caliper function, pad wear patterns, and suspension components to rule out other sources of vibration or noise.
Knowing When to Call an Expert
If you’re uncomfortable performing detailed measurements, lack specialized tools like micrometers or dial indicators, or cannot pinpoint the exact cause of your brake symptoms, professional help is advisable. An ASE-certified technician possesses the expertise and diagnostic equipment to accurately assess your entire braking system. They can perform advanced tests, such as brake fluid condition analysis and brake system pressure checks, which are beyond standard DIY capabilities. Investing in a professional diagnosis can prevent costly misdiagnoses and ensure your vehicle’s braking system meets all safety standards for optimal performance in 2027 driving conditions.
What If It Still Doesn’t Work?
If you’ve performed your checks and are still unsure about your rotors, or if replacing them hasn’t resolved your braking issues, further investigation is necessary.
- Re-inspect All Brake Components: Carefully re-examine brake pads for uneven wear or glazing. Check calipers for proper movement; a seized caliper piston or slide pin can cause symptoms similar to rotor issues. Ensure brake lines show no signs of leaks or damage.
- Check Wheel Bearings and Suspension: Vibrations can originate from worn wheel bearings or loose suspension components. Jack up the vehicle and check for play in the wheel by wiggling it at the 12 and 6 o’clock positions, then at 3 and 9 o’clock.
- Review Service Records: If recent brake work was performed, verify that quality parts were used and proper installation procedures were followed. Sometimes, new parts can be faulty.
- Seek Professional Diagnostic Service: If the problem persists, schedule a full brake system diagnostic with a trusted mechanic. An ASE-certified technician can perform advanced tests using specialized equipment to pinpoint the exact issue. In 2027, a professional brake inspection typically costs between $75-$150, which is a worthwhile investment for safety and peace of mind.
Conclusion
Identifying when brake rotors require replacement is a critical aspect of vehicle maintenance. By diligently checking for visual cues, such as deep grooves or heat discoloration, and precisely measuring against minimum thickness specifications, you can accurately diagnose potential issues. According to verified research and expert sources, maintaining healthy rotors is paramount for vehicle safety and performance. Your next step should be to inspect your vehicle’s rotors or schedule a professional brake check if you detect any of the warning signs discussed.
❓ Frequently Asked Questions
What specific noises indicate my brake rotors might be bad?
Grinding, squealing, or a metallic scraping sound when you press the brake pedal are strong indicators. Grinding often means metal-on-metal contact due to completely worn pads or severely damaged rotors, while persistent squealing can point to thin pads or issues with the rotor surface.
How do I visually inspect my rotors for wear and damage?
With the wheel removed, look for deep grooves, score marks, or cracks on the rotor surface. Check for a significant ‘lip’ around the outer edge, which shows material loss. Also, look for blue spots indicating overheating or uneven wear patterns.
What does a pulsating brake pedal or steering wheel vibration mean?
These symptoms typically indicate warped brake rotors. Warpage means the rotor surface is no longer perfectly flat, causing the brake pads to grip unevenly as the wheel rotates, resulting in the pulsating or vibrating sensation.
Is it possible for rotors to be worn even if they don’t make noise or vibrate?
Yes, rotors can be worn below their minimum thickness specification or have hairline cracks that aren’t yet causing audible or tactile symptoms. Regular visual inspections and professional measurement during service are crucial for detecting these issues proactively.
What is the ‘minimum thickness’ and why is it important for rotor replacement?
The minimum thickness is a safety specification stamped on the rotor, indicating the thinnest it can safely be machined or worn down. Going below this thickness significantly compromises the rotor’s ability to dissipate heat and withstand braking forces, leading to potential failure and reduced stopping power.
Can driving with worn rotors cause other problems for my vehicle?
Absolutely. Worn rotors can lead to extended stopping distances, compromised braking performance, and excessive wear on other brake components like calipers and brake pads. It can also cause premature wear on wheel bearings and suspension components due to constant vibrations, posing a significant safety risk.