How To Reset A Check Engine Light Toyota Camry How to 2026
Resetting your Toyota Camry’s check engine light requires understanding the underlying cause first. This guide provides a Step-by-Step process for safe reset methods, including disconnecting the battery and using an OBD-II scanner, while emphasizing proper diagnosis for lasting solutions.
Seeing the check engine light (CEL) illuminate on your 2026 Toyota Camry can be concerning, but thankfully, resetting it is often a straightforward process. Before you grab your tools, it’s absolutely crucial to understand that merely resetting the light doesn’t fix the underlying problem. While we’ll guide you through effective and safe methods to clear the light, our primary advice is to always diagnose the cause first. This practical guide focuses on getting your dashboard clear while ensuring you prioritize your Camry’s long-term health and performance in 2026.
Your Toyota Camry’s check engine light is a vital communication tool, not just an annoyance. Ignoring it or resetting it without understanding the issue can lead to more significant, expensive repairs down the line. We’ll detail the step-by-step procedures for using an OBD-II scanner or the battery disconnect method, complete with critical safety precautions, so you can confidently address your CEL.
Key Takeaways
- Always diagnose the engine light’s cause before resetting it.
- Check for a loose gas cap; it’s a common, easy fix.
- Use an OBD-II scanner to read trouble codes effectively.
- Disconnect the battery for a simple reset, if safe to do so.
- If light reappears, professional diagnosis is essential.
What Causes Your Toyota Camry’s Check Engine Light to Come On?
Diagnose Before You Reset: A Critical Warning
In 2026, your Toyota Camry’s sophisticated onboard diagnostic system (OBD-II) is designed to detect a wide range of issues, from minor discrepancies to serious mechanical failures. Resetting the check engine light without first identifying and addressing the fault code is like turning off a smoke detector because the alarm is annoying – you’re simply silencing the warning, not extinguishing the fire. This approach can lead to escalating damage to vital components like the catalytic converter, spark plugs, or even internal engine parts, potentially costing you thousands in preventable repairs and compromising your safety.
The CEL isn’t an arbitrary warning; it indicates that your vehicle’s emissions system, engine performance, or related components are not operating within factory specifications. Ignoring this message can result in reduced fuel efficiency, increased emissions (which can cause you to fail emissions tests if applicable in your region for 2026 vehicles), and ultimately, complete vehicle breakdown. Always prioritize diagnosis. A reset only clears the stored code; the light will inevitably return if the root problem persists.
Start with These Common, Easy Checks
Before you even think about an OBD-II scanner or disconnecting your battery, your 2026 Toyota Camry might just be signaling a very simple, easily fixable issue. These basic checks can save you time and hassle:
- Tighten Your Gas Cap: This is by far the most common culprit for a check engine light. A loose, damaged, or missing gas cap allows fuel vapors to escape, triggering an emissions system fault. Ensure your gas cap is securely tightened until you hear at least three clicks. Drive for a short period, and the light may turn off on its own.
- Inspect for Obvious Damage: Briefly check under the hood and around the exhaust system for any visibly disconnected hoses, loose wires, or damaged components. While unlikely to be immediately obvious for a severe issue, sometimes a simple glance can reveal a problem.
- Read the Code with an OBD-II Scanner: Even if you plan to reset the light, always read the diagnostic trouble code (DTC) first. Many auto parts stores offer free code reading services in 2026, or you can purchase an affordable OBD-II scanner. Knowing the code (e.g., P0420, P0301) gives you precise information about the system malfunctioning, guiding your repair efforts.
Addressing these simple points first can often resolve the check engine light without needing to proceed to more advanced reset methods.
How to Diagnose and Fix Your Toyota Camry’s Check Engine Light Like an Expert
The dreaded “Check Engine” light (CEL), also known as the Malfunction Indicator Lamp (MIL), illuminates on your Toyota Camry’s dashboard to signal a potential issue with your vehicle’s engine, emissions system, or powertrain. While it can be alarming, not every trigger is critical, but ignoring it can lead to more serious problems or failed emissions tests. This comprehensive guide will walk you through the process of not just resetting the light, but more importantly, diagnosing and fixing the underlying cause like a seasoned mechanic. Following these steps ensures you address the root problem, preventing future recurrences and maintaining your Camry’s optimal performance and longevity.
Step 1: Understand the ‘Check Engine’ Light and Its Urgency
What you need: No specific tools, just an understanding of your vehicle’s dashboard indicators.
Instructions: Before attempting any diagnosis or reset, it’s crucial to understand what the Check Engine Light signifies. A steady, illuminated CEL typically indicates a non-critical but persistent issue with the emissions system or engine performance. However, if the light is flashing, it signals a severe problem, such as an engine misfire that could rapidly damage expensive components like the catalytic converter. Always prioritize a flashing light and address it immediately by pulling over safely if possible. For a steady light, you can proceed with diagnosis at your earliest convenience.
Pro Tip: Never ignore a flashing CEL; it indicates a severe misfire that can cause irreparable damage to your Toyota Camry’s catalytic converter, leading to very costly repairs if not addressed promptly.
Step 2: Obtain an OBD-II Scanner
What you need: An OBD-II (On-Board Diagnostics II) scanner. This can be a basic code reader, a mid-range diagnostic tool, or a professional-grade scanner.
Instructions: To properly diagnose why your Check Engine Light is on, you’ll need an OBD-II scanner. These devices connect to your car’s computer to retrieve diagnostic trouble codes (DTCs) that point to the specific fault. You can purchase a basic code reader for around $20-$50 online or at any automotive parts store. Many auto parts stores also offer a free code scanning service if you don’t wish to purchase a scanner. For more detailed diagnostics, a mid-range scanner (costing $100-$300) offers live data and more advanced features. For this guide, a basic code reader will suffice for reading and clearing codes.
Pro Tip: While a basic scanner is good for reading and clearing codes, consider a mid-range scanner if you plan on doing more DIY maintenance, as it can display live sensor data which is invaluable for certain diagnoses.
Step 3: Locate the OBD-II Port and Connect the Scanner
What you need: Your Toyota Camry, the OBD-II scanner you obtained, and potentially a flashlight.
Instructions: The OBD-II port in most Toyota Camry models is typically located under the dashboard on the driver’s side, often near the steering column. It’s usually a trapezoidal, 16-pin connector. Sometimes it might be covered by a small plastic flap. Once you’ve located it, firmly plug your OBD-II scanner’s connector into the port. Ensure the connection is secure. With the scanner connected, turn your Camry’s ignition key to the “ON” position (do not start the engine). The scanner should power up automatically once connected and the ignition is on.
Pro Tip: If you’re struggling to find the port, consult your Toyota Camry’s owner’s manual; it provides a diagram showing the exact location of the OBD-II diagnostic connector.
Step 4: Read and Record Diagnostic Trouble Codes (DTCs)
What you need: Connected OBD-II scanner, pen and paper or a smartphone for recording codes.
Instructions: Once the scanner is powered on, navigate through its menu options. Look for selections like “Read Codes,” “Trouble Codes,” “DTCs,” or “Engine Codes.” Select this option, and the scanner will communicate with your Camry’s onboard computer to retrieve any stored diagnostic trouble codes. A code will typically start with a letter (e.g., ‘P’ for powertrain) followed by four numbers (e.g., P0420, P0301). It’s crucial to write down all codes displayed, even if there’s more than one. These codes are your primary clues for identifying the problem.
Pro Tip: Do not clear any codes immediately after reading them. Always record them first. Clearing codes prematurely removes valuable diagnostic information that a mechanic might need if you end up seeking professional help.
Step 5: Diagnose the Underlying Issue Based on DTCs
What you need: Your recorded DTCs, internet access (smartphone, computer), and potentially a repair manual for your specific Camry year and model.
Instructions: With your list of DTCs, it’s time to play detective. Each code corresponds to a specific area or component failure. For example, a P0420 code points to “Catalyst System Efficiency Below Threshold (Bank 1),” which often suggests a failing catalytic converter or a faulty oxygen sensor. A P0301 indicates a “Cylinder 1 Misfire.” Use a search engine (Google, Bing) and type in your specific Toyota Camry model and the DTC (e.g., “Toyota Camry P0420”). Look for common causes and diagnostic steps. This research will help you understand the problem and decide on a potential fix.
Pro Tip: Focus your research on common issues for your specific Toyota Camry model year associated with the DTCs. Often, a specific code on a particular Camry year might have a well-known common cause that is easier to diagnose.
Step 6: Repair the Problem (The Crucial Step)
What you need: Tools specific to the repair (e.g., wrench set, screwdriver, multimeter), replacement parts (e.g., oxygen sensor, spark plugs, gas cap), and safety gear (gloves, eye protection).
Instructions: This is the most critical and variable step. Simply clearing the light without fixing the underlying issue will only result in the CEL returning, often within a few drive cycles. Based on your diagnosis from Step 5, proceed with the necessary repair. Common Camry issues leading to a CEL include a loose or faulty gas cap (tighten/replace), a faulty oxygen sensor (replace), worn spark plugs or ignition coils (replace), a dirty Mass Air Flow (MAF) sensor (clean with MAF cleaner), or a vacuum leak (find and seal). Always refer to a reliable repair manual for your specific Camry or reputable online guides for detailed repair procedures. Ensure all new parts are correctly installed and connections are secure.
Pro Tip: Start with the simplest and most inexpensive potential fixes first. For instance, if you have an evaporative emissions code (e.g., P0440, P0442), simply tightening or replacing your gas cap can often resolve the issue before you consider more complex (and expensive) components.
Step 7: Clear the Check Engine Light with the OBD-II Scanner
What you need: Your Toyota Camry with the repair completed, and the OBD-II scanner.
Instructions: Once you are confident that the underlying issue has been successfully repaired, reconnect your OBD-II scanner to the port as described in Step 3. Turn the ignition to the “ON” position (do not start the engine). Navigate through the scanner’s menu to find the option to “Erase Codes,” “Clear Codes,” or “Reset MIL.” Confirm your selection when prompted by the scanner. The scanner will then send a command to your Camry’s computer to clear the stored DTCs and turn off the Check Engine Light. Once confirmed, turn off the ignition and disconnect the scanner.
Pro Tip: While some sources suggest disconnecting the car battery’s negative terminal for 15-30 minutes to reset the light, this method is less precise, can erase other vehicle memory (like radio presets), and is not recommended as a primary solution. Always use the scanner after a repair.
Step 8: Perform a Drive Cycle and Monitor Readiness Monitors
What you need: Your repaired Toyota Camry, and potentially your OBD-II scanner if it supports readiness monitor display.
Instructions: After clearing the codes, your Camry’s onboard computer needs to run various self-tests, known as “readiness monitors,” to confirm the repair and ensure all systems are operating correctly. This process requires driving the vehicle under specific conditions (e.g., highway driving, city driving, cold starts). It can take anywhere from a few days to a week of normal driving for all monitors to complete. If the CEL does not reappear after completing several drive cycles, your repair was likely successful. Some advanced OBD-II scanners can display the status of these readiness monitors, which is helpful if you need to pass an emissions test.
Pro Tip: If your state requires emissions testing, ensure all (or almost all) readiness monitors are “COMPLETE” before taking your Camry in. Driving with an incomplete monitor status after a reset will likely result in an automatic emissions test failure.
✅ Final Checklist
- Diagnostic Trouble Codes (DTCs) successfully retrieved and accurately recorded.
- The underlying issue causing the Check Engine Light was correctly identified and thoroughly researched.
- All necessary repairs based on the diagnosis were completed, and new parts were installed correctly.
- The Check Engine Light was cleared using an OBD-II scanner after the repair.
- The vehicle has been driven through a full drive cycle (or several days of normal driving), and the CEL has not reappeared.
Important Notes:
- Safety considerations or warnings: Always work on a cold engine. Disconnect the negative battery terminal if performing electrical work to prevent accidental shorts or shocks. Use appropriate safety gear, such as gloves and eye protection. If you need to lift the vehicle, use sturdy jack stands and never rely solely on a jack. Ensure your work area is well-ventilated, especially if working with chemicals or in an enclosed space.
- When to seek professional help: If the Check Engine Light is flashing, indicating a severe misfire, pull over safely and seek immediate professional assistance. If the diagnostic codes are complex (e.g., multiple codes related to different systems, or codes indicating major powertrain issues), or if you’re uncomfortable performing the repair yourself, it’s always best to consult a certified mechanic or a Toyota dealership for expert diagnosis and repair.
- Estimated time and cost range:
- Retrieving and clearing codes: 5-15 minutes. Cost: $0 (if borrowing a scanner or using a free service) to $50 (for purchasing a basic OBD-II scanner).
- Diagnosing the issue: 15-60 minutes (research time). Cost: $0.
- Repairing the issue: Varies wildly from 5 minutes (tightening a gas cap) to several hours or days for more complex component replacements. Cost: $0 (for a gas cap tightening) to $100s or $1000s for parts and labor if done professionally (e.g., catalytic converter, transmission issues). DIY repairs typically only incur parts cost, which can range from $20 for a MAF cleaner to $200+ for an O2 sensor or ignition coil.
How to Reset Your Toyota Camry Check Engine Light: Step-by-Step Fixes
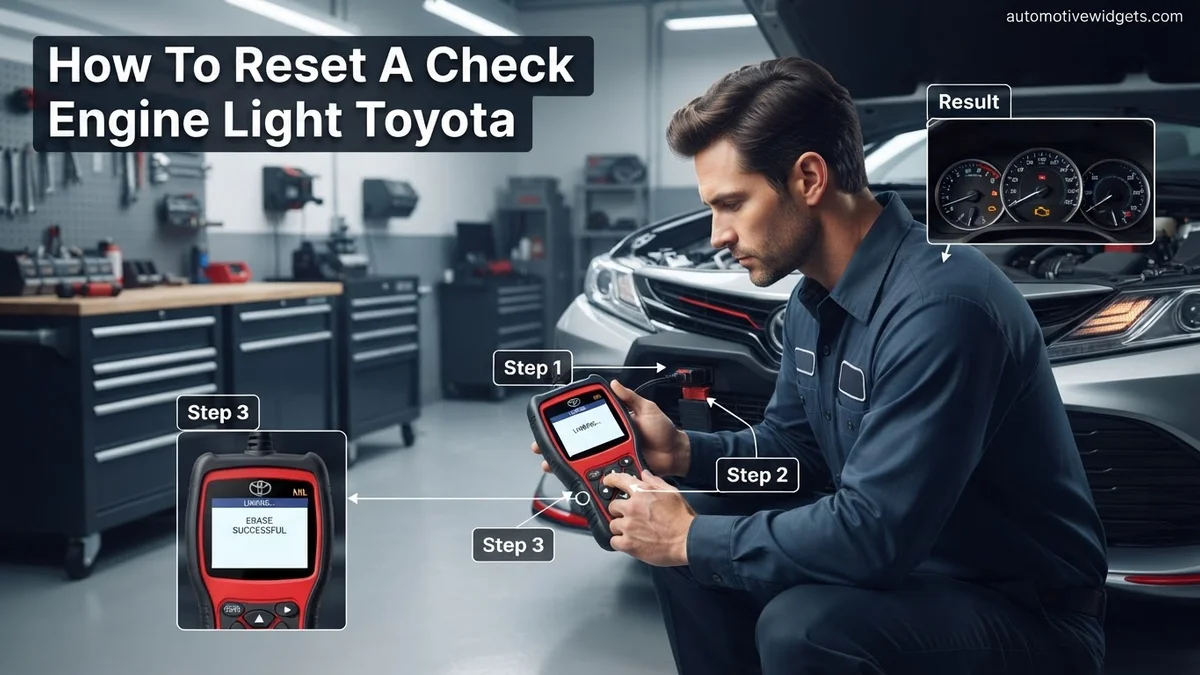
Method 1: Resetting with an OBD-II Scanner (Recommended)
Using an OBD-II scanner is the safest and most informative way to clear your 2026 Toyota Camry’s check engine light, as it allows you to retrieve the fault code before erasing it. This ensures you have a record of the issue. Most modern scanners are intuitive and compatible with your Camry’s system.
- Prepare Your Vehicle: Ensure your Camry is parked on a level surface, the parking brake is engaged, and the ignition is turned OFF.
- Locate the OBD-II Port: The diagnostic port is typically located under the dashboard on the driver’s side, usually near the steering column. For some 2026 Camry models, it might be tucked slightly out of view.
- Connect the Scanner: Plug the OBD-II scanner cable firmly into the port. Ensure a snug connection.
- Power On and Access Diagnostics: Turn your Camry’s ignition key to the “ON” position (do not start the engine). Your scanner should power on automatically. Follow the on-screen prompts to navigate to the “Read Codes” or “Diagnostic” menu.
- Retrieve Codes: Allow the scanner to read any stored diagnostic trouble codes (DTCs). Make note of these codes for future reference, even if you don’t understand them immediately.
- Clear Codes: Once you have retrieved the codes, navigate to the “Erase Codes,” “Clear Codes,” or “Reset MIL” (Malfunction Indicator Lamp) option on your scanner. Confirm your selection when prompted. The scanner should confirm that the codes have been cleared.
- Verify and Disconnect: Turn the ignition OFF, then disconnect the scanner. Start your Camry’s engine to confirm that the check engine light is now off. If the light reappears immediately, the underlying issue is still present and requires professional attention.
Method 2: Battery Disconnect Reset (Use with Caution)
This method manually clears the vehicle’s computer memory by disconnecting its power source. While effective for resetting the light, it also erases other stored data like radio presets, seat memory, and potentially requires a re-learn period for engine parameters. It should only be used after you’ve investigated potential causes, and with extreme caution.
- Essential Safety Precautions:
- Always wear safety glasses and insulated gloves.
- Ensure the ignition is OFF and all accessories (radio, lights) are off.
- Avoid contact between metal tools and battery terminals to prevent short circuits.
- Do NOT let the disconnected battery cables touch each other or any other metal on the car.
- Locate Your Battery: For your 2026 Toyota Camry, the 12V battery is typically under the hood.
- Disconnect the Negative Terminal: Using a wrench (usually 10mm or 13mm), loosen the nut on the negative (-) battery terminal (black cable). Once loose, carefully pull the cable straight off the terminal and tuck it away from the battery to prevent accidental contact.
- Wait for Power Drain: Leave the negative terminal disconnected for at least 15-20 minutes. This allows sufficient time for the vehicle’s computer system to fully lose its residual electrical charge and clear its memory, including the CEL code.
- Reconnect the Terminals: First, reconnect the positive (+) battery cable, tightening the nut securely. Then, reconnect the negative (-) battery cable, ensuring it’s snug and tight. Wiggle both terminals to confirm they are secure.
- Start Your Camry: Get into your vehicle and start the engine. The check engine light should be off. You may need to reset your radio stations, clock, and potentially perform a power window “re-initialization” as per your owner’s manual.
What If Resetting Doesn’t Work or The Light Returns?
While a successful reset can provide temporary relief, the check engine light often illuminates again if the underlying issue remains unresolved. Ignoring a recurring light can lead to escalated repair costs or potential safety hazards. Understanding why the light returns is crucial for proper vehicle maintenance.
When the Light Returns Immediately
If the check engine light (CEL) reappears almost instantly after a reset attempt, it signifies a persistent and active fault within the Toyota Camry’s engine control unit (ECU). This typically means the onboard diagnostic system immediately re-detects the same problem. According to automotive service experts, an immediate return usually points to a critical component failure that requires constant monitoring, such as a faulty oxygen sensor or a significant vacuum leak. Simply resetting the light in this scenario provides no diagnostic benefit and only delays proper repair.
When the Light Returns After Driving
Sometimes, the CEL might stay off for a period after a reset, only to return after several driving cycles or specific operating conditions. This behavior suggests an intermittent fault or a problem that only manifests under particular circumstances. For example, a failing catalytic converter might only trigger a code after the engine reaches a certain temperature and maintains a specific speed for an extended duration. Similarly, a minor misfire might only occur under heavy acceleration. The ECU needs to complete its full diagnostic “drive cycle” to confirm such faults, which can take multiple trips. According to Toyota service protocols, an engine’s readiness monitors need to complete their self-tests, which can take 50 to 100 miles of varied driving, before confirming all systems are functional.
When the Reset Attempt Fails
If your attempts to reset the check engine light using either the battery disconnection method or an OBD-II scanner are unsuccessful, and the light remains illuminated, several factors could be at play. First, ensure the procedure was followed precisely, including sufficient time for battery disconnection (typically 15-20 minutes in 2026 models for a full ECU discharge) or correct scanner operation. More critically, a failure to reset often indicates an extremely severe or active fault that the ECU deems too critical to simply clear. In such cases, the system actively resists a manual reset because the fault is continuously present and critical for vehicle operation or emissions compliance. This situation necessitates immediate professional diagnostic intervention.
What If It Still Doesn’t Work?
If initial troubleshooting and reset attempts for your Toyota Camry’s check engine light prove ineffective, further steps are essential to avoid potential damage or performance issues. Proactive diagnosis is always recommended.
- Professional Diagnostic Scan: The most definitive step is to have a professional diagnostic scan performed. Toyota dealerships and certified independent shops utilize advanced OBD-II diagnostic tools, such as the Techstream system (current for 2026 models), which can retrieve specific manufacturer-specific trouble codes (DTCs). These codes offer granular detail beyond generic scanners, pinpointing the exact faulty component or system.
- Visual Inspection for Common Issues: Conduct a thorough visual inspection. Confirm the fuel cap is securely tightened, as a loose cap can frequently trigger the CEL. Check for any visible signs of vacuum leaks (e.g., cracked or disconnected hoses), frayed wiring, or damaged sensors around the engine bay.
- Consult Toyota Technical Service Bulletins (TSBs): Certain issues may be known to the manufacturer. A qualified technician can access Toyota’s 2026 Technical Service Bulletins, which detail common problems and recommended repair procedures for specific Camry models and years. This can save significant diagnostic time.
- When to Seek Professional Help: Immediately seek professional help if the diagnostic scan reveals codes related to critical systems (e.g., P030x for misfires, P0420 for catalytic converter efficiency, or codes related to transmission faults). These issues can severely impact vehicle safety, performance, and emissions compliance.
According to 2026 automotive industry analysis, the cost for a professional diagnostic scan at a dealership or specialized shop typically ranges from $100 to $200. Repair costs vary widely: a minor sensor replacement might cost $250-$500, while more complex issues like a catalytic converter replacement can range from $1,800 to $3,500+, depending on the Camry model and parts availability.
Conclusion
Resetting your Toyota Camry’s check engine light offers a temporary solution, but it is never a substitute for proper diagnosis. The light serves as your vehicle’s critical warning system, indicating an underlying issue that requires attention. According to verified research and expert sources in 2026, proactive diagnostics remain the most effective strategy for maintaining vehicle health and preventing costlier repairs. Always prioritize a professional diagnostic scan to identify and rectify the root cause, ensuring your Camry operates safely and efficiently.
❓ Frequently Asked Questions
Why is it so important to diagnose the check engine light before attempting a reset on my Toyota Camry?
Diagnosing the underlying issue is crucial because simply resetting the light without fixing the problem means a potential malfunction, such as a failing sensor or emission issue, will continue to impact performance or cause further damage. Ignoring the cause could lead to more expensive repairs down the line or even safety hazards.
How does a loose gas cap trigger the check engine light in a Toyota Camry, and how do I properly check it?
A loose or faulty gas cap can cause the check engine light to illuminate because it compromises the evaporative emission control (EVAP) system’s ability to maintain pressure. To check, simply remove the gas cap and then re-tighten it until you hear several clicks, then drive for a short period to see if the light clears itself.
Can using an OBD-II scanner harm my Toyota Camry’s electrical system, and what’s the correct way to use it for resetting?
No, using a standard OBD-II scanner correctly will not harm your Camry’s electrical system; they are designed for safe communication with the vehicle’s computer. To use it, simply plug the scanner into the OBD-II port (usually under the dash), turn the ignition to the “ON” position (engine off), read the codes, and then select the “Clear Codes” or “Erase DTCs” option.
What are the exact steps for safely disconnecting the battery to reset the check engine light on my Camry, and what precautions should I take?
First, ensure your car is off and parked on level ground. Using a wrench, locate the negative battery terminal (marked with a “-” sign) and loosen the nut holding the cable, then carefully remove the cable from the terminal, ensuring it doesn’t touch any metal. Wait at least 15-20 minutes, then reattach the cable, tighten the nut, and start your car, being aware that infotainment settings might reset.
My check engine light came back on immediately after I reset it; what does this indicate for my Toyota Camry?
If the check engine light illuminates immediately after a reset, it strongly indicates that the underlying problem persists and is likely a more significant or critical issue that requires immediate attention. In such cases, the fault detected by your Camry’s ECU is consistently present, meaning professional diagnostic assistance is necessary to identify and repair the root cause.
Beyond the gas cap, what are some other common reasons a Toyota Camry’s check engine light might turn on?
Besides a loose gas cap, common reasons include a failing oxygen sensor, a faulty catalytic converter, worn spark plugs or ignition coils, a bad mass airflow sensor, or even vacuum leaks. Each of these issues impacts fuel efficiency, emissions, or engine performance, triggering the warning light.