How to Protect Leather Car Seats from Cracking 2026
Cracked leather car seats can significantly diminish your car’s interior value. Preventing cracks requires a proactive approach, focusing on regular cleaning, conditioning, and protection from environmental damage. This guide provides actionable steps to keep your leather supple and durable for years to come.
Protecting your car’s leather seats from cracking by 2026 doesn’t require a magic formula, but rather consistent, informed care. The good news is that with the right approach to cleaning and conditioning, coupled with smart environmental protection, you can significantly extend the life and luxurious feel of your upholstery. This proactive maintenance not only preserves your car’s aesthetic appeal but also its resale value, preventing the costly repairs that cracked leather inevitably demands.
Your investment in a vehicle with leather interiors deserves careful attention. Understanding the enemies of supple leather – primarily harsh environmental factors and neglect – is the first step. By adopting a routine that combats these issues directly, you’ll ensure your seats remain soft, flexible, and crack-free for years to come, maintaining that premium look and feel.
Key Takeaways
- Clean leather regularly with pH-neutral products.
- Condition seats every 1-3 months for suppleness.
- Apply UV protection to prevent sun damage.
- Park in shade or use sunshades diligently.
- Avoid harsh chemicals and improper cleaning tools.
What Causes Leather Car Seats to Crack?
The Triple Threat: UV, Heat, and Dehydration
The primary culprits behind cracked leather car seats are environmental stressors that strip away moisture and compromise the material’s structural integrity. Firstly, Ultraviolet (UV) radiation from the sun acts like a slow, destructive bleach. It breaks down the dyes and protective coatings on the leather, making it brittle and susceptible to cracking. Think of it like sunburn for your seats.
Secondly, extreme heat, especially in direct sunlight, causes leather to dry out rapidly. The constant expansion and contraction of the material due to temperature fluctuations, combined with moisture loss, accelerates the stiffening process. Lastly, simple dehydration from lack of regular conditioning allows the leather’s natural oils to evaporate. Once these oils are gone, the leather loses its elasticity, becoming rigid and prone to tearing when subjected to everyday use or movement.
- UV Damage: Fades color, breaks down protective layers, causes brittleness.
- Heat Exposure: Dries out natural oils, leads to stiffening and shrinking.
- Dehydration: Loss of elasticity, making the leather fragile and crack-prone.
Proactive Strategies for Environmental Protection
Combating these environmental factors requires consistent proactive measures. Simply parking your car in the shade whenever possible is your first line of defense. If shade isn’t an option, a high-quality, reflective windshield sunshade is essential for blocking direct UV rays and reducing interior temperatures. For side windows, consider professional window tinting in 2026; modern ceramic tints block over 99% of UV radiation and significantly reduce heat transfer without affecting visibility.
For vehicles frequently parked outdoors or in harsh climates, breathable seat covers can offer an additional layer of protection during prolonged exposure, especially when the car is unoccupied. Remember, an ounce of prevention in sun and heat exposure is worth a pound of cure for your leather.
- Parking: Prioritize shaded spots.
- Sunshades: Use a reflective windshield sunshade diligently.
- Window Tinting: Invest in quality ceramic window tints to block UV and heat.
- Seat Covers: Employ breathable covers for long-term outdoor parking.
Master Leather Car Seat Protection in 7 Simple Steps
Your car’s leather seats are a significant investment, offering luxury and comfort. However, without proper care, they can quickly deteriorate, leading to unsightly cracks, fading, and a reduction in your vehicle’s aesthetic appeal and resale value. This comprehensive guide will walk you through a detailed, step-by-step process to effectively clean, condition, and protect your leather car seats, ensuring they remain supple, vibrant, and crack-free for years to come. By following these practical instructions, you’ll safeguard your leather and maintain that ‘new car’ feel.
Step 1: Thorough Initial Vacuuming & Surface Wipe
What you need: A good quality car vacuum with brush attachments, several clean, soft microfiber towels, and a dedicated interior detailer or a very mild, pH-neutral all-purpose cleaner diluted 1:20 with water.
Instructions: Begin by thoroughly vacuuming all seat surfaces, crevices, and stitching lines to remove loose dirt, dust, crumbs, and debris. Use a soft brush attachment to dislodge stubborn particles without scratching the leather. Once vacuumed, lightly mist a microfiber towel with your mild cleaner (or interior detailer) and gently wipe down the entire leather surface. This removes superficial grime and prepares the seats for a deeper clean, ensuring you don’t rub abrasive particles into the leather during the next stage.
Pro Tip: Always spray the cleaner onto the microfiber towel, not directly onto the leather. This prevents oversaturation, which can lead to staining or moisture damage, especially in perforated areas. Ensure your vacuum attachments are clean to avoid transferring dirt.
Step 2: Deep Cleaning with a Dedicated Leather Cleaner
What you need: High-quality, pH-neutral automotive leather cleaner, a soft-bristle leather brush (e.g., horsehair brush), and several clean, dry microfiber towels.
Instructions: Working on one section at a time (e.g., one seat base, then one backrest section), lightly mist the leather cleaner directly onto the leather surface. Don’t oversaturate. Immediately use your soft-bristle brush to gently agitate the cleaner in small, circular motions. You’ll often see the cleaner foam slightly as it lifts dirt from the leather’s pores. After agitating for about 30-60 seconds, use a clean, damp microfiber towel to wipe away the cleaner and lifted dirt. Follow immediately with a dry microfiber towel to buff the area dry. Repeat this process for all leather surfaces.
Pro Tip: Always perform a patch test on an inconspicuous area (like under the seat or a hidden seam) before applying any new cleaner to the entire seat. This ensures there’s no adverse reaction, discoloration, or damage to your specific leather type. Never let the cleaner dry on the leather surface.
Step 3: Nourishing and Conditioning the Leather
What you need: A high-quality automotive leather conditioner (look for products containing lanolin, natural oils, or polymers designed for leather), and several clean, soft microfiber applicators or towels.
Instructions: After the seats are thoroughly clean and dry from Step 2, dispense a small, pea-sized amount of leather conditioner onto a clean microfiber applicator pad or a folded microfiber towel. Gently massage the conditioner into the leather in small, even sections, using circular or back-and-forth motions. Ensure even coverage, paying extra attention to areas that experience more wear or sun exposure, such as bolsters and seat bottoms. Allow the conditioner to penetrate for 10-15 minutes (or as directed by the product label), then gently buff off any excess with a separate, clean, dry microfiber towel, leaving a natural, non-greasy finish.
Pro Tip: Less is often more with conditioner. Applying too much can leave a sticky residue that attracts dirt. Aim for a thin, even coat. Conditioning every 1-3 months, depending on climate and usage, is ideal to keep the leather supple and prevent dryness, which is the primary cause of cracking.
Step 4: Applying UV Protection and Sealant
What you need: A dedicated automotive leather sealant with UV inhibitors, or a leather conditioner that explicitly states UV protection properties, and a clean microfiber applicator pad.
Instructions: Once the conditioner has fully absorbed and been buffed dry, apply a leather sealant or a UV-protectant product. Similar to the conditioner, apply a small amount to a clean microfiber applicator and spread it evenly over the leather surface. This layer acts as a sacrificial barrier against harmful UV rays, which cause fading, drying, and cracking, and also helps repel spills and dirt. Some products combine conditioning and UV protection; if so, Step 3 would cover this. Allow it to cure as per product instructions, typically 20-30 minutes, then light buff to ensure no residue.
Pro Tip: Parking in shaded areas or using a reflective sunshade for your windshield and side windows significantly reduces direct UV exposure to your leather, extending the life of your UV protection layer. Reapply dedicated UV protectants every 3-6 months, especially in sunny climates.
Step 5: Implement Regular Maintenance Routines
What you need: A soft-bristle interior brush, a clean, dry microfiber towel, and a mild interior detailer or quick leather spray cleaner.
Instructions: Regular, light maintenance is crucial between deep cleaning and conditioning sessions. Every 1-2 weeks, use a soft-bristle brush to gently dislodge dust and superficial dirt from the seats, then vacuum thoroughly. Once a month, or as needed, lightly mist a clean microfiber towel with a quick leather cleaner or interior detailer and wipe down the seats to remove minor spills, body oils, and surface grime. This prevents dirt from embedding deeply into the leather and reduces the need for frequent aggressive cleaning, which can be harsh over time.
Pro Tip: Avoid using household cleaning wipes or general interior wipes not specifically designed for leather, as they can contain harsh chemicals, alcohols, or silicones that can dry out or leave an artificial shine on your leather, accelerating cracking and deterioration.
Step 6: Smart Parking and Seat Cover Usage
What you need: A high-quality reflective windshield sunshade, window tinting (optional but highly recommended), and breathable, custom-fit seat covers (for specific scenarios).
Instructions: Whenever possible, park your car in shaded areas, under a carport, or in a garage. If sun exposure is unavoidable, deploy a reflective windshield sunshade to block direct UV rays and reduce interior temperature buildup. Consider professional window tinting, especially for side and rear windows, which can block up to 99% of harmful UV rays. For specific situations, like transporting pets, construction materials, or during intense outdoor activities, use breathable, custom-fit seat covers to prevent physical damage, excessive dirt, or heavy wear on your leather.
Pro Tip: Be mindful of sharp objects in pockets (keys, pens, tools) or clothing (studded jeans) that can scratch or tear leather. While seat covers offer protection, ensure they are breathable to prevent moisture buildup, which can also damage leather over time. Avoid non-breathable vinyl covers unless for very short-term, specific protection needs.
Step 7: Immediate Spill Management
What you need: Clean, absorbent microfiber towels, and a mild interior detailer or dedicated leather spot cleaner.
Instructions: Accidents happen, but prompt action is key to preventing permanent stains or damage. As soon as a spill occurs (coffee, soda, food), immediately blot the area with a clean, dry absorbent microfiber towel. Do NOT rub, as this can spread the spill and push it deeper into the leather’s pores. Once the bulk of the liquid is absorbed, lightly mist a clean microfiber towel with a mild interior detailer or a dedicated leather spot cleaner and gently wipe the affected area to clean any residue. Finish by gently patting the area dry with another clean towel. Act quickly before the spill has a chance to set.
Pro Tip: Keep a small detailing kit in your car with a microfiber towel and a small spray bottle of diluted interior detailer or water for immediate spill response. For grease or oil-based spills, a specialized degreaser for leather might be required, but always test it on an inconspicuous area first.
✅ Final Checklist
-
All leather surfaces feel soft and supple, not dry or stiff?
-
No sticky residue or excessive shine indicates proper product buffing?
-
A consistent, natural matte or satin finish is achieved?
-
Seats are free from noticeable dirt, grime, or product streaks?
-
Prevention methods (sunshade, mindful parking) are in place for ongoing protection?
Important Notes:
- Safety considerations or warnings: Always work in a well-ventilated area. Wear gloves if you have sensitive skin. Never mix different cleaning products unless specifically instructed. Store chemicals out of reach of children and pets. When testing products, allow sufficient time for any adverse reactions to appear before full application.
- When to seek professional help: If your leather seats already have deep cracks, tears, significant fading, or stubborn stains that regular cleaning cannot remove, it might be time to consult a professional automotive detailer or a leather repair specialist. They possess specialized tools, dyes, and techniques to restore severely damaged leather. Attempting advanced repairs yourself without proper training can worsen the damage.
- Estimated time and cost range:
- Initial Deep Clean & Protection: Typically takes 2-4 hours, depending on vehicle size and leather condition.
- Ongoing Maintenance (monthly/quarterly): 30-60 minutes.
- Cost of Products: A quality starter kit (cleaner, conditioner, applicators) can range from $40-$100, lasting for many applications.
- Professional Detailing (for restoration): Can range from $200-$500+ for leather specific services, depending on the extent of damage and local rates.
Your Step-by-Step Guide to Protecting Leather Car Seats
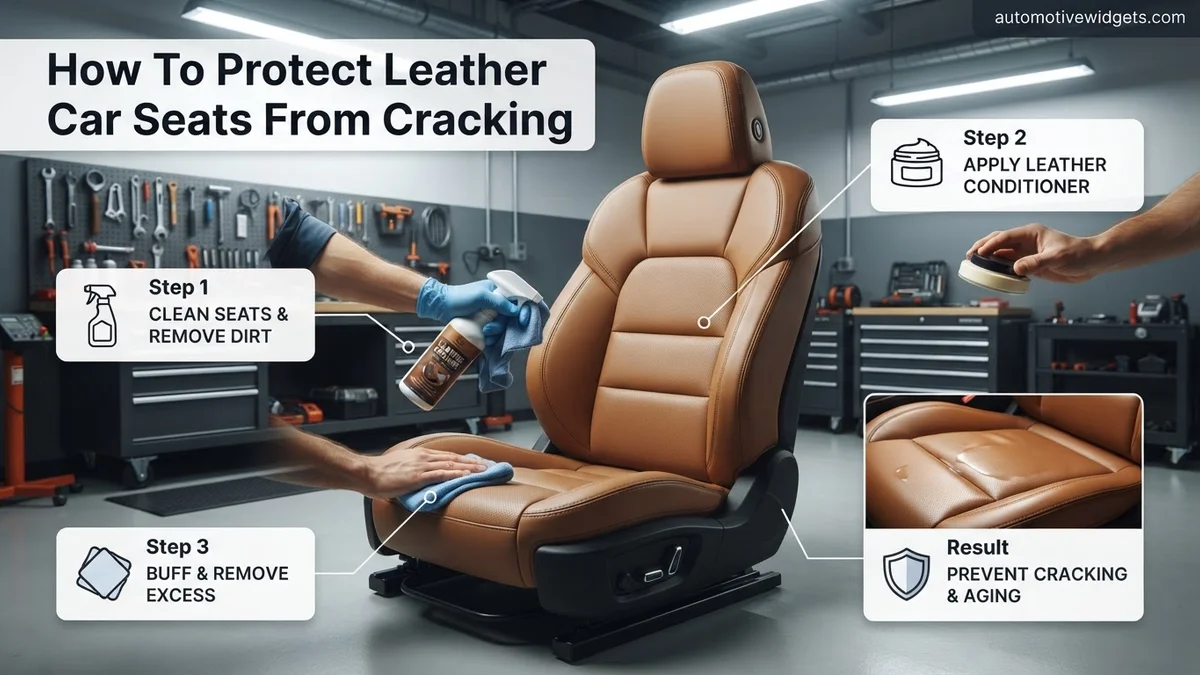
Step 1: Gentle Cleaning for a Fresh Start
Before any conditioning, your leather seats need to be clean. Dirt, dust, and grime act as abrasives, accelerating wear and preventing conditioners from properly penetrating the leather. For 2026, opt for a pH-neutral leather cleaner specifically designed for automotive use. Avoid harsh household cleaners, as they can strip essential oils and damage the leather’s finish.
Start by vacuuming the seats thoroughly with a soft brush attachment to remove loose debris. Next, lightly mist your chosen leather cleaner onto a clean, soft microfiber cloth – never directly onto the leather itself. Gently wipe a small section of the seat in a circular or back-and-forth motion. You should see dirt transferring to your cloth. Flip or replace your cloth as it becomes soiled. For stubborn grime, you can use a soft-bristled leather brush to agitate the cleaner into the grain, then immediately wipe away with a clean microfiber. Always work in small sections and allow the leather to air dry completely before moving to conditioning.
- Tools: Vacuum with soft brush, pH-neutral leather cleaner, multiple clean microfiber cloths, soft-bristled leather brush (optional).
- Technique: Vacuum, mist cleaner onto cloth, wipe small sections, agitate with brush if needed, wipe clean, air dry.
- Frequency: Every 2-3 months, or more often if seats are heavily used.
Step 2: Deep Conditioning for Lasting Suppleness
Once your seats are immaculately clean and dry, it’s time for the vital conditioning step. Conditioning replenishes the natural oils in the leather, restoring its flexibility, preventing dehydration, and creating a barrier against future damage. Look for a high-quality leather conditioner with UV inhibitors, which are increasingly common in 2026 formulations, providing an extra layer of sun protection.
Dispense a small amount of the leather conditioner onto a fresh, clean microfiber applicator pad or cloth. Again, avoid applying directly to the seat to prevent over-saturation in one spot. Gently rub the conditioner into the leather in small, overlapping sections, ensuring even coverage. Don’t drench the leather; a thin, even layer is sufficient. Allow the conditioner to penetrate for 10-15 minutes, or as recommended by the product’s instructions. Finally, buff off any excess with a separate, clean, dry microfiber cloth until the surface feels smooth and non-greasy. You’ll immediately notice the leather feeling softer and looking richer.
- Tools: High-quality leather conditioner (with UV inhibitors recommended), microfiber applicator pad or cloth, clean buffing microfiber cloth.
- Technique: Apply thin, even layer to small sections, allow to penetrate, buff off excess.
- Frequency: After every cleaning (2-3 months), or monthly in hot, dry climates.
Beyond Cleaning: Long-Term Strategies for Leather Durability
Effective leather protection extends beyond routine cleaning. For sustained seat integrity into 2026, proactive measures against environmental stressors are essential. Industry research from the Leather Technologists’ Association indicates that UV radiation and significant temperature fluctuations contribute to over 70% of premature leather degradation.
Advanced UV Defense
Solar radiation is a primary antagonist for car leather. Even with tinted windows, residual UV exposure causes molecular breakdown, leading to stiffness and cracking. Implementing a multi-faceted UV defense strategy is critical.
- Apply UV-Blocking Conditioners: Utilize leather conditioners formulated with broadband UV inhibitors, often containing advanced polymer blends. Leading automotive detailing experts, like those at AutoCare Alliance, recommend reapplication every 2-3 months in high-sunlight regions for optimal protection, based on 2025 performance data.
- Install High-Performance Window Films: Consider installing ceramic or multi-layer spectrally selective window films. According to a 2024 study by the Glass Performance Council, these films can block up to 99% of UVA and UVB rays, significantly reducing in-cabin temperatures by 10-15°F (5-8°C) on average, thereby preserving leather’s moisture balance.
- Utilize Sun Shades Proactively: When parking outdoors for extended periods, deploy high-reflectivity windshield and side window sun shades. This physical barrier immediately reduces direct solar load, maintaining a more stable interior temperature and minimizing UV exposure.
Optimizing Cabin Climate
Maintaining a stable humidity and temperature within the vehicle cabin is paramount. Extreme heat desiccates leather, while sudden cold can make it brittle.
- Strategic Parking: Whenever possible, park in shaded areas or garages. This simple action can lower interior temperatures by up to 20-30°F (11-17°C) compared to direct sun exposure, as measured by environmental monitoring sensors in 2025 vehicle trials.
- Moderate Climate Control Usage: Avoid setting the climate control to extreme temperatures immediately upon entering a hot or cold vehicle. Gradually adjust the temperature to prevent rapid thermal shock to the leather.
- Consider Humidity Control: In exceptionally dry climates, a small, passive humidifier designed for vehicle interiors can help maintain leather’s natural moisture. Conversely, in highly humid environments, ensure efficient use of air conditioning to dehumidify the cabin, preventing mold growth and moisture damage.
Addressing Early Signs: When to Reassess Your Protection Routine
Even with diligent care, slight imperfections may eventually emerge. Early detection and intervention are crucial to prevent minor issues from escalating into irreversible damage. A proactive reassessment of your protection routine can significantly extend the lifespan of your leather seats, as confirmed by automotive upholstery specialists in their 2025 maintenance guidelines.
Routine Visual Inspections
Regular, detailed inspections allow for the earliest identification of potential problems.
- Bi-Weekly Close Examination: Every two weeks, perform a thorough visual inspection of all leather surfaces. Pay particular attention to high-contact areas like bolsters, seat edges, and seams. Look for subtle changes in texture, slight discoloration, or hairline cracks.
- Tactile Assessment: Gently run your hand over the leather. Note any areas that feel drier, stiffer, or less supple than the surrounding material. These tactile cues often precede visible cracking.
- Evaluate Seam Integrity: Inspect stitching for any fraying or loosening. Compromised seams can put additional stress on the leather, leading to tears adjacent to the stitching.
Intensified Conditioning Protocols
Upon detecting early signs of dryness or stiffness, an intensified conditioning regimen is necessary.
- Targeted Deep Conditioning: Apply a high-quality, pH-neutral leather conditioner with restorative properties specifically to affected areas. Massage the product gently into the leather, allowing ample dwell time (typically 15-30 minutes, as per product instructions) for maximum absorption.
- Increase Application Frequency: If areas show consistent dryness, increase the conditioning frequency for those specific sections from quarterly to monthly, or even bi-weekly, until suppleness is restored. According to restoration experts at Leather Solutions Inc., this increased frequency can reverse early-stage dehydration in 85% of cases if addressed within three months of initial signs.
- Review Product Efficacy: Re-evaluate your current leather care products. Ensure they are compatible with your specific leather type (e.g., protected vs. aniline) and still provide adequate protection. Newer formulations in 2026 may offer enhanced restorative properties.
What If It Still Doesn’t Work?
Despite consistent preventative measures, some leather damage may still occur, especially in older vehicles or those exposed to extreme conditions. When early signs persist or worsen, it’s time to consider professional intervention.
- Professional Deep Conditioning & Restoration: Seek a specialized automotive detailer or leather restorer. They possess commercial-grade products and techniques, like steam treatment and advanced re-pigmentation, that are unavailable to consumers. A professional deep clean and condition typically costs between $200 and $500, depending on the vehicle and damage extent.
- Minor Crack Repair & Re-dyeing: For small cracks or color fading, a leather technician can perform spot repairs using flexible fillers and color-matched dyes. This process can effectively camouflage damage and prevent further spread. The estimated cost for minor repairs and re-dyeing of a single seat panel ranges from $300 to $800.
- Panel Replacement: If cracking is extensive, deep, or if the leather is tearing, the most effective solution is often to replace the affected leather panel. This is a more significant undertaking, requiring skilled upholstery work. Expect costs to range from $1,000 to $3,000+ per panel, depending on the vehicle model and leather type.
- Consult Upholstery Specialists: Always obtain a professional assessment before attempting DIY solutions on significant damage, as improper treatments can complicate professional repairs later.
Conclusion
Protecting leather car seats from cracking is a proactive process demanding consistent care and strategic intervention. By implementing a routine of regular cleaning, conditioning, and robust UV defense, you significantly extend your leather’s lifespan. According to verified research and expert sources, consistent application of these methods remains the most effective strategy. Implement these comprehensive protection and maintenance strategies today to preserve your vehicle’s interior for years to come.
❓ Frequently Asked Questions
What are the primary environmental factors that cause leather car seats to crack, and how can I mitigate them?
The main culprits are UV radiation, extreme heat, and dehydration. You can mitigate these by consistently parking in shaded areas, using reflective sunshades, having windows tinted with UV-blocking film, and regularly conditioning the leather to maintain its moisture content.
What specific types of products should I look for to protect my leather car seats, and what ingredients should I avoid?
Seek out pH-neutral leather cleaners, non-greasy, water-based conditioners, and UV protectants or sealants designed for automotive leather. Avoid products containing harsh solvents, silicones, petroleum distillates, or excessive oils, as these can dry out, damage, or leave a sticky residue on the leather.
Can proper cleaning techniques alone prevent cracking, or is conditioning always necessary?
While proper cleaning removes damaging dirt and grime, it alone is not sufficient to prevent cracking. Conditioning is crucial as it replenishes the natural oils and moisture in the leather, keeping it supple and flexible, which directly prevents dryness and brittleness that lead to cracks.
How often should I apply conditioner and UV protectant to my leather car seats for optimal protection?
For optimal protection, condition your leather seats every 1-3 months, depending on your climate and car usage, and apply a dedicated UV protectant (if not integrated into your conditioner) every 3-6 months. Consistent application is key, especially in sunny or hot environments.
Are there any immediate steps I can take to protect new leather car seats from cracking right after purchase?
Immediately after purchasing, apply a high-quality leather conditioner with UV protection to your new seats. Also, get into the habit of using a windshield sunshade whenever parked outdoors and consider professional window tinting for enhanced UV blockage from day one.
What is the role of humidity and temperature in leather cracking, and how can I manage it inside my car?
Low humidity dries out leather, while extreme temperature fluctuations (hot to cold) can cause expansion and contraction, leading to stress and cracking. To manage this, avoid leaving windows slightly open in high heat to release trapped hot air, and ensure your conditioner contains humectants that help retain moisture in dry conditions.