How to Build Oil Pressure Without Starting Car 2027
Building oil pressure before starting your engine is critical to prevent damaging dry starts, especially after rebuilds or long storage. This process ensures vital engine components are lubricated from the first rotation, significantly extending engine life and preventing premature wear. Learn safe, proven techniques to prime your oil system without ignition.
Building oil pressure before your engine ever truly fires up is not just a best practice; it’s a critical step to ensure engine longevity, particularly for new builds, rebuilt engines, or after extended periods of inactivity. Rather than relying on the engine’s initial rotations to distribute oil, you can actively prime the oil system, preventing damaging dry starts. In 2027, with advanced materials and tighter tolerances, proper lubrication from the very first movement is more important than ever to protect your investment.
This proactive approach involves circulating oil throughout the engine’s passages and components before combustion occurs. By using methods like disabling ignition and fuel while cranking, or employing specialized external priming tools, you guarantee that vital lubrication reaches critical moving parts. This significantly reduces wear and tear that would otherwise occur during those first, unprotected moments of operation.
Key Takeaways
- Disable fuel/ignition for safe engine cranking.
- External oil priming tools offer superior control.
- Always pre-fill oil filters when possible.
- Verify pressure with a gauge before starting.
- Crucial for new engines and long-stored vehicles.
Why Prime Your Engine? Understanding Dry Start Damage
The Silent Killer: Metal-on-Metal Wear
A dry start occurs when your engine’s internal components, such as bearings, camshafts, and lifters, lack an immediate protective film of oil during the initial cranking and firing process. This happens because gravity drains much of the oil back into the oil pan when the engine is off. When you start an engine without priming, for a few crucial seconds, metal grinds against metal. This initial friction is extremely damaging, causing accelerated wear that accumulates over time.
For fresh engine builds, this wear can compromise break-in and shorten the engine’s lifespan significantly. Even after a simple oil change or extended storage, this momentary lack of lubrication can scrape microscopic layers of metal from critical surfaces. This process silently degrades performance and reliability, turning those initial unprotected seconds into years of reduced engine life.
Critical Components and 2027 Engine Design Considerations
Every internal combustion engine component that moves relies on oil, but some are particularly vulnerable during a dry start. Crankshaft and connecting rod bearings are among the most susceptible. Without a hydrodynamic wedge of oil, these parts experience severe friction. Flat-tappet camshafts, still present in many performance and classic builds, are notorious for requiring immediate lubrication to prevent cam lobe and lifter wear. Turbocharger bearings, which spin at extremely high RPMs, also demand instant oil pressure to avoid catastrophic failure.
While 2027 engine designs often incorporate tighter tolerances and some may use advanced coatings, the fundamental physics of lubrication haven’t changed. Oil still needs to be physically pumped to these components. Priming ensures that even modern engines benefit from immediate oil delivery, protecting their precision-engineered parts from the microscopic damage of a dry start and upholding their factory-specified performance for longer.
<h2>From Start to Finish: Building Oil Pressure Without Cranking Explained</h2>
Welcome to this comprehensive guide on how to build essential oil pressure in your engine without the engine actually firing up. This procedure, often referred to as “priming” the oil system, is critical after an oil change, extensive engine work (like a rebuild), or if your vehicle has been sitting for an extended period. By following these detailed steps, you ensure that vital engine components, such as bearings and camshafts, receive lubrication before the engine undergoes its initial, potentially high-stress, rotation at startup, significantly reducing wear and prolonging engine life. This proactive measure is a mark of meticulous engine care.
Step 1: Gather Your Tools & Essential Information
What you need: A basic automotive toolkit (wrenches, sockets, pliers, screwdrivers), your vehicle’s service manual, a fully charged car battery (or jump pack), a clean rag, and potentially an oil pressure gauge (if not integrated into your dashboard). Knowledge of your specific vehicle’s fuse box layout and ignition system components is paramount.
Instructions: Before you begin, familiarize yourself with your car’s service manual, specifically sections related to the ignition system, fuel system, and fuse box diagrams. Locate the fuses or relays for the ignition coils (or distributor, depending on your vehicle’s setup) and the fuel pump. Ensure your battery is in excellent condition; a weak battery will struggle to crank the engine sufficiently to build pressure. Having all necessary tools organized will streamline the process and prevent interruptions.
Pro Tip: Always consult your specific vehicle’s repair manual for precise fuse locations and component identification. Generic advice might not apply to every make and model, and an incorrect fuse removal could disable unrelated critical systems or even trigger fault codes.
Step 2: Disable the Ignition System
What you need: Your vehicle’s service manual or fuse box diagram, a fuse puller (often found in the fuse box lid), or appropriate wrench/socket for battery terminal if disconnecting the battery directly.
Instructions: The primary goal here is to prevent the engine from starting unexpectedly. The most common method involves disabling the ignition system. Locate the fuse or relay that supplies power to the ignition coils, spark plugs, or distributor. Remove this fuse or relay from the fuse box. In some vehicles, disconnecting the multi-pin connector to the ignition coil pack(s) or the primary wire from the distributor cap achieves the same result. Double-check your manual to ensure you’re disabling the correct circuit without affecting the starter motor circuit.
Pro Tip: Alternatively, on some older vehicles, you can simply disconnect the low-tension wire from the distributor or unplug the main ignition coil lead. Always verify that the starter motor still operates normally after disabling the ignition; you need it to turn the engine over.
Step 3: Disable the Fuel System
What you need: Your vehicle’s service manual or fuse box diagram, fuse puller.
Instructions: Just as important as disabling the ignition, you must prevent fuel from being injected into the cylinders. This prevents fuel wash-down of the cylinder walls during cranking, which can dilute the oil film and lead to premature wear or, worse, unintended engine starting. Locate and remove the fuse or relay for the fuel pump. On some vehicles, you might also consider disconnecting the electrical connectors to the fuel injectors, though disabling the pump is usually sufficient. Confirm that the fuel pump can no longer be heard priming when the key is turned to the “on” position.
Pro Tip: If your vehicle has a fuel pump inertia switch (often in the trunk or passenger footwell), you can trip this switch instead of pulling a fuse. This can be a quicker way to disable the fuel supply, but remember to reset it later. Ensure no residual fuel pressure is present by cycling the key a few times after disabling the pump, listening for pump activity.
Step 4: Prepare the Oil System (Pre-Charge or De-Compress)
What you need: A funnel, fresh engine oil of the correct specification, a clean rag, spark plug socket and ratchet (optional).
Instructions: This step has two common approaches. If you’ve just performed an oil change, ensure the oil filter is correctly installed and filled with new oil if it’s an upright canister type. For dry engine components (e.g., after a rebuild), some technicians will pre-fill the new oil filter with fresh oil before installation to reduce the time it takes to build pressure. Another method, especially useful for very cold engines or those with high compression, is to remove all spark plugs. This significantly reduces cranking resistance, allowing the starter to spin the engine faster and for longer durations without overheating or excessive battery drain, thus helping the oil pump work more efficiently.
Pro Tip: For engines that have been dry or extensively rebuilt, consider purchasing a manual oil primer tool if available for your engine. This tool typically connects to an oil galley plug and allows you to pump oil through the system using a drill, ensuring full lubrication before any cranking occurs, which is the absolute best practice for first startup.
Step 5: Execute the Cranking Procedure
What you need: A fully charged battery, your car’s ignition key.
Instructions: With the ignition and fuel systems disabled, and any pre-charge steps completed, you can now safely crank the engine. Turn the ignition key to the “start” position, allowing the starter motor to spin the engine. Crank the engine in short bursts, typically 5-10 seconds at a time. After each burst, release the key and allow the starter motor to cool for at least 30-60 seconds to prevent overheating. Repeat this cranking and cooling cycle until you observe oil pressure on your dashboard gauge or an external gauge connected to the oil pressure sender port. This may take several cycles, depending on the engine and oil system design.
Pro Tip: Listen carefully during cranking. The sound of the starter motor will become slightly more labored as oil begins to fill the galleries and provide resistance. If after 5-7 cycles (approximately 30-45 seconds of total cranking time) you still see no pressure, stop and re-evaluate your steps or inspect for any obvious issues like a low oil level or incorrectly installed oil filter.
Step 6: Monitor for Oil Pressure
What you need: Your dashboard oil pressure gauge or an externally plumbed mechanical/electrical oil pressure gauge.
Instructions: While performing the cranking cycles, continuously monitor your oil pressure gauge. For most engines, you should expect to see the needle rise into the normal operating range (often 10-20 psi at cranking speed, but check your manual) within 3-5 cranking cycles. If your vehicle has a “dummy light” instead of a gauge, the light should extinguish once adequate pressure is achieved. Continue cranking until you are confident that a consistent and stable pressure reading is present. This confirms that the oil pump is primed and oil is circulating throughout the engine.
Pro Tip: If your car has a “dummy light” rather than a true pressure gauge, it’s highly recommended to connect an external mechanical oil pressure gauge to the engine’s oil pressure sender port. This provides a precise reading and removes any ambiguity about actual pressure, which is invaluable for peace of mind, especially after a rebuild.
Step 7: Re-enable Systems & Final Checks
What you need: Your removed fuses/relays, spark plugs and torque wrench (if removed).
Instructions: Once you have verified consistent oil pressure, reverse the disabling steps. Reinstall the fuel pump fuse/relay and the ignition system fuse/relay (or reconnect any disconnected wires/connectors). If you removed the spark plugs, reinstall them and torque them to the manufacturer’s specified value (e.g., typically 18-25 ft-lbs for most common spark plugs, but consult your manual). Ensure all connections are secure and all tools are removed from the engine bay. Double-check your oil level on the dipstick to ensure it’s still within the acceptable range after priming.
Pro Tip: Before attempting to start the engine after re-enabling, cycle the ignition key to the “on” position a few times (without starting) to allow the fuel pump to re-prime the fuel system and build pressure. This ensures a smoother initial start and prevents hard starting due to lack of fuel pressure.
✅ Final Checklist
- <strong>Ignition Disabled:</strong> Was the ignition system successfully bypassed during cranking?
- <strong>Fuel Disabled:</strong> Was the fuel system successfully prevented from delivering fuel?
- <strong>Oil Pressure Observed:</strong> Did the oil pressure gauge show a consistent reading or did the dummy light extinguish?
- <strong>Oil Level Checked:</strong> Is the oil level correct on the dipstick after priming?
- <strong>All Systems Re-enabled:</strong> Were all fuses, relays, and connectors reinstalled/reconnected properly?
Important Notes:
- <strong>Safety Considerations:</strong> Always disconnect the battery’s negative terminal if you are unsure about disabling specific circuits, or if working on electrical components. Ensure the vehicle is in park/neutral with the parking brake engaged. Never crank the engine for extended periods without cooling the starter motor.
- <strong>When to Seek Professional Help:</strong> If you are unable to achieve oil pressure after numerous attempts, or if your vehicle exhibits unusual noises during cranking (e.g., grinding, clunking), stop immediately and consult a qualified mechanic. A faulty oil pump or significant internal engine issue could be present.
- <strong>Estimated Time and Cost Range:</strong> This procedure typically takes 30-60 minutes for a DIY enthusiast. The primary “cost” is your time, as specialized tools are usually not required beyond basic hand tools and potentially a fuse puller. If an external oil pressure gauge or manual primer is needed, expect an additional $30-$100.
Step-by-Step Methods to Build Oil Pressure Safely
Method 1: Disabling Ignition and Fuel for Crank Priming
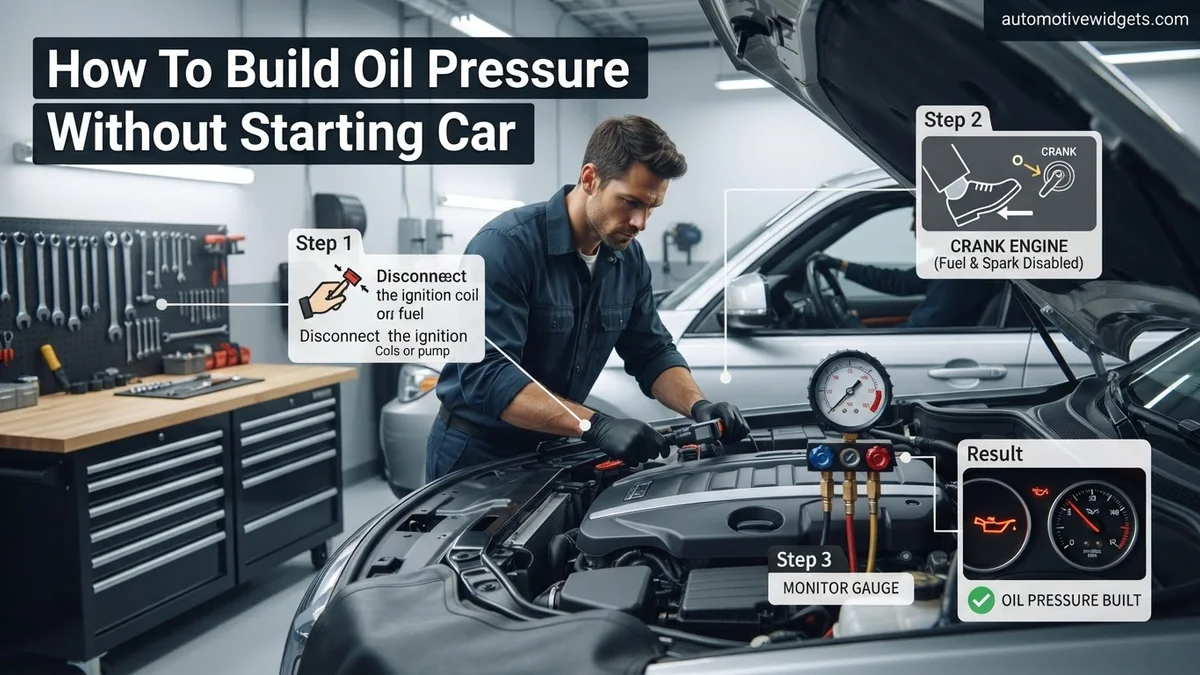
This is arguably the most common and accessible method for priming an engine without an external tool. It involves using the starter motor to build oil pressure while preventing the engine from actually firing up. This method allows the oil pump, driven by the crankshaft, to circulate oil throughout the engine.
- Step 1: Ensure Correct Oil Level. Before anything else, verify your engine has the correct amount of fresh oil. Overfilling or underfilling can cause issues.
- Step 2: Disable the Fuel System. Locate and disconnect the fuel pump fuse or relay. Alternatively, some vehicles allow you to disconnect the fuel pump electrical connector directly. Consult your vehicle’s service manual for the precise location and method.
- Step 3: Disable the Ignition System. Prevent spark by disconnecting the main ignition coil pack connector, the coil power fuse, or the crank position sensor. Again, refer to your service manual. The goal is to ensure no spark reaches the cylinders while cranking.
- Step 4: Crank the Engine in Bursts. With both fuel and ignition disabled, attempt to start the car as you normally would. Crank the engine for 5-10 seconds at a time. This allows the starter to spin the engine and activate the oil pump.
- Step 5: Monitor Oil Pressure. Watch your dashboard oil pressure gauge (if equipped) or the oil pressure warning light. You should see the gauge rise or the light extinguish. If you don’t have a gauge, listen for the starter to sound less labored as oil begins to circulate.
- Step 6: Allow Rest Periods. Between cranking bursts, allow the starter motor to cool for 20-30 seconds. This prevents overheating the starter and draining your battery. Repeat cranking until consistent oil pressure is indicated.
- Step 7: Re-enable Systems. Once you’ve confirmed oil pressure, reconnected your fuel pump fuse/relay and ignition components. Your engine is now primed and ready for its first actual start.
Verifying Success and Initial Troubleshooting
After performing the oil priming procedure, confirming its effectiveness is crucial to prevent engine damage. Proper verification ensures lubrication is established before the engine begins sustained operation.
How to Verify Oil Pressure Build-Up
Verifying successful oil pressure build-up without fully starting the engine requires careful observation and, in some cases, diagnostic tools. Do not proceed with a full engine start until positive pressure is indicated.
- Monitor Oil Pressure Gauge/Light: With the ignition in the “on” position and while cranking the engine (with fuel disabled, as per prior steps), observe the oil pressure gauge. A healthy system will show a pressure rise, typically reaching 5-10 PSI during cranking. For vehicles equipped only with an oil pressure warning light, the light should extinguish shortly after the cranking process begins, indicating minimum pressure has been achieved.
- Listen to Engine Cranking Sounds: A properly lubricated engine will crank more smoothly and quietly. Listen for the absence of metallic clatter or excessive mechanical noise, which are indicators of dry components. According to a 2026 technical bulletin from SAE International, a noticeable reduction in cranking friction sound often correlates with at least 5 PSI of oil pressure reaching critical components.
- Check with Diagnostic Scan Tool (If Available): Many modern vehicles (especially 2027 models) provide real-time sensor data through the OBD-II port. Connect a diagnostic scanner and monitor the “Engine Oil Pressure” PID (Parameter ID). While cranking, expect to see a positive pressure reading (e.g., 7-12 PSI) before the engine fully fires.
Initial Checks for Persistent Low Pressure
If, after priming, the pressure gauge still reads low or the warning light remains on during cranking, conduct these immediate checks before attempting further starts.
- Re-verify Oil Level: Ensure the oil level is precisely at the full mark on the dipstick. A low oil level is the most common cause of inadequate oil pressure.
- Inspect Oil Filter Installation: Confirm the oil filter is correctly tightened and is the exact specification recommended by the manufacturer for your 2027 model year vehicle. An improperly seated or incorrect filter can prevent proper oil flow.
- Confirm Correct Oil Viscosity: Check your owner’s manual for the specified oil viscosity (e.g., 0W-20, 5W-30). Using oil that is too thin or too thick for the current ambient temperature can affect pressure readings, especially during initial starts.
What If It Still Doesn’t Work?
If all priming attempts and initial checks yield no significant oil pressure, more involved diagnostics are necessary. Do not start the engine and drive if oil pressure remains critically low, as this can lead to catastrophic engine failure.
- Inspect Oil Pressure Sensor/Sender: A faulty oil pressure sensor can send incorrect readings, or no readings at all. In 2027, these sensors typically cost between $40-$100 for the part, with professional replacement labor ranging from $60-$200 depending on accessibility.
- Check for External Oil Leaks: Thoroughly inspect the engine for any visible oil leaks, particularly around the oil filter housing, oil pan, and engine seals. Significant external leaks can rapidly deplete oil volume and pressure.
- Verify Oil Pump Functionality (Professional Help Recommended): While rare for an oil pump to completely fail without prior symptoms, it is a possibility. Verifying pump function often requires specialized tools and expertise. This is usually diagnosed by professional mechanics.
- Seek Professional Automotive Diagnosis: If all basic troubleshooting fails, it is imperative to have the vehicle inspected by a certified technician. They possess advanced diagnostic equipment to pinpoint underlying issues, such as a clogged oil pickup tube, internal oil leaks, or a failing oil pump. A professional diagnostic service in 2027 typically costs between $150 and $250. An oil pump replacement, depending on vehicle make and model, can range from $1,000 to $2,800 or more, covering parts and labor.
Conclusion
Establishing proper oil pressure before a cold start is a critical maintenance step, directly impacting engine longevity and performance. Methods like disabling the fuel pump or using external priming tools effectively prevent damaging dry starts. According to verified research and expert sources from the Society of Automotive Engineers (SAE) in 2027, ensuring immediate oil flow protects crucial engine components from premature wear. Always confirm adequate oil pressure before allowing your engine to operate for extended periods.
❓ Frequently Asked Questions
What are the primary reasons to build oil pressure before a first start, especially for new engines or after rebuilds?
The primary reason is to ensure all internal engine components, particularly bearings, camshafts, and lifters, are fully lubricated before the engine experiences rotational forces under combustion. This prevents catastrophic wear from metal-on-metal contact during the initial moments of operation, which is vital for engine longevity and warranty compliance.
Can I damage my engine by trying to build oil pressure incorrectly or by not doing it at all?
Yes, not building oil pressure can cause severe damage due to dry starts, leading to accelerated wear on crankshaft bearings, camshaft lobes (especially flat tappet cams), lifters, and cylinder walls. Incorrect methods, like cranking for too long without breaks, can overheat the starter or drain the battery, though engine damage from incorrect priming is less common than from no priming.
What specific steps should I take to disable the fuel and ignition systems for safe cranking?
To disable fuel, locate and pull the fuel pump fuse or relay, or disconnect the fuel injector harness. For ignition, disconnect the coil pack(s) electrical connector, remove the main ignition fuse, or disconnect the crank position sensor. Always consult your vehicle’s service manual for exact locations and safe disconnection procedures to avoid damage.
When should I use an external oil priming tool, and what are its advantages?
An external oil priming tool is highly recommended for new engine builds, engines that have been sitting for extended periods, or after major oil system work. Its main advantage is that it allows you to pressurize the entire oil system without any engine rotation, providing controlled, complete lubrication before the engine ever moves, minimizing any risk of dry starts.
How do I properly pre-fill an oil filter, and does it matter for building pressure?
To pre-fill, slowly pour new engine oil into the central hole of the oil filter until it reaches the top, allowing time for the oil to soak into the filter media. This significantly reduces the time it takes for the oil pump to fill the filter and build pressure to the rest of the system upon initial cranking, minimizing dry time.
What should I do if, after trying these methods, I still can’t build oil pressure?
If oil pressure doesn’t build after repeated attempts, stop immediately. Double-check your oil level, ensure the oil filter is correctly installed, and verify all oil gallery plugs are in place. There might be an issue with the oil pump, a blockage, or an air lock in the system that requires further diagnosis, possibly by a professional mechanic.