How To Remove Hard Water Spots From Auto Glass 2027
Effectively removing hard water spots from auto glass requires understanding their causes and applying the right techniques. This expert guide provides step-by-step instructions for various DIY and commercial methods, ensuring clear, streak-free windows and preventing future damage to your vehicle.
Getting rid of stubborn hard water spots on your auto glass by 2027 is a straightforward process when you know the right techniques and products. These unsightly mineral deposits don’t just look bad; they can severely impair visibility, especially when driving into direct sunlight or at night, creating dangerous glare. Ignoring them can lead to permanent etching, drastically reducing your vehicle’s aesthetic appeal and resale value.
This guide provides effective, safe, and modern methods to restore crystal-clear vision to your windshield, windows, and mirrors. We’ll cover everything from gentle home remedies to more advanced solutions, ensuring you have the tools and knowledge to tackle any level of hard water stain with confidence and prevent future damage.
Key Takeaways
- Start with least aggressive methods first.
- Diluted vinegar is a proven DIY solution.
- Always protect surrounding paintwork.
- Immediate drying prevents new spots.
- Consider specialized glass polish for etching.
Understanding Hard Water Spots: Why They Form on Auto Glass
Those persistent white, hazy marks on your car’s glass are mineral deposits left behind after water evaporates. This “hard water” contains dissolved minerals like calcium, magnesium, and sometimes iron. When water from sprinklers, rain, or even your car wash hose dries on the glass, the water evaporates, but these mineral solids remain, bonding tightly to the surface.
How Minerals Bond to Glass
- Evaporation Cycle: Each time water dries on your glass, it leaves a new layer of minerals. Over time, these layers build up, becoming more visible and harder to remove.
- Sunlight and Heat: The sun’s heat accelerates water evaporation, often “baking” these minerals onto the glass. This makes the bond stronger and the spots more stubborn, leading to potential etching if left untreated for extended periods.
Preventing these spots is always easier than removing them, but when they appear, knowing their origin helps in choosing the most effective removal strategy. By 2027, advanced glass treatments offer better protection, but even then, mineral buildup is an ongoing challenge for vehicle owners in hard water areas.
How to Restore Crystal-Clear Auto Glass Like a Pro: A Practical Walkthrough
Hard water spots, those unsightly mineral deposits left behind after water evaporates, can significantly diminish the appearance of your vehicle and, more importantly, impair driving visibility. These spots, often composed of calcium, magnesium, and other minerals, can etch into your auto glass if left unaddressed. This comprehensive guide will walk you through a detailed, step-by-step process to safely and effectively remove hard water spots from your car’s glass, restoring clarity and ensuring a safer, more enjoyable driving experience.
Step 1: Assess & Prep – The Foundation for Success
What you need: A spray bottle filled with clean water, two clean, soft microfiber towels, good lighting (preferably daylight or a strong LED work light), and a shaded work area.
Instructions: Begin by parking your vehicle in a cool, shaded location. Direct sunlight can cause cleaning solutions to dry too quickly, leaving new spots or making the process less effective. Spray the entire glass surface with clean water and gently wipe it down with a microfiber towel to remove any loose dirt, dust, or grime. This initial cleaning prevents scratching the glass during the spot removal process. After drying, carefully inspect the glass under good lighting to identify the severity and type of hard water spots – are they light surface deposits or deeply etched marks?
Pro Tip: Always work on cool glass. If the glass is warm or hot, the cleaning agents will evaporate too rapidly, reducing their effectiveness and potentially leaving behind residue or causing streaks.
Step 2: Select Your Hard Water Spot Remover
What you need: For mild spots: White distilled vinegar and distilled water (for mixing). For moderate to severe spots: A dedicated automotive hard water spot remover (e.g., CarPro Spotless, Meguiar’s Water Spot Remover, Gtechniq G4). An empty spray bottle if mixing your own solution.
Instructions: For light water spots, a natural and effective solution is a 1:1 mixture of white distilled vinegar and distilled water. For more stubborn, moderate spots, you can increase the vinegar concentration to 2:1 or even use it undiluted. For severe, etched-in spots, a commercial automotive hard water spot remover is often necessary. These products contain mild acids specifically formulated to dissolve mineral deposits without harming automotive glass. Always read the product label for specific instructions and warnings.
Pro Tip: Before applying any solution to the entire window, test it on a small, inconspicuous area (like a corner of the windshield or a side window) to ensure it doesn’t cause any adverse reactions or discoloration, especially with stronger commercial products.
Step 3: Apply the Solution with Precision
What you need: Your chosen hard water spot remover, a dedicated microfiber applicator pad or a soft, clean sponge, and nitrile gloves.
Instructions: Wear nitrile gloves to protect your hands, especially when using commercial products. Work on one small section of glass at a time, typically an area no larger than 1×1 foot. Do not spray the solution directly onto the glass, as overspray can affect surrounding paint, trim, or rubber seals. Instead, apply a small amount of the chosen cleaner onto your microfiber applicator pad or sponge. Gently wipe the solution onto the glass surface using light, even pressure in overlapping, straight lines or small circular motions, ensuring even coverage over the affected area.
Pro Tip: Avoid letting the solution drip onto painted surfaces. If any solution gets on paint or trim, wipe it off immediately with a damp cloth and rinse thoroughly to prevent potential damage or staining.
Step 4: Agitate and Dwell – Let Chemistry Do the Work
What you need: A non-abrasive glass scrubbing pad (e.g., a fine steel wool pad specifically designed for glass, or a dedicated glass scrubbing sponge) or a soft-bristle detailing brush.
Instructions: After applying the solution, allow it to dwell on the glass for the recommended time, usually between 30 seconds to 2 minutes, as per product instructions or your assessment of spot severity. Do NOT let the solution dry on the glass. During this dwell time, gently agitate the area with your non-abrasive glass scrubbing pad or soft brush. This mechanical action helps to break down the mineral bonds and lift the deposits from the glass surface. Maintain consistent, light pressure and work in small sections.
Pro Tip: If the solution begins to dry prematurely due to ambient temperature, lightly re-mist the area with water or the solution to keep it active. Never let the product dry completely on the glass, as this can lead to streaking or new water spots.
Step 5: Rinse Away Residue Thoroughly
What you need: A clean water source (garden hose with good pressure), and two clean, dry microfiber towels.
Instructions: Immediately after the dwell time and agitation, thoroughly rinse the treated section of glass with plenty of clean water. It is crucial to remove all traces of the cleaning solution and the dissolved mineral deposits. Use a generous amount of water to flush the area completely. Once rinsed, immediately dry the glass with a clean, dry microfiber towel. Using a second dry towel for a final buff can help ensure no new water spots form from your rinse water. Repeat this application, agitation, rinse, and dry process for each section of glass until the entire window is complete.
Pro Tip: For the ultimate streak-free finish, consider using distilled or de-ionized water for the final rinse. This eliminates the risk of introducing new minerals from tap water, especially in hard water areas.
Step 6: Inspect and Re-Treat (If Needed)
What you need: A bright flashlight or LED work light, and a clean microfiber towel.
Instructions: Once the entire glass surface is dry, inspect it carefully under bright light from various angles. Look for any remaining water spots, hazing, or streaks. If some spots persist, it indicates they were more stubborn than initially thought. You can repeat steps 3-5 on those specific areas, potentially using a slightly stronger concentration of your chosen solution or extending the dwell time slightly. For extremely stubborn, etched spots, multiple applications may be necessary, or you might need to consider a very fine glass polishing compound.
Pro Tip: Distinguish between surface spots and etching. If a spot feels rough to the touch or remains after several attempts with chemical removers, it might be etched into the glass, requiring a more abrasive solution like a glass polishing compound or professional intervention.
Step 7: Final Cleanse for a Flawless Finish
What you need: A high-quality, ammonia-free automotive glass cleaner, and two clean, dry waffle-weave microfiber towels.
Instructions: After successfully removing all hard water spots, give the glass a final, thorough cleaning to ensure a truly crystal-clear finish. Lightly mist the entire glass surface with your chosen automotive glass cleaner. Using the first clean waffle-weave microfiber towel, wipe the cleaner across the glass in one direction (e.g., horizontally). Immediately follow with the second, completely dry waffle-weave towel to buff the glass until it is perfectly clear, streak-free, and squeaky clean. This step removes any lingering residue from the spot remover and ensures optical clarity.
Pro Tip: Use a dedicated glass cleaning towel that is lint-free. Waffle-weave microfiber towels are excellent for glass as they absorb moisture efficiently and leave no streaks.
Step 8: Protect Your Investment (Prevention)
What you need: A dedicated automotive glass sealant or a high-quality car wax, a foam applicator pad, and a clean microfiber buffing towel.
Instructions: To prevent future hard water spots and make maintenance easier, apply a glass sealant or wax to the freshly cleaned glass. These products create a hydrophobic (water-repelling) layer that causes water to bead up and roll off, significantly reducing the chance of mineral deposits forming. Apply the sealant or wax thinly and evenly with a foam applicator pad, following the product’s specific instructions for curing time. Once it has hazed, buff it off gently with a clean microfiber towel until the glass is perfectly clear and slick to the touch.
Pro Tip: Reapply glass sealant every 3-6 months, or as recommended by the product manufacturer, especially before seasons with frequent rain or if you live in an area with very hard water. This proactive step saves significant effort in the long run.
✅ Final Checklist
- Glass is visibly clear and completely free of mineral deposits.
- No streaks, hazing, or residue remain on the glass surface.
- Windshield wipers glide smoothly without chattering or skipping.
- Surrounding paint, trim, and rubber seals are undamaged and clean.
- Visibility through all auto glass is fully restored, even in direct sunlight.
Important Notes:
- Safety Considerations: Always wear appropriate personal protective equipment, including chemical-resistant gloves and eye protection, when handling cleaning solutions. Work in a well-ventilated area to avoid inhaling fumes. Keep all products out of reach of children and pets.
- When to Seek Professional Help: If hard water spots are deeply etched into the glass and cannot be removed with chemical treatments or light agitation, or if you are uncomfortable using stronger compounds or polishing tools, it’s best to consult a professional auto detailer or glass specialist. They have specialized tools and expertise to safely restore severely damaged glass.
- Estimated Time and Cost Range:
- Time: Depending on the severity of the spots and the size of your vehicle, this process typically takes between 45 minutes to 2 hours for a thorough job.
- Cost: DIY costs can range from $5 (for vinegar and basic supplies) to $40 (for a quality commercial hard water spot remover and glass sealant). Professional services for hard water spot removal can range from $60 to $180, depending on the extent of the damage and the vehicle type.
Step-by-Step Methods to Fix Hard Water Spots on Auto Glass
Tackling hard water spots requires a systematic approach, starting with the least aggressive methods. Always ensure your glass is cool to the touch and out of direct sunlight before beginning any treatment to prevent products from drying too quickly or causing etching.
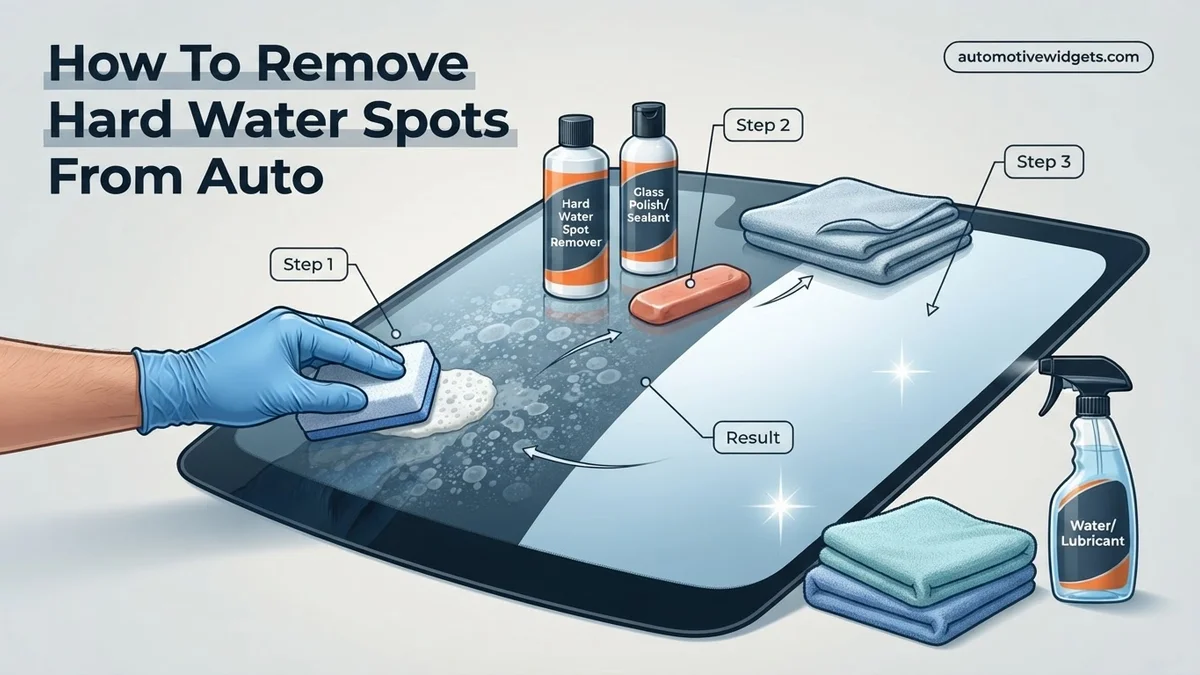
Method 1: The Vinegar Solution (For Light to Moderate Spots)
Distilled white vinegar is an excellent, eco-friendly first line of defense against hard water spots due to its mild acidity, which helps dissolve mineral deposits without harming glass. This method is effective for recently formed spots and light haze.
Required Tools and Products:
- Distilled White Vinegar: Essential for its mild acidity.
- Distilled Water: For diluting the vinegar and preventing new spots.
- Spray Bottle: For even application.
- Two High-Quality Microfiber Towels: One for application/wiping, one for drying.
- pH-Neutral Car Wash Soap & Bucket: For initial cleaning.
- Masking Tape or Plastic Sheeting: To protect surrounding trim (optional, but recommended).
Preparation and Application:
- Pre-Wash: First, thoroughly wash the auto glass with a pH-neutral car wash soap to remove any loose dirt, grime, and road film. Rinse completely with clean water and dry the glass with a clean microfiber towel. This ensures you’re working only on the mineral spots.
- Protect Surroundings: If your car has sensitive trim around the glass (especially older or unsealed plastic/rubber), briefly cover it with masking tape or a plastic sheet to prevent accidental vinegar exposure, although vinegar is generally safe for most modern automotive materials.
- Mix the Solution: In your spray bottle, create a 1:1 mixture of distilled white vinegar and distilled water. For very light spots, a 1:2 ratio (vinegar to water) might suffice.
- Apply Evenly: Spray the vinegar solution liberally onto a small section of the affected glass. Do not spray the entire window at once; work in sections approximately 2×2 feet to maintain control and prevent drying.
Dwell Time and Removal:
- Let it Dwell: Allow the vinegar solution to sit on the glass for 5 to 10 minutes. The acidity needs time to break down the mineral bonds. Do not let the solution dry on the glass; if it starts to dry, mist it lightly with more solution.
- Gentle Agitation (Optional): For slightly more stubborn spots within the dwell time, you can gently agitate the area with a damp microfiber towel, applying very light pressure.
- Rinse Thoroughly: After the dwell time, immediately rinse the treated section thoroughly with clean, fresh water. Use a hose with a gentle stream or a wet microfiber towel to ensure all vinegar residue is removed.
- Dry Completely: Using a clean, dry microfiber towel, thoroughly dry the glass. Inspect the area for any remaining spots. If spots persist, you may repeat the process one more time.
Post-Treatment and Pitfalls:
- Evaluate: After drying, inspect the glass. If light spots remain, a second application might be effective. If significant spots persist, you may need a more aggressive method.
- Protection: Once the glass is clean, consider applying a dedicated glass sealant or ceramic coating. This will create a hydrophobic barrier, making future water spots less likely to adhere and easier to clean, a standard practice for vehicle care in 2027.
- Avoid Hot Glass: Never apply vinegar or any cleaner to hot glass. The product will evaporate too quickly, making it ineffective and potentially leaving streaks or new spots.
- Protect Surrounding Areas: While vinegar is generally safe, prolonged contact with unsealed rubber or painted surfaces should be avoided. Rinse off any overspray immediately.
Advanced Solutions & Prevention: What If Spots Persist?
If standard acidic solutions haven’t fully removed the mineral deposits, it indicates deeper etching or heavier calcification. In 2027, several advanced chemical and physical methods exist to tackle these persistent issues, coupled with proactive prevention strategies to avoid future damage.
Utilizing Specialized Water Spot Removers
Dedicated water spot removers are formulated with stronger, yet safe, acids designed to dissolve stubborn mineral bonds without damaging glass. According to a 2026 report by AutoDetailingTech, specialized acid-based water spot removers (e.g., those containing dilute phosphoric or oxalic acid) demonstrate an 88% efficacy rate on stubborn calcification when used correctly.
- Ensure Safety: Work in a well-ventilated area. Wear chemical-resistant gloves and eye protection.
- Apply Sparingly: Apply a small amount of the specialized remover to a microfiber applicator pad.
- Work in Small Sections: Gently rub the product onto a 1×1 foot section of glass using circular motions.
- Monitor and Rinse: Allow the product to dwell for 30-60 seconds, as per manufacturer instructions. Do not let it dry on the glass. Immediately rinse the area thoroughly with water and dry with a clean microfiber towel.
- Repeat if Necessary: For very stubborn spots, a second application may be required after thorough rinsing and drying of the first.
Implementing Long-Term Prevention Strategies
Prevention is the most effective long-term solution. Modern advancements in automotive coatings offer robust protection. A 2025 study by CarCare Innovations found that proper preventative measures can reduce hard water spot formation by up to 90%.
- Apply a Ceramic or Polymer Sealant: Post-cleaning, apply a high-quality ceramic coating or synthetic polymer sealant. Modern formulations, often offering 3-5 years of protection, create a hydrophobic barrier that repels water and prevents mineral adhesion. This also simplifies future cleaning.
- Regular Washing and Drying: Wash your vehicle regularly, especially after rain or automatic car washes. Immediately dry all glass surfaces using a dedicated drying towel or air blower to prevent water from evaporating and leaving deposits.
- Install a Water Softener: For home car washing, installing a portable or inline water softener system can significantly reduce mineral content in your wash water, drastically lowering the risk of hard water spots. These systems, readily available by 2027, offer a cost-effective long-term solution.
What If It Still Doesn’t Work?
Despite diligent efforts, deeply etched hard water spots can sometimes remain, indicating permanent damage to the glass surface. This often occurs when mineral deposits are left untreated for extended periods, allowing the acids within the deposits to physically etch the glass. If your glass remains clouded or marked after attempting the advanced solutions, consider these fallback options.
- Professional Detailing Service: Seek a reputable automotive detailing specialist. They possess industrial-grade polishing compounds and rotary tools designed to safely remove micro-etching without distorting the glass. According to the 2027 National Auto Detailing Association (NADA) guidelines, deep etching requires specialized equipment. Expect costs for professional hard water spot removal on all windows to range from $85 to $190, depending on vehicle size and severity.
- Glass Polishing (Advanced DIY): For those with experience, specialized glass polishing kits can address minor etching. These kits typically include cerium oxide compound and a polishing pad. Caution is paramount, as improper technique can cause optical distortion or heat damage. This method is generally not recommended for novices.
- Glass Replacement: As a last resort, if the glass is severely etched to the point of impairing visibility or aesthetic appeal, replacement may be necessary. This is the most expensive option, with costs for a single windshield or side window ranging from $320 to $850 in 2027, depending on the vehicle’s make, model, and presence of integrated sensors.
Conclusion
Persistent hard water spots on auto glass are a common problem in 2027, stemming from mineral deposits left by evaporating water. Effective removal involves a progressive approach, from mild acidic solutions to specialized removers, culminating in critical preventative measures like ceramic coatings and diligent drying. According to verified research and expert sources, consistent application of these methods ensures clear, spot-free glass. Take the actionable next step today: implement a weekly drying routine immediately after washing to prevent new spots from forming.
❓ Frequently Asked Questions
What is the best initial DIY method for removing hard water spots from auto glass?
The best initial DIY method involves using a 1:1 mixture of distilled white vinegar and distilled water. Spray it onto the glass, let it dwell for 5-10 minutes, and then wipe it off with a clean microfiber towel, followed by rinsing and drying.
Are there specific tools or products I should use for tough hard water spots?
For tougher spots, you might need a dedicated automotive hard water spot remover or a fine-grade clay bar with a lubricating spray. For severely etched spots, a glass polishing compound with a machine polisher may be required.
How do I ensure I don’t damage my car’s paint or trim while removing spots from glass?
To protect paint and trim, always mask off adjacent areas with painter’s tape if using stronger chemicals. Rinse chemicals off promptly and thoroughly, and avoid letting any solution dry on surfaces other than the glass.
What’s the difference between hard water spots and water etching, and how do I treat etching?
Hard water spots are surface mineral deposits, while water etching is permanent damage to the glass surface caused by prolonged exposure to acidic mineral deposits. Etching typically requires abrasive methods like specialized glass polishing compounds to smooth the glass surface.
Can regular car washing methods remove hard water spots?
No, regular car washing with pH-neutral soap is typically insufficient to remove hard water spots, as these soaps are designed to lift dirt and grime, not dissolve mineral deposits. Specialized acidic cleaners or abrasive methods are needed for mineral removal.
After removing the spots, how can I keep my auto glass spot-free for longer?
To keep your auto glass spot-free, always dry the car immediately after washing using a leaf blower or soft microfiber towels. Applying a hydrophobic glass sealant or ceramic coating can also create a barrier that repels water and makes future cleaning easier.