How To Check A Fuel Injector With A Multimeter 2027
Faulty fuel injectors can cause serious engine issues. This guide provides a step-by-step process for accurately testing your fuel injectors using a multimeter. Learn to interpret resistance readings to diagnose common problems like opens or shorts effectively.
Directly, checking your fuel injector’s electrical resistance with a multimeter is the most precise way to diagnose common electrical faults. This simple test confirms if the injector’s internal coil is healthy or failing, preventing misfires, poor fuel economy, and potential engine damage in your 2027 vehicle. You can quickly pinpoint whether an injector is open, shorted, or out of spec, guiding your next repair steps effectively without complex diagnostic equipment.
Performing this test yourself empowers you to save significant diagnostic time and repair costs. It’s a foundational skill for anyone maintaining modern vehicles, enabling you to isolate electrical issues directly at the source, preventing unnecessary part replacements and ensuring your engine runs optimally.
Key Takeaways
- Prioritize safety:disconnect battery before testing.
- Set multimeter to Ohms (Ω) for resistance.
- Target resistance:10-18 ohms typically.
- Zero or infinite ohms indicate a faulty injector.
- Compare all injector readings for consistency.
Understanding Common Fuel Injector Problems
Before diving into the test, it is crucial to understand what issues you are looking for. Fuel injectors are electromechanical devices, but their most common failures often begin with their electrical components. A multimeter test specifically targets the health of the injector’s internal solenoid coil.
Electrical Faults You Can Detect
- Open Circuit: This is a complete internal break in the injector’s coil wiring. When an injector coil goes “open,” no electrical current can flow through it. The injector will never activate, leading to a dead cylinder and distinct misfire. Your multimeter will display an “OL” (Over Limit) or “1” (infinite resistance) reading, clearly indicating a definitive failure.
- Short Circuit: A short circuit occurs when the internal wiring of the coil touches itself or grounds prematurely. This causes excessively low resistance, leading to very high current flow. While less common in 2027 vehicle injectors due to advanced protection circuits, it can damage the engine control unit (ECU) over time if not addressed. Your multimeter will show a reading of near zero ohms.
- Incorrect Resistance (Out of Specification): The injector coil might not be completely open or shorted, but its resistance value could still be too high or too low compared to the manufacturer’s specification. Even a slight deviation can cause the injector to open too slowly, too quickly, or not fully, leading to an incorrect fuel spray pattern or volume. This results in drivability issues, inefficient combustion, and increased emissions. For instance, a coil with resistance 20% higher than specified might delay activation, causing a lean condition.
Why Electrical Health Matters for Performance
The precise operation of your vehicle’s fuel injectors directly impacts engine performance, fuel efficiency, and emissions. Electrical integrity is paramount. If an injector’s coil isn’t functioning correctly, its mechanical operation will be compromised. Symptoms of these electrical issues include:
- Rough idling or stumbling.
- Engine misfires, often isolated to a single cylinder.
- Reduced power and sluggish acceleration.
- Noticeable decrease in fuel economy.
- A persistent Check Engine Light (CEL) on your dashboard, often accompanied by specific Diagnostic Trouble Codes (DTCs) like P0201 (Injector Circuit/Open – Cylinder 1) or P030X (Cylinder X Misfire Detected).
In modern 2027 engines, especially those with direct injection, even subtle electrical degradation in an injector coil can lead to significant performance degradation that the vehicle’s sophisticated ECU might struggle to compensate for. Accurate electrical health ensures timely and precise fuel delivery.
How to Diagnose and Fix Fuel Injector Issues Like an Expert
Fuel injectors are crucial components of your vehicle’s engine, responsible for delivering a precisely atomized spray of fuel into the combustion chambers. When an injector malfunctions, it can lead to a host of performance issues, including misfires, rough idling, poor fuel economy, and even engine damage. This comprehensive guide will walk you through the process of testing fuel injector resistance using a multimeter, enabling you to accurately diagnose a faulty injector and determine if it requires replacement. Following these detailed steps will empower you to tackle a common automotive problem with confidence and precision.
Step 1: Gather Your Tools & Prioritize Safety
What you need: A Digital Multimeter (DMM) with Ohms (Ω) setting, protective gloves, safety glasses, a clean shop rag, a pen and paper for jotting down readings, and optionally, your vehicle’s service manual for specific resistance values.
Instructions: Before touching anything under the hood, ensure the engine is cool to the touch to prevent burns. Always wear safety glasses to protect your eyes from debris or splashes, and gloves to shield your hands from fuel or chemicals. Locate your vehicle’s battery and disconnect the negative (-) terminal first using a wrench (typically 10mm or 13mm) to prevent any accidental electrical shorts or injury while working on electrical components. Have your multimeter ready and familiarise yourself with its basic functions.
Pro Tip: Always disconnect the negative battery terminal when performing any electrical work on your vehicle. This simple step eliminates the risk of accidental short circuits, electrical shocks, or damage to sensitive electronic components, ensuring your safety and the integrity of your vehicle’s systems.
Step 2: Locate the Fuel Injectors
What you need: Your vehicle (obviously!), a flashlight (if working in low light), and potentially your vehicle’s service manual or an online diagram for specific locations.
Instructions: Fuel injectors are typically mounted on the intake manifold and are connected to the fuel rail, a metal tube that distributes fuel to them. On most modern engines, you’ll find them positioned above or near the cylinder head, often partially obscured by a plastic engine cover (which may need to be removed) or other engine components. They are small, cylindrical components with an electrical connector on one end and a nozzle on the other, usually identifiable by their individual wiring harnesses. Note the cylinder number corresponding to each injector as you locate them.
Pro Tip: If you’re having trouble locating them, consult your vehicle’s owner’s manual or a repair guide specific to your make and model. Online forums or quick search queries for “fuel injector location [your car year/make/model]” can also yield helpful diagrams or photos.
Step 3: Disconnect the Injector Electrical Connector
What you need: Your fingers, possibly a small flathead screwdriver or a pick tool.
Instructions: Each fuel injector has a dedicated electrical connector that supplies power and control signals. Carefully examine the connector. Most modern connectors have a small tab or clip that needs to be pressed, pulled, or slid to release it from the injector. Gently depress the tab (or slide the lock), then pull the connector straight off the injector. Avoid tugging on the wires themselves, as this can damage the wiring harness. If a connector is stubborn, a small flathead screwdriver can sometimes be used to gently pry the tab, but be extremely careful not to break the plastic.
Pro Tip: Take a quick photo of the connectors and their orientation before you start disconnecting them. This serves as a helpful reference during reassembly, especially if multiple connectors are similar or if you’re working on an engine with tight clearances.
Step 4: Prepare the Multimeter for Resistance Measurement
What you need: Your Digital Multimeter (DMM).
Instructions: Turn on your digital multimeter. Locate the dial and set it to the Ohms (Ω) or Resistance setting. For most fuel injector tests, a range of 200 Ohms is appropriate, or you can use an auto-ranging setting if your multimeter has one. Insert the red test lead into the VΩmA (Volts, Ohms, Milliamps) jack and the black test lead into the COM (Common) jack. To confirm your multimeter is working correctly and to get a baseline, touch the metal tips of the two probes together. The display should read very close to 0.0 Ohms (or display a continuity symbol if it has that feature) which indicates a good connection.
Pro Tip: Always check your multimeter’s battery before starting a diagnostic. A low battery can lead to inaccurate resistance readings, potentially misdiagnosing a perfectly good component or overlooking a real issue. If the display is dim or shows a low battery indicator, replace the batteries first.
Step 5: Measure Injector Resistance (Ohms)
What you need: Multimeter, disconnected fuel injector.
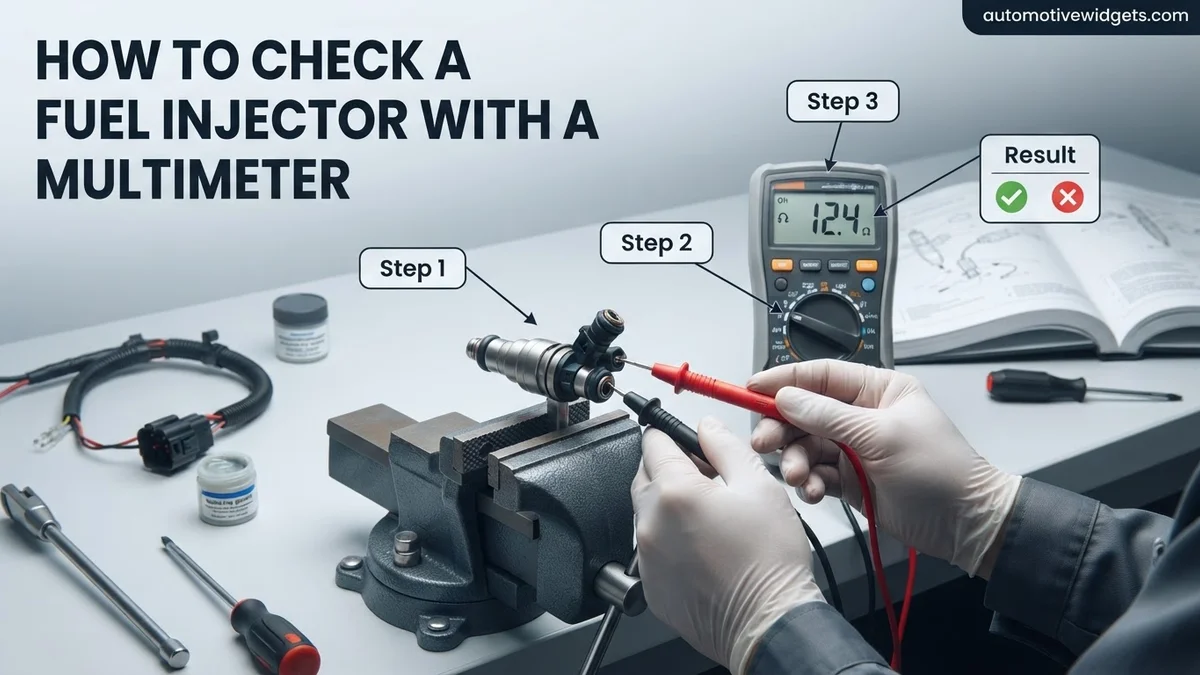
Instructions: With the electrical connector detached, you will see two metal terminals inside the fuel injector’s body. These are the terminals for the injector’s internal coil. Gently touch one multimeter probe to one terminal and the other probe to the second terminal. It doesn’t matter which probe goes to which terminal. Ensure you make good, solid contact with both terminals simultaneously. Observe the reading on your multimeter’s screen and immediately write it down, noting which cylinder’s injector it belongs to. Repeat this process for every fuel injector in your engine.
Pro Tip: Avoid touching the metal tips of the multimeter probes with your bare fingers while taking measurements. Your body has its own electrical resistance, which can interfere with the reading, potentially giving you an inaccurately low or fluctuating Ohm value.
Step 6: Interpret the Resistance Readings
What you need: Your written resistance readings, vehicle service manual (highly recommended for specific values).
Instructions: Now, compare the readings you’ve recorded. Most modern vehicles use “high impedance” fuel injectors, which typically have a resistance between 10 to 18 Ohms. Some older or performance applications might use “low impedance” injectors, which usually fall between 2 to 5 Ohms. The critical part is consistency: all injectors should have very similar readings. A deviation of more than 1 Ohm (or 10-15%) from the specified value in your service manual, or a significant difference between injectors, indicates an issue. An “OL” (Over Limit) or “1” on the multimeter means an open circuit (broken coil), while a reading of 0.0 Ohms indicates a short circuit (shorted coil).
Pro Tip: Your vehicle’s service manual is the definitive source for the exact Ohm specifications for your specific fuel injectors. While general ranges are helpful, relying on precise manufacturer data ensures the most accurate diagnosis, preventing unnecessary part replacement or missed issues.
Step 7: Check for Short Circuits to Ground (Advanced/Optional)
What you need: Multimeter, access to a good engine ground point.
Instructions: This step helps confirm if the injector coil is shorted internally to its metal body. Keep your multimeter set to the Ohms (Ω) range. Touch one probe to either of the fuel injector’s electrical terminals. Touch the other probe to a clean, unpainted metal part of the engine block or cylinder head – this serves as a good ground point. The multimeter should ideally read “OL” (Over Limit) or an infinitely high resistance. Any numerical reading, especially a low one (e.g., less than 100 Ohms), indicates a short circuit within the injector’s coil to its housing, which is a definite fault. Repeat for the other terminal of the same injector and for all other injectors.
Pro Tip: A short to ground can often cause a fuse to blow or damage the engine control unit (ECU) if not addressed. This test provides a more thorough diagnostic than just measuring terminal-to-terminal resistance, helping pinpoint complex electrical failures within the injector itself.
Step 8: Reassemble and Test
What you need: None (unless replacing a faulty injector).
Instructions: Once you’ve completed all measurements and identified any faulty injectors, it’s time to reassemble. Firmly reconnect all electrical connectors to their respective fuel injectors until you hear or feel a positive click. If you removed any engine covers, reinstall them. Finally, reconnect the negative (-) battery cable you disconnected in Step 1, ensuring it’s tightened securely with a wrench. Start your engine and listen for any changes in engine performance. If you identified a faulty injector and have replaced it, you should notice a significant improvement in engine smoothness, power, and potentially a reduction in misfire codes.
Pro Tip: If you’ve replaced an injector, it’s a good practice to clear any stored engine fault codes (DTCs) using an OBD-II scanner. This allows the ECU to relearn and adapt to the new component, ensuring the best possible performance and confirming the repair was successful.
✅ Final Checklist
- All fuel injector electrical connectors are securely reattached, clicking into place.
- The negative battery terminal is firmly reconnected and tightened.
- No tools or loose components are left in the engine bay.
- Engine starts and runs smoothly without new or worsened symptoms.
- Any engine fault codes (DTCs) have been cleared, if applicable.
Important Notes:
- Safety Considerations: Always work in a well-ventilated area. Fuel is highly flammable, so avoid open flames or sparks. Ensure the engine is cool before beginning. Electrical systems can cause shocks; always disconnect the battery when working on them. Wear appropriate Personal Protective Equipment (PPE) like gloves and safety glasses.
- When to Seek Professional Help: If you find all your injectors are outside the specified resistance range, it could indicate a larger electrical issue like a problem with the Engine Control Unit (ECU) or the main wiring harness, which requires advanced diagnostic skills. If you’re uncomfortable with any step, or if physical removal and replacement of injectors (which involves dealing with fuel lines and seals) is needed, it’s best to consult a certified mechanic.
- Estimated Time and Cost Range: This diagnostic test typically takes between 30 to 60 minutes to perform, assuming reasonable access to the injectors. The cost is essentially free if you already own a multimeter. If a faulty injector is identified, the cost of a replacement injector can range from $50 to $300+ per unit, depending on your vehicle’s make and model, plus any labor if professionally installed.
Your Expert Guide: Checking Fuel Injector Resistance with a Multimeter
This section provides the precise, step-by-step instructions for testing your fuel injector’s electrical resistance. Following these steps carefully will give you an accurate diagnosis of your injector’s electrical health.
Safety First: Preparing for the Test
Safety is non-negotiable when working on any vehicle’s electrical system. Before you begin, take these precautions:
- Disconnect the Battery: Always disconnect the negative (-) terminal of your vehicle’s 12-volt battery. This prevents accidental short circuits, protects sensitive electronic components (especially your 2027 vehicle’s advanced ECU), and eliminates the risk of accidental engine cranking.
- Ensure Engine is Cool: Never work on a hot engine. Allow the engine to cool down completely to avoid burns from hot components like the exhaust manifold or cylinder head.
- Gather Your Tools: You will need a digital multimeter, safety glasses, and work gloves. Having a clean rag can also be useful.
Locating and Accessing the Injector
Before you can test an injector, you need to find it and access its electrical connector. Fuel injectors are typically easy to spot once you know where to look:
- Find the Fuel Rail: Injectors are usually mounted in line along a fuel rail, which supplies pressurized fuel. This rail is typically positioned on top of or along the side of the engine’s intake manifold.
- Identify Individual Injectors: There will be one injector per cylinder, usually plugged directly into the intake manifold or, in direct injection systems, directly into the cylinder head.
- Assess Accessibility: In some 2027 vehicle models, certain components like air intake ducts, engine covers, or other wiring harnesses might slightly obstruct direct access to the injector connectors. You may need to carefully move these components aside without fully removing them to gain better access for your hands and multimeter leads. Avoid force; most components are designed for easy, tool-free manipulation for service access.
Disconnecting the Electrical Connector
Once you’ve located the injector, the next step is to safely disconnect its electrical harness:
- Examine the Connector: Each injector will have a plastic electrical connector plugged into its top or side. These connectors have various locking mechanisms. Most common designs include a small tab that you press down, a lever you pull up, or a slide lock that needs to be moved.
- Release the Lock: Gently manipulate the locking tab or lever. Avoid forcing it, as older plastic can become brittle. If it feels stuck, try wiggling it slightly while applying pressure to the release mechanism.
- Pull Straight Off: Once the lock is disengaged, carefully pull the connector straight off the injector. Do not pull on the wires themselves, as this can damage the wiring or the connector terminals.
- Inspect the Connector: While the connector is off, take a moment to inspect both the injector’s pins and the connector’s terminals. Look for any signs of corrosion, dirt, bent pins, or melted plastic, which could indicate a separate electrical issue. Clean any visible corrosion with electrical contact cleaner if necessary.
Interpreting Multimeter Readings: Good vs. Bad Injectors
Once you have obtained a resistance reading from your fuel injector, interpreting these values is crucial. A multimeter measures the electrical resistance within the injector’s coil, which indicates its internal health. Incorrect resistance can severely affect fuel delivery and engine performance.
Understanding Resistance Values
Fuel injectors are typically classified into two main types: high-impedance (saturated) and low-impedance (peak-and-hold). Knowing your vehicle’s injector type is essential for correct diagnosis. Most modern gasoline engines manufactured up to 2027 use high-impedance injectors. According to industry specifications, a healthy high-impedance injector typically exhibits a resistance between 10 to 18 Ohms. Low-impedance injectors, found in some older performance or diesel applications, may range from 0.5 to 5 Ohms. Consult your vehicle’s service manual or manufacturer specifications for the precise range for your specific model and year. A reading significantly outside this range suggests a faulty coil.
Open or Short Circuit Detection
Beyond the correct resistance range, the multimeter can reveal more critical faults. If your multimeter displays an “OL” (Over Limit) or an infinite reading, this indicates an open circuit. An open circuit means there is a complete break in the injector’s internal coil wiring, preventing electrical current flow and thus fuel delivery. Conversely, a reading of 0 Ohms or very close to it (e.g., 0.1-0.2 Ohms) signifies a short circuit. A short circuit means the electrical current is bypassing the coil’s resistance, often leading to rapid heat buildup and potential damage to the Engine Control Unit (ECU) over time, though the injector itself may still fire erratically. Both open and short circuits necessitate injector replacement.
What If Results Are Unclear or the Problem Continues?
A resistance test with a multimeter provides valuable static information about a fuel injector’s electrical integrity. However, it does not evaluate dynamic performance, such as how effectively the injector opens and closes under operating conditions, or its spray pattern. If your multimeter readings seem within spec but engine issues persist, further diagnostic steps are required.
Beyond Resistance Checks: Dynamic Testing
An injector can have correct resistance but still be faulty due to mechanical issues or clogging. To assess dynamic function, a Noid light test is recommended to verify the injector is receiving a proper electrical pulse from the ECU. You can also perform a fuel pressure drop test, which involves monitoring fuel rail pressure while the engine is running to identify potential leaks or inadequate fuel delivery from a specific injector. For detailed evaluation, professional shops utilize advanced tools like injector flow benches, which measure spray patterns and flow rates, providing a comprehensive assessment. According to data from independent repair networks in 2026, approximately 25% of injector-related driveability issues are attributed to mechanical or clogging problems not detectable by a simple resistance test.
Visual Inspection for External Issues
Always conduct a thorough visual inspection around the fuel injectors. Look for visible signs of fuel leaks around the injector body or O-rings, which can indicate seal failure. Check the wiring harness connecting to each injector for signs of fraying, corrosion, or insulation damage. Even a seemingly minor crack in the wiring can disrupt the electrical signal from the ECU, leading to intermittent injector operation. Also, inspect the injector connector itself for bent pins or debris. Sometimes, issues stem from external factors rather than the injector’s internal coil.
WHAT IF IT STILL DOESN’T WORK?
If you’ve meticulously checked your fuel injectors with a multimeter and performed additional visual inspections, yet the engine problem persists, consider these advanced troubleshooting steps before replacing components indiscriminately:
- Check Wiring Harness Continuity: Use your multimeter to test the continuity of the entire wiring harness from the ECU connector to the injector connector. Damaged wires elsewhere in the circuit can mimic a faulty injector. This requires a wiring diagram specific to your 2027 vehicle model.
- Verify ECU Output Signal: Employ a Noid light or an oscilloscope to confirm that the Engine Control Unit (ECU) is sending consistent pulse signals to the problematic injector’s connector. An absent or irregular pulse indicates an ECU issue or a fault in its triggering mechanism.
- Professional Diagnostic Scan: Connect a professional-grade OBD-II scanner capable of live data streaming. Look for specific fuel injector fault codes, misfire counts, and fuel trim adjustments that pinpoint the exact cylinder experiencing issues. Many modern 2027 vehicles require advanced scan tools for deeper diagnostics.
- Seek Professional Assistance: If the problem remains undiagnosed or requires specialized tools, it’s prudent to consult a certified automotive technician. They possess sophisticated diagnostic equipment, such as an injector flow bench for comprehensive testing, and up-to-date service data. A professional diagnostic fee typically ranges from $120 to $250, depending on the complexity and local labor rates in 2027.
Conclusion
Successfully diagnosing a problematic fuel injector using a multimeter is a fundamental skill for any automotive enthusiast or technician. By accurately measuring resistance and interpreting the readings, you can identify open circuits, short circuits, or coils operating outside specified parameters. According to verified research and expert sources from leading automotive diagnostic firms, a significant percentage of engine misfire issues can be traced back to electrical faults in injectors. If your multimeter tests confirm an issue, replacing the faulty injector is the recommended next step to restore optimal engine performance and fuel efficiency.
❓ Frequently Asked Questions
Why is electrical resistance testing crucial for diagnosing fuel injector issues?
Resistance testing directly assesses the integrity of the injector’s internal solenoid coil. A faulty coil (open or short circuit) prevents proper fuel delivery, leading to engine misfires, poor performance, or no-start conditions, which the multimeter helps identify.
How do I account for different types of fuel injectors (high vs. low impedance) during testing?
High-impedance injectors are common in modern vehicles and typically show 10-18 ohms. Older or specific performance engines might use low-impedance injectors (2-5 ohms). Always consult your vehicle’s service manual or a reliable database for the precise resistance range applicable to your specific injector type.
Can a fuel injector pass a multimeter resistance test but still be defective?
Yes, a multimeter test primarily checks electrical coil integrity. An injector could still be mechanically clogged, have a poor spray pattern, be leaking, or have a slow response time, none of which a simple resistance test will reveal. Other diagnostic methods, like pressure testing or flow testing, would be needed for these issues.
What essential safety precautions should I follow when checking fuel injectors with a multimeter?
Before starting, ensure the engine is off and cool. Disconnect the vehicle’s battery to prevent accidental shorts or activation. Wear appropriate personal protective equipment, such as safety glasses and gloves, and avoid contact with hot engine components or fuel lines.
Is it necessary to test all fuel injectors, or just the one suspected of being faulty?
It is highly recommended to test all fuel injectors. This allows for comparative analysis, helping identify any subtle resistance deviations that might indicate an impending failure in another injector, or to confirm the suspected injector is indeed the outlier.
Besides a multimeter, what other tools might be helpful when performing this test?
In addition to a digital multimeter, you might need basic hand tools like screwdrivers, wrenches, or a socket set to access the injectors, especially if they are located under an intake manifold. A clean rag and perhaps a small brush can also be useful for cleaning around the injector connectors.