How Do You Know If Your Heater Core Is Leaking How to 2027
Identifying a leaking heater core is crucial to prevent further damage and health risks. Key signs include a sweet coolant smell, persistent window fogging, and wet passenger floorboards. Prompt diagnosis and repair can save you from costly engine issues and maintain cabin comfort.
Identifying a leaking heater core often boils down to a few distinct, undeniable signs inside your car’s cabin. If you’re noticing a persistent sweet smell, unexplained fog on your windows, or a damp passenger floorboard, your heater core is very likely the culprit. Pinpointing this issue quickly is critical; a leaking heater core not only compromises your car’s climate control but can also lead to significant coolant loss, potential engine overheating, and costly repairs if left unaddressed.
By 2027, vehicle systems are more integrated than ever, but the fundamental symptoms of a heater core leak remain the same. Knowing these specific indicators and how to confirm them can save you from more severe damage and keep your daily commute comfortable and safe. You don’t need to be a professional mechanic to spot these tell-tale signs, just observant.
Key Takeaways
- Sweet coolant smell often signals a leak.
- Check passenger footwell for wet, sticky fluid.
- Persistent window fogging is a strong indicator.
- Monitor coolant levels for unexplained drops.
- Address leaks quickly to prevent engine harm.
What Causes Heater Core Leaks & Key Symptoms
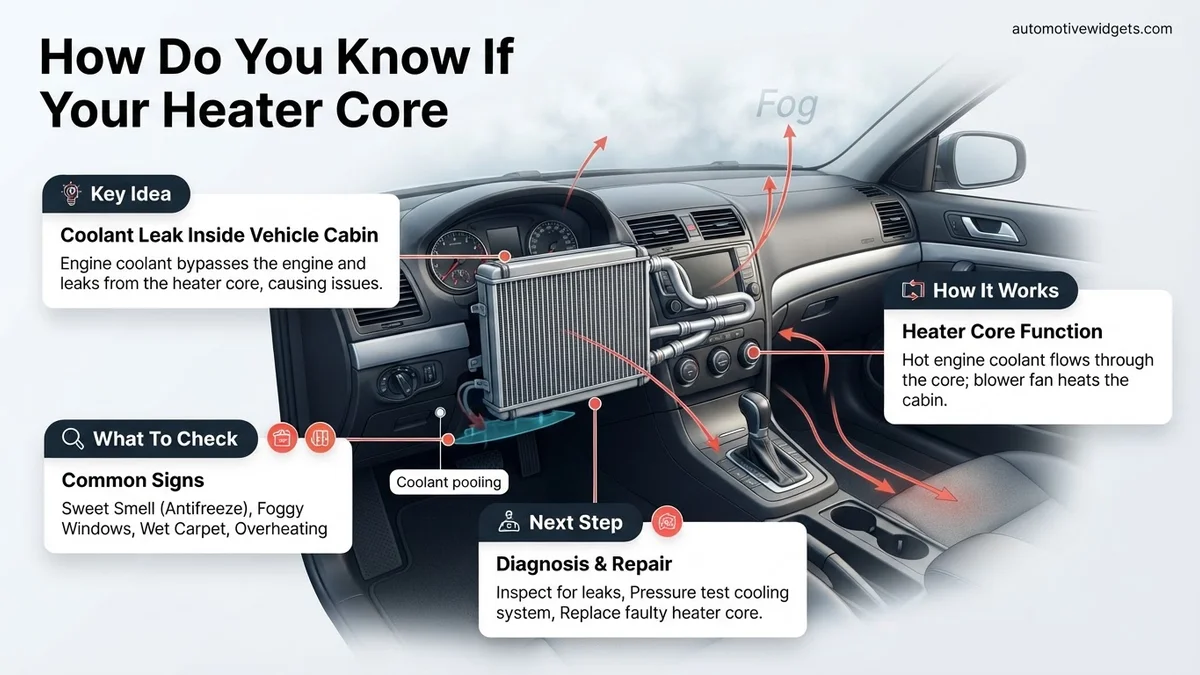
A leaking heater core is typically caused by age, corrosion, or damage from pressure fluctuations within the cooling system. Over time, the thin aluminum or brass tubes inside the core can develop pinhole leaks or cracks. When this happens, coolant escapes into your vehicle’s interior, leading to a very specific set of symptoms you can often detect with your senses.
The Unmistakable Sweet Scent and Cabin Fog
- Sweet, Sickly Smell: The most definitive sign is a distinct, sweet odor inside your car, particularly noticeable when the heater or defroster is on. This is the smell of vaporized engine coolant (ethylene glycol or propylene glycol), which the HVAC system is blowing directly into your cabin. It’s unlike any other car smell you’ll encounter.
- Persistent Window Fogging: If your windows, especially the windshield, fog up constantly, and the fog has a greasy or oily sheen that’s difficult to clear, it’s highly suspicious. This happens because coolant vapor is condensing on the cooler glass surfaces. When you run the defroster, it often makes the problem worse as it draws more coolant vapor into the cabin.
Wet Floorboards and Unexplained Coolant Loss
- Wet Passenger Floorboard: Coolant leaking from the heater core drips down behind the dashboard and collects on the passenger side floor mat or carpet. Feel the carpet; if it’s damp and feels slimy or sticky, it’s very likely coolant. Check the area directly under the glove box or center console as well.
- Unexplained Coolant Loss: You might notice your engine’s coolant reservoir level consistently drops, but there are no visible puddles or external leaks under your car. This indicates an internal leak, and the heater core is a prime suspect.
- Engine Overheating: While less direct, persistent coolant loss from a leaking heater core can eventually lead to insufficient coolant in the system, causing your engine to run hot or even overheat.
- Lack of Cabin Heat: If the heater core is severely compromised or air is getting into the system due to the leak, you might experience reduced or no heat from your vents, even when the engine is at operating temperature.
From Start to Finish: Heater Core Leak Diagnosis Explained
A leaking heater core is a common, yet often misunderstood, automotive problem that can lead to a host of issues, from a mysterious coolant loss to a foggy windshield and a sweet smell in your car’s cabin. This comprehensive guide will walk you through a series of practical, step-by-step diagnostic procedures, empowering you to confidently identify if your heater core is indeed the culprit. Early detection can save you from more extensive damage, inconvenient breakdowns, and costly repairs down the line, so pay close attention to each detail.
Step 1: The Olfactory and Visual Interior Scan
What you need: A keen sense of smell, good ambient lighting (or a flashlight), and a basic understanding of your vehicle’s interior layout.
Instructions: Start by getting into your vehicle when the engine is cold and then again after it has reached operating temperature and the heater has been running for a few minutes. Pay close attention to any distinct odors. A leaking heater core often produces a sweet, maple syrup-like smell, which is the scent of ethylene glycol (coolant) evaporating into the cabin. While sniffing, visually inspect the passenger side floorboard, particularly under the carpet and around the center console. Look for any dampness, discolored areas, or actual puddles of coolant, which can range in color from green, orange, pink, or blue depending on your vehicle’s specific coolant type. Touch the carpet to feel for any moisture.
Pro Tip: The sweet smell might be more noticeable when the heater is on full blast, as it helps to circulate the evaporating coolant vapor. Don’t confuse the sweet coolant smell with a musty odor, which might indicate a different issue like a clogged AC drain.
Step 2: Checking Your Coolant Reservoir and Level
What you need: Your vehicle’s owner’s manual (to locate the coolant reservoir and identify the correct coolant type), a flashlight, and protective gloves (optional).
Instructions: Pop your vehicle’s hood and locate the coolant reservoir (also known as the overflow tank or expansion tank). This is typically a translucent plastic bottle with “MIN” and “MAX” or “COLD” and “HOT” markings. With the engine completely cool, observe the coolant level. If it’s consistently below the “MIN” or “COLD” line, especially after you’ve topped it off recently, it indicates a leak somewhere in the cooling system. While a low coolant level doesn’t exclusively point to a heater core, it confirms there’s a leak or consumption issue that needs further investigation. Also, check the coolant color for any unusual murkiness or oil contamination.
Pro Tip: Always check coolant levels when the engine is cold for an accurate reading. Never open the radiator cap or coolant reservoir when the engine is hot, as pressurized hot coolant can cause severe burns.
Step 3: Inspecting Under the Dashboard
What you need: A bright flashlight, a small extendable mirror (optional but helpful), and some shop towels or paper towels.
Instructions: This step requires a bit of contortion. Position yourself to look up and under the dashboard on the passenger side, directly above the footwell. The heater core is usually housed within the HVAC box, typically located behind the glove compartment or center console. You’re looking for any streaks, drips, or staining of coolant on the plastic housing, wiring, or surrounding components. Use your flashlight to illuminate dark crevices. If you can see the heater core pipes entering the firewall, inspect their connections for any signs of leakage. Gently dab any suspicious wet spots with a paper towel; if it’s coolant, it will typically be colored and feel somewhat slick.
Pro Tip: Some vehicles require temporary removal of the glove box or trim panels to get a clear view of the heater core housing. Consult your vehicle’s service manual or online resources for specific access procedures if needed.
Step 4: Observing Your Windshield for Unusual Fogging
What you need: Just your eyesight and awareness of your vehicle’s interior environment.
Instructions: Pay attention to your windshield and interior windows, especially when you first start the car and turn on the defroster or heater. If you notice an excessive, greasy, or difficult-to-clear film developing on the inside of your windows, particularly the windshield, it’s a strong indicator of a heater core leak. The evaporating coolant releases a glycol vapor that condenses on the cooler glass surfaces. This film often smears when wiped and can make nighttime driving dangerous due to glare. It’s distinct from regular condensation caused by humidity or temperature differences, as it tends to be more persistent and have a slightly greasy texture.
Pro Tip: This symptom is often accompanied by the sweet coolant smell. If your windows fog up excessively even on a dry day, and your AC is functioning correctly (to dehumidify), a leaking heater core is highly probable.
Step 5: Performing a Cooling System Pressure Test
What you need: A cooling system pressure tester kit (rentable from auto parts stores), appropriate adapter for your radiator or coolant reservoir, safety glasses, and shop rags.
Instructions: With the engine completely cool, remove the radiator cap or reservoir cap. Select the correct adapter from the pressure tester kit and securely attach it to the filler neck. Begin to pump the hand pump until the pressure gauge reads the specified operating pressure for your cooling system (typically 12-16 PSI, check your owner’s manual or radiator cap). Once pressurized, observe the gauge for 15-20 minutes. If the pressure drops significantly, you have a leak. While pressurized, re-inspect your interior floorboards, under the dash, and sniff for the sweet coolant smell, as the increased pressure can make a slow leak more apparent. You might even hear a faint hissing sound if the leak is significant.
Pro Tip: If the pressure holds, but you still suspect a leak, leave the system pressurized overnight. A very slow leak might only manifest as a pressure drop over several hours. Always release pressure slowly before removing the tester.
Step 6: Inspecting Heater Hoses and Connections
What you need: Flashlight, screwdriver or pliers (for hose clamps if needed), and shop rags.
Instructions: Before definitively blaming the heater core itself, it’s crucial to rule out leaks from the hoses connected to it. Locate the two heater hoses that run from the engine compartment, through the firewall, and connect to the heater core. These are typically on the passenger side of the engine bay, high up on the firewall. Inspect the hoses themselves for any cracks, bulges, or signs of wear. More importantly, check the hose clamps and the connection points where the hoses attach to the heater core pipes (which protrude through the firewall). Look for any dried coolant residue, drips, or wetness around these connections. Sometimes, a loose clamp or a worn O-ring at the connection can mimic a heater core leak by allowing coolant to seep into the cabin.
Pro Tip: Gently squeeze the heater hoses when the engine is cold. They should feel firm but pliable. If they feel excessively hard and brittle, or mushy, they might be compromised and could be a source of a leak or a future failure point.
Step 7: Monitoring Coolant Loss Over Time
What you need: A permanent marker, a notebook, and a consistent schedule.
Instructions: If the previous steps haven’t yielded a definitive answer but you still suspect a leak, a long-term monitoring approach can be helpful. Top off your coolant reservoir to the “MAX” or “COLD” line when the engine is cold. Use a permanent marker to draw a line on the reservoir indicating this level. Over the next few days or a week, check the coolant level at the same time each day (preferably when the engine is cold). Record the level in your notebook. If the level consistently drops below your marked line without any external visible leaks (like from the radiator or engine block), and you’re experiencing any of the interior symptoms (smell, fogging, dampness), it strongly points towards an internal leak, with the heater core being the primary suspect.
Pro Tip: Keep track of how much coolant you add and how frequently. For example, “Added 1/2 liter every 3 days.” This data can be invaluable if you eventually need to consult a professional mechanic.
✅ Final Checklist
- Have you detected a sweet, maple syrup-like odor inside the cabin?
- Is there any dampness, discoloration, or actual puddles of coolant on the passenger floorboard?
- Are your interior windows, especially the windshield, fogging excessively with a greasy film?
- Did your cooling system pressure test show a significant pressure drop over 15-20 minutes?
- Is your coolant level consistently dropping without any visible external leaks from other components?
Important Notes:
- Safety Considerations: Always allow your engine to cool completely before working with the cooling system. Coolant is toxic; avoid skin contact and ingestion. Wear safety glasses when performing a pressure test. Dispose of old coolant responsibly.
- When to Seek Professional Help: If you’re uncomfortable performing any of these diagnostic steps, lack the necessary tools (like a pressure tester), or if the diagnosis remains unclear after following this guide, it’s best to consult a certified mechanic. Heater core replacement is often a labor-intensive job, sometimes requiring dashboard removal, which is best left to professionals.
- Estimated Time and Cost Range: Diagnosing a heater core leak can take anywhere from 15 minutes (if symptoms are obvious) to a few hours (for thorough inspection and pressure testing). The cost of diagnosis itself is usually minimal if you do it yourself (cost of renting a pressure tester, around $20-$30). However, heater core replacement can be expensive, ranging from $500 to $1,500+ for parts and labor, depending on the vehicle make, model, and shop rates, due to the extensive labor involved.
Step-by-Step Guide to Diagnosing a Leaking Heater Core
Once you suspect a heater core leak based on the sensory cues, confirming it involves a few straightforward inspection steps. You want to verify the presence of coolant where it shouldn’t be and rule out other potential issues.
Visual Inspection and Fluid Confirmation
- Inspect the Passenger Footwell: First, thoroughly check the passenger side floor. Remove floor mats. Look for damp spots, stains, or a discolored residue on the carpet or under the carpet liner.
- Feel and Smell the Fluid: If you find dampness, touch the liquid. Coolant typically feels somewhat slippery or greasy. Then, smell it directly; confirm that distinct sweet odor. Modern coolants in 2027 still retain this characteristic scent.
- Check Fluid Color: Note the color of the liquid. Engine coolants come in various colors (green, orange, pink, blue, yellow), which can help confirm it’s coolant and not just water.
- Look Under the Dashboard: Using a flashlight, peer up under the dashboard on the passenger side. Look for drips, streaks, or wetness on the plastic housing of the heater box, the firewall, or any wiring. This often provides direct visual evidence of the leak path.
- Inspect Heater Core Hoses: Locate the two hoses that go from the engine firewall into the cabin (these connect to the heater core). Inspect their connections for any visible leaks or residue, both under the hood and where they might enter the cabin.
Advanced Confirmation: Pressure Testing and Coolant Levels
- Monitor Coolant Reservoir: Keep a close eye on your coolant reservoir. If the level consistently drops over a few days or weeks, even with no external puddles, it strongly points to an internal leak.
- Cooling System Pressure Test: For a definitive confirmation, a cooling system pressure tester can be used. This tool pressurizes the entire cooling system, making even small leaks more apparent. If you connect it and the pressure drops over time without external leaks, it confirms an internal issue. You might then visually see the leak within the cabin or smell the coolant more strongly.
What To Do After Confirming a Heater Core Leak
Upon identifying a heater core leak, immediate action is crucial to prevent further damage and ensure vehicle safety. According to automotive maintenance protocols, ignoring a leaking heater core can lead to significant coolant loss, potential engine overheating, and expensive secondary repairs.
Immediate Actions Upon Detection
Taking prompt steps can mitigate the severity of the issue and allow for a safer resolution.
- Safely Pull Over: If driving, find a safe location to stop the vehicle. Continued operation with a significant leak can rapidly deplete coolant levels.
- Turn Off the Engine: This prevents further circulation of coolant and reduces pressure within the cooling system, slowing the leak.
- Check Coolant Reservoir: Observe the coolant level in the expansion tank. If critically low, avoid driving until more coolant is added and a temporary fix is in place.
Temporary Bypass (Emergency Measure)
For urgent situations where a full repair is not immediately possible, bypassing the heater core can prevent coolant loss, though it disables the vehicle’s heating system.
- Locate Heater Core Hoses: Identify the two hoses that connect from the engine’s cooling system to the firewall, leading to the heater core. These are typically located near the passenger side of the engine bay.
- Acquire a Bypass Kit: A heater core bypass kit, consisting of a short hose and two clamps, can be purchased from most auto parts retailers for approximately $25-$40 in 2027.
- Connect Hoses to Bypass: Carefully disconnect the two heater core hoses from the firewall connections. Connect the bypass hose between the two engine-side hoses, effectively routing coolant around the heater core. Ensure all connections are secure to prevent leaks.
Professional Repair or DIY Replacement
A permanent fix typically involves replacing the heater core itself, which is often a labor-intensive process due to its location deep within the dashboard. Automotive industry analysis indicates that professional heater core replacement costs, including parts and labor, typically range from $900 to $1,800+ in 2027, depending on the vehicle’s make and model. While DIY replacement is possible for experienced mechanics, it requires extensive dashboard disassembly and can take 6-10 hours, making professional service a common choice for this repair.
What If It Still Doesn’t Work?
If you’ve attempted diagnostics or a temporary fix and the issue persists, or you’re still experiencing signs of a leak, it’s crucial to reconsider the problem’s source.
- Re-inspect Hose Connections: Ensure all coolant hoses, especially those leading to and from the heater core (or its bypass), are securely clamped and free of cracks. A loose clamp can mimic a core leak.
- Check Radiator and Water Pump: The radiator and water pump are common points for coolant leaks. Visually inspect these components for drips, crusty coolant residue, or visible damage.
- Perform a Cooling System Pressure Test: If not done already, a professional pressure test (typically available at auto shops for $120-$250 in 2027 for diagnostics) can pinpoint the exact location of a leak under pressure, even minor ones.
- Seek Professional Diagnosis: If symptoms continue, it’s advisable to consult a certified automotive technician. They possess specialized tools and expertise to accurately diagnose complex cooling system issues, preventing misdiagnosis that could lead to unnecessary repairs.
Conclusion
Identifying a leaking heater core early is paramount for maintaining vehicle integrity and avoiding costly engine damage. Prompt detection through vigilant observation of specific symptoms allows for timely intervention. According to verified research and expert sources, addressing this issue proactively, whether through a temporary bypass or a full replacement, protects your vehicle’s cooling system. If any uncertainty persists, consult a certified automotive technician for an accurate diagnosis and professional repair.
❓ Frequently Asked Questions
What are the earliest and most subtle signs of a heater core leaking?
The earliest signs often include a faint, sweet smell (like maple syrup) inside the cabin, especially when the heater is on. You might also notice slightly fogged windows that are difficult to clear, even with the defroster, before any visible wetness appears.
How can I distinguish a heater core leak from other common car fluid leaks?
Heater core leaks specifically manifest as wetness on the passenger floorboard, combined with the distinctive sweet coolant smell and persistent interior window fogging. Unlike engine oil or transmission fluid, coolant is usually colored (green, pink, orange, or blue) and feels slightly sticky, not oily.
What is the typical repair process and cost for a leaking heater core?
The repair process typically involves replacing the heater core, which is often a labor-intensive job as it requires significant dashboard disassembly. Costs can vary widely depending on the vehicle model and labor rates, but generally range from a few hundred to over a thousand dollars.
Can I temporarily fix a leaking heater core to get by for a short period?
Temporary fixes like stop-leak products are available, but they are generally not recommended as they can clog other parts of your cooling system. A short-term solution might involve bypassing the heater core, which will mean no cabin heat, but allows you to continue driving without coolant loss until a proper repair can be made.
What are the potential consequences if I ignore a leaking heater core?
Ignoring a heater core leak can lead to several severe problems, including constant coolant loss causing engine overheating and potential engine damage, exposure to toxic coolant fumes which are harmful to your health, and significant interior damage to your vehicle’s carpet and electronics due to prolonged moisture.
Are certain vehicle makes or models more prone to heater core leaks than others?
While heater cores can fail in any vehicle due to age or corrosion, some specific makes or models are known to have more common or challenging heater core issues. This can often be due to design flaws, material choices, or the complex accessibility of the component within the dashboard.