How to Reattach Rear View Mirror to Windshield 2027
Reattaching a rearview mirror to your windshield requires a specific type of adhesive and careful surface preparation. Using the correct method ensures a lasting and safe bond, preventing future detachments. This guide will walk you through the process step-by-step for a durable repair.
When your rearview mirror unexpectedly detaches from your windshield, it’s more than an inconvenience – it’s a safety hazard. The good news is that reattaching it properly is a straightforward DIY task for 2027, requiring specific materials and careful attention to detail. This guide will walk you through securing your mirror button firmly back in place, ensuring a durable bond that withstands daily driving and temperature fluctuations.
Successfully reattaching your rearview mirror means restoring full visibility behind your vehicle, crucial for safe lane changes, parking, and avoiding collisions. Opting for the correct adhesive and following a precise procedure prevents repeated detachment, saving you time, frustration, and potential safety risks on the road. Let’s get your mirror firmly secured.
Key Takeaways
- Use specialized rearview mirror adhesive.
- Clean windshield and button thoroughly.
- Apply adhesive precisely; avoid over-application.
- Allow full curing time for strong bond.
- Temperature impacts adhesive performance.
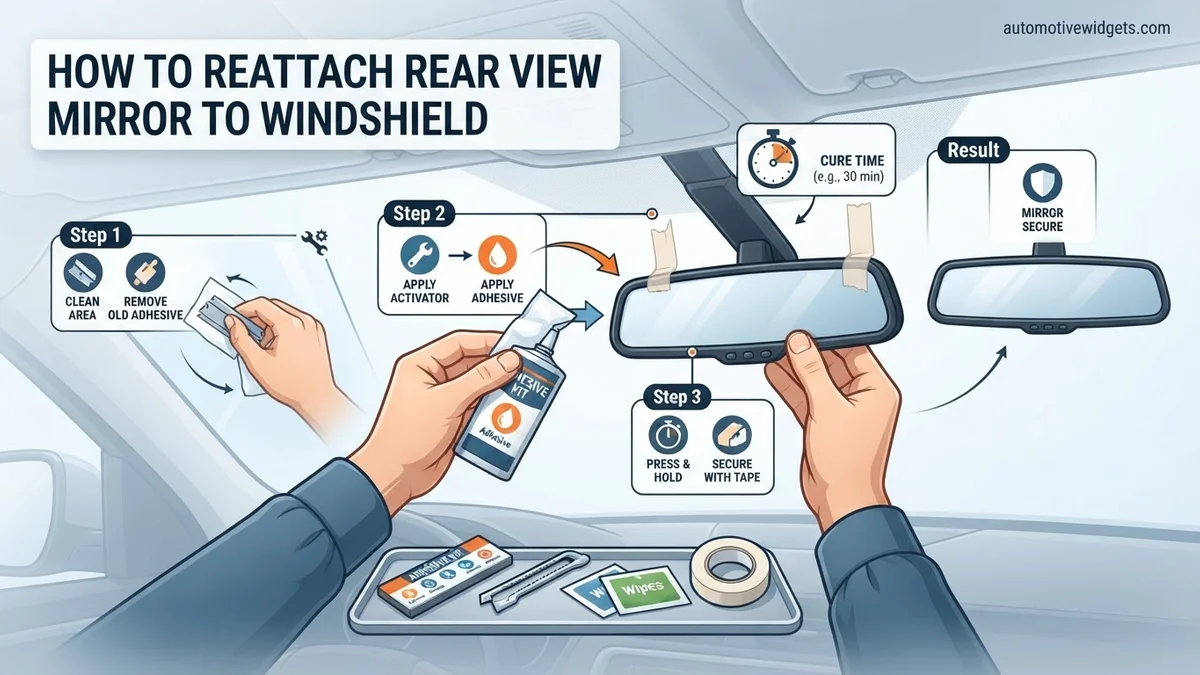
What Causes Your Rearview Mirror to Detach?
Even with advanced automotive manufacturing in 2027, rearview mirror detachment remains a common issue. Understanding the root causes helps in preventing future occurrences and ensures your repair is long-lasting. It’s rarely a sudden failure; rather, it’s usually a cumulative effect on the adhesive bond.
Material Degradation Over Time
- Temperature Extremes: Your windshield experiences significant temperature swings, especially in direct sunlight or freezing conditions. This constant expansion and contraction stresses the adhesive, leading to a breakdown of the bond.
- UV Exposure: Ultraviolet rays from the sun can degrade many types of adhesives over years, causing them to become brittle and lose their elasticity. Even modern UV-resistant compounds have a lifespan.
- Windshield Flex: While subtle, your windshield does flex slightly with vehicle movement and impacts. This constant micro-movement can slowly weaken the bond between the mirror button and the glass.
Installation Errors or Wrong Adhesives
- Incorrect Adhesive Type: Using general-purpose glues like super glue or epoxy is a common mistake. These are not formulated for the specific demands of glass-to-metal bonding under automotive conditions and will fail quickly.
- Improper Surface Preparation: Any grease, oil, or old adhesive residue left on the windshield or mirror button will prevent a new adhesive from forming a strong, lasting bond. Cleanliness is paramount.
- Insufficient Curing Time: Rushing the reattachment process and not allowing the adhesive to fully cure before reattaching the mirror assembly puts immediate stress on the fresh bond, leading to premature failure.
How to Reattach Your Rearview Mirror Like a Pro: A Practical Walkthrough
A dislodged rearview mirror is more than just an inconvenience; it can be a significant safety hazard and, in many regions, a legal requirement to have one properly functioning. Whether it’s due to extreme temperature changes, vibrations, or just the age of the original adhesive, reattaching your rearview mirror is a common DIY task that can save you a trip to the mechanic. This comprehensive guide will walk you through every step, ensuring a secure and lasting bond, so you can get back on the road safely and with clear visibility.
Step 1: Preparation is Key: Gathering Your Tools
What you need: Rearview mirror adhesive kit (e.g., Loctite, Permatex), razor blade scraper, rubbing alcohol (or adhesive prep pad from kit), clean paper towels or microfiber cloth, painter’s tape, a washable marker (optional), and safety glasses.
Instructions: Before you begin, lay out all your necessary tools and materials within easy reach. Thoroughly read the specific instructions provided with your chosen rearview mirror adhesive kit, as procedures can vary slightly between brands. Ensure you have adequate lighting to clearly see the working area. Inspect your mirror button (the small metal piece that glues to the windshield) for any damage or excessive old adhesive that might hinder a flat reattachment.
Pro Tip: Always purchase a fresh rearview mirror adhesive kit. The activator or adhesive in older kits can dry out or lose effectiveness, leading to a weak or failed bond. It’s a small investment for a secure repair.
Step 2: Safety First: Clearing the Old Adhesive
What you need: Razor blade scraper, safety glasses, clean paper towels.
Instructions: Don your safety glasses. Carefully use the razor blade scraper to remove all traces of old adhesive from both the windshield glass where the mirror button was previously attached and from the metal mirror button itself. Hold the scraper at a shallow angle to avoid scratching the glass. Be meticulous; any residual adhesive will prevent a strong new bond. Collect the scraped debris with a paper towel and dispose of it properly.
Pro Tip: If the old adhesive is stubborn, you can gently warm the area with a hairdryer on a low setting for 30-60 seconds. This can soften the old adhesive, making it much easier and safer to scrape off without excessive force or risk of scratching the glass.
Step 3: Cleanliness is Crucial: Preparing the Bonding Surfaces
What you need: Rubbing alcohol (or kit’s cleaner pad), clean paper towels or microfiber cloth.
Instructions: This is arguably the most critical step. Thoroughly clean both the specific area on the windshield where the mirror button will attach and all surfaces of the metal mirror button itself with rubbing alcohol. Use a fresh, clean paper towel or the provided prep pad from your kit. Wipe until no streaks, smudges, dust, or residue remain. Allow both surfaces to air dry completely for 1-2 minutes. Any oils, dirt, or leftover cleaning solution will compromise the adhesive’s ability to bond properly.
Pro Tip: After cleaning, avoid touching the bonding surfaces (the glass area and the mirror button) with your bare fingers. Skin oils can transfer and create an invisible barrier that prevents the adhesive from adhering strongly.
Step 4: Precision Placement: Marking the Spot
What you need: Painter’s tape, washable marker (optional), original mirror assembly (for reference).
Instructions: Sit in the driver’s seat and hold the mirror assembly up to the windshield to determine the optimal position for viewing. While holding it, have a helper, or carefully step outside the vehicle. From the outside of the windshield, use painter’s tape to create an outline or place small guide marks exactly where the mirror button needs to be reattached. This ensures the mirror will be centered, level, and at the correct height for comfortable viewing once reinstalled.
Pro Tip: Many vehicle manufacturers etch a faint, almost invisible circle or square into the windshield glass that indicates the precise factory-recommended mounting point for the mirror button. Look closely for this guide before marking your own spot.
Step 5: Adhesive Application: The Bonding Process
What you need: Rearview mirror adhesive kit (activator/primer, adhesive resin).
Instructions: Carefully follow the specific application instructions provided with your adhesive kit. Typically, you will first apply the activator (often a small wipe or brush applicator) to both the cleaned windshield area and the face of the metal mirror button. Allow it to “flash dry” for about 30-60 seconds, or until it’s no longer visibly wet. Next, apply a single, small, pea-sized drop of the liquid adhesive (resin) directly to the center of the mirror button. Do NOT spread the adhesive; it will spread naturally when pressed against the glass.
Pro Tip: Resist the urge to use more adhesive than recommended. Too much adhesive can actually create a weaker bond by not allowing proper curing, and it will also squeeze out, creating a messy appearance that’s difficult to clean.
Step 6: Secure Attachment: Mounting the Mirror Button
What you need: Prepared mirror button with adhesive, marked windshield.
Instructions: Immediately after applying the adhesive, carefully align the mirror button with your marked outline on the windshield. Press the button firmly and steadily against the glass. Maintain consistent, firm pressure without wiggling or twisting for the duration specified by the adhesive manufacturer, which is typically between 60 seconds and 5 minutes. This initial pressure is crucial for the adhesive to grab and begin forming a strong bond.
Pro Tip: If the adhesive requires a longer initial hold time (e.g., several minutes) and you find it difficult to hold it manually, you can use strong painter’s tape or masking tape to secure the button in place against the windshield immediately after the initial firm press. Just ensure the tape doesn’t interfere with the bonding surface.
Step 7: Patience is a Virtue: Curing Time
What you need: Time.
Instructions: Once the mirror button is securely attached, it is imperative to allow the adhesive to fully cure before attempting to reattach the mirror assembly. The curing time varies significantly by product and environmental conditions (temperature, humidity), ranging from as little as 15 minutes to a full 24 hours. Consult your specific adhesive kit’s instructions for the precise recommended curing duration. Prematurely attaching the mirror can weaken or break the bond.
Pro Tip: For the most robust and long-lasting bond, always err on the side of caution and wait longer than the minimum recommended curing time. If working in colder temperatures, the curing process will take longer, so plan accordingly.
Step 8: The Final Connection: Reattaching the Mirror Assembly
What you need: Mirror assembly, small screwdriver (if required for set screw).
Instructions: After the adhesive has fully cured, carefully take your rearview mirror assembly. Most modern mirrors slide down onto the metal button and click into place. Some older or specific models might have a small set screw located on the mirror arm or base that needs to be tightened against the mirror button to secure it. Align the mirror correctly and gently slide or push it into place. Do not force it; if it doesn’t fit easily, double-check alignment or any securing mechanisms.
Pro Tip: If your mirror has a set screw, tighten it just enough to eliminate any play and secure the mirror firmly. Over-tightening can strip the screw, damage the mirror casing, or put undue stress on the newly formed adhesive bond, potentially causing it to fail prematurely.
Step 9: Final Checks: Testing Stability
What you need: Your hands.
Instructions: Once the mirror assembly is reattached, gently try to adjust the mirror’s angle. Then, very lightly push and pull on the mirror housing to check for any looseness, wobble, or movement at the button-to-windshield connection. The entire assembly should feel solid and secure, with no indication of the button separating from the glass. If there’s any movement, the bond may be weak, or the mirror wasn’t properly secured to the button.
Pro Tip: Even if the mirror feels secure after this check, avoid making drastic adjustments or applying excessive force when positioning the mirror for the first 12-24 hours. This allows the adhesive to reach its absolute maximum strength without being unduly stressed.
✅ Final Checklist
- Old adhesive completely removed from windshield and mirror button surfaces.
- Windshield and mirror button surfaces thoroughly cleaned and dry before adhesive application.
- Mirror button correctly positioned and level according to original placement or driver’s preference.
- Adhesive applied precisely according to the kit’s specific instructions.
- Mirror button held firmly and steadily in place for the initial set time.
- Adhesive allowed to fully cure for the recommended duration before mirror reattachment.
- Mirror assembly securely attached to the metal button, with any set screws tightened appropriately.
- Rearview mirror feels stable and secure with no wobble or movement at the mounting point.
Important Notes:
- Safety Considerations: Always wear safety glasses when scraping old adhesive. Ensure good ventilation when working with chemical adhesives. Some adhesives can be skin irritants, so consider wearing gloves.
- When to Seek Professional Help: If your windshield has a crack, chip, or other damage in the area where the mirror mounts, or if your vehicle has advanced features (like rain sensors, automatic high beams, or lane assist cameras) integrated into the mirror or its mount, it’s best to consult a professional auto glass technician. These systems often require specialized tools and knowledge.
- Estimated Time and Cost Range: The active working time for this repair is typically 20-40 minutes. However, you must factor in the adhesive curing time, which can range from 15 minutes to 24 hours (check your kit). The cost for a rearview mirror adhesive kit is usually between $10 and $20.
Step-by-Step Guide: How to Reattach Your Rearview Mirror
Reattaching your rearview mirror successfully relies on precision and using the correct products. Do not substitute materials; the specialized adhesive is key to a permanent repair. We’ll focus on preparing the surfaces and securely bonding the mirror button first, which is the foundation of the entire reattachment process.
Gathering Your 2027-Compliant Materials
For a durable bond in today’s vehicles, you need specific tools. Standard glues won’t hold. By 2027, adhesive kits have become even more efficient, often featuring faster cure times without compromising strength.
- Rearview Mirror Adhesive Kit: This is critical. Look for kits specifically designed for rearview mirrors, like Permatex Rearview Mirror Adhesive or Loctite Rear View Mirror Adhesive. These kits typically include an adhesive and an activator. Avoid general-purpose epoxy or super glue; they lack the flexibility and strength for this application.
- New Mirror Mounting Button (Optional): If your original metal button is damaged, corroded, or has adhesive fused to it that cannot be fully removed, a replacement button (often included in kits) ensures a cleaner bond.
- Single-Edge Razor Blade: For scraping off old adhesive residue without damaging the glass.
- Rubbing Alcohol (Isopropyl Alcohol 70% or higher): Essential for thoroughly degreasing and cleaning both surfaces.
- Clean Microfiber Cloths: Lint-free cloths are vital for proper cleaning and drying.
- Grease Pencil or Washable Marker: To precisely mark the mirror button’s position from the outside of the windshield.
Preparing Surfaces and Applying Adhesive for the Button
This is where the quality of your bond is determined. Take your time with each step; shortcuts here lead to failure.
- Remove All Old Adhesive:
- Carefully use a single-edge razor blade to scrape off every trace of old adhesive from the windshield where the mirror button was located. Angle the blade almost flat to avoid scratching the glass.
- Similarly, remove all old adhesive from the metal mirror button itself. This is often the most time-consuming step but is absolutely crucial for the new adhesive to bond correctly.
- Clean the Windshield Thoroughly:
- Generously wet a clean microfiber cloth with rubbing alcohol.
- Vigorously clean the area on the windshield where the mirror button will reattach. Rub until the glass is squeaky clean and free of any oils, dust, or film.
- Let the alcohol evaporate completely; do not touch the cleaned surface with your fingers.
- Clean the Mirror Button:
- Using a fresh part of your alcohol-dampened cloth, thoroughly clean the mounting surface of the metal mirror button. Ensure no residue, fingerprints, or foreign material remains.
- Allow it to air dry completely.
- Mark the Button’s Position:
- From the outside of the windshield, use a grease pencil or washable marker to outline the exact original position of the mirror button. This ensures correct alignment and prevents the need for re-positioning, which can weaken the bond.
- Apply the Activator (If Provided):
- Most rearview mirror adhesive kits include an activator wipe or dropper bottle. Read your kit’s instructions carefully.
- Typically, you’ll apply the activator to the inside of the windshield where the button will go. Some kits instruct application to both surfaces. Allow the activator to dry for about 30-60 seconds, or as specified by the product. This step prepares the glass for a stronger chemical bond.
- Apply the Rearview Mirror Adhesive:
- Open the adhesive tube. Apply a single, small drop of the rearview mirror adhesive directly to the center of the clean mirror button. Do not spread it out; it will spread naturally when pressed.
- Using too much adhesive can prevent proper curing and create a weaker bond. Follow the kit’s specific instructions for the amount.
- Position and Hold the Mirror Button:
- Carefully align the mirror button with your marks on the windshield.
- Firmly press the button against the windshield. Hold it in place with consistent, firm pressure for at least 60 seconds (or as directed by your adhesive kit). Do not let go early.
- Many modern adhesives (circa 2027) achieve initial tack quickly, but sustained pressure is vital for proper setting.
Troubleshooting: What If Your Mirror Still Won’t Stay?
Even with careful application, sometimes the rearview mirror refuses to bond securely. This typically points to an issue with surface preparation, adhesive application, or environmental conditions. Addressing these factors systematically is crucial for success.
Insufficient Surface Preparation
The most common culprit for bond failure is inadequate surface cleaning. According to automotive adhesive manufacturers, a contaminant-free surface is paramount. Residual old adhesive, oils from fingers, or invisible grime can drastically reduce bonding strength by up to 70%.
- Re-clean Thoroughly: Completely remove any remaining adhesive from both the button and the windshield with a razor blade, then clean with isopropyl alcohol (at least 90% concentration). Ensure no streaks or residue remain.
- Use an Activator Properly: If your kit includes an activator wipe, ensure it fully dries for the recommended 60 seconds before applying adhesive. Applying adhesive to a wet activator surface can inhibit chemical bonding.
Incorrect Adhesive Application
The type and amount of adhesive are critical. Using too much or too little, or applying it incorrectly, will compromise the bond.
- Verify Adhesive Type: Ensure you are using a dedicated rearview mirror adhesive, typically an acrylic-based or cyanoacrylate formulation designed for glass-to-metal bonding. Standard super glue is often too brittle for automotive vibrations.
- Optimal Adhesive Quantity: Apply just a single drop or a thin, even layer to the center of the mirror button. When pressed, the adhesive should spread to cover the entire button without oozing excessively from the edges. Excessive adhesive can create weak points during curing.
Environmental Factors
Temperature and humidity play a significant role in adhesive curing. Modern adhesives, as per 2027 specifications, perform best within specific ranges.
- Ideal Temperature Range: Most automotive adhesives require an ambient temperature between 65°F (18°C) and 75°F (24°C) for optimal curing. If working in colder conditions, use a hairdryer on a low setting to gently warm the windshield area before and during application. Avoid direct heat on the adhesive itself.
- Control Humidity: High humidity can sometimes interfere with curing, especially for cyanoacrylate-based glues. Aim for a moderate humidity environment, typically between 30-70%.
Maintaining Your Reattached Mirror for Longevity
Once your rearview mirror is securely reattached, adopting a few best practices will significantly extend the life of the bond and prevent future detachments. Proactive maintenance is key to avoiding repeat repairs.
Gentle Handling Practices
Rough handling is a primary cause of mirror detachment, especially during adjustments or cleaning. Mechanical stress directly impacts the adhesive bond.
- Adjust with Care: When adjusting the mirror angle, grip the mirror housing firmly but gently, moving it slowly. Avoid pushing or pulling directly on the mirror glass itself, as this can leverage the bond point.
- Mind the Accessories: Avoid hanging heavy objects from your rearview mirror. Items like air fresheners or dashboard cameras, especially those with long levers, can exert constant strain and vibration, weakening the adhesive over time.
Environmental Protection
Extreme temperatures and UV exposure are known factors that degrade adhesive bonds in automotive applications. Protecting your vehicle’s interior can indirectly protect your mirror.
- Minimize Direct Sunlight: Whenever possible, park your vehicle in shaded areas or use a windshield sunshade. Prolonged exposure to intense UV radiation and heat (which can reach over 150°F / 65°C inside a parked car) can cause adhesive breakdown, as noted in studies on polymer degradation in automotive environments.
- Avoid Extreme Temperature Fluctuations: Rapid changes from very cold to very hot conditions (and vice-versa) create thermal expansion and contraction stresses between the metal mirror button and the glass, which can weaken the adhesive layer.
Regular Inspection
A quick, periodic check can identify potential issues before they become major problems, allowing for early intervention.
- Check for Play: Every few months, gently attempt to wiggle the mirror base where it meets the windshield. If you detect any movement, even slight, it indicates the bond may be compromised and should be addressed before the mirror fully detaches.
- Observe Adhesive Integrity: Look for any discoloration, cracking, or shrinkage in the adhesive visible around the mirror button. These are signs of adhesive degradation.
What If It Still Doesn’t Work?
If you’ve attempted the reattachment multiple times following all recommended steps and your rearview mirror still won’t stay put, it’s time to consider alternative solutions or professional assistance. Some issues require specialized tools or expertise.
- Try a Different Adhesive Kit: Not all kits are equal. Purchase a kit from a different reputable manufacturer (e.g., Permatex, Loctite) as formulations can vary, and one might bond better with your specific windshield/button material.
- Inspect the Mirror Button: Examine the metal mirror button itself for any signs of damage, corrosion, or unevenness. A warped or corroded button will prevent proper surface contact and bond. Replacement buttons are available from auto parts stores.
- Assess Windshield Damage: Inspect the windshield area where the mirror attaches. Micro-fractures or surface imperfections might be preventing a clean bond. While rare, this could necessitate a professional repair of the glass itself.
- Seek Professional Help: If DIY attempts fail, consult an auto glass repair specialist. They have industrial-grade adhesives, specialized surface preparation tools, and experience with stubborn cases.
For professional reattachment in 2027, expect costs to range from $40 to $80, depending on the vehicle type and shop rates, according to projected automotive service costs.
Conclusion
Reattaching a rearview mirror is a common automotive repair that is well within the capabilities of most DIY enthusiasts. By meticulously following surface preparation guidelines, applying the correct adhesive, and observing proper curing conditions, a secure bond can be achieved. According to verified automotive service guidelines and material science research, careful execution ensures both safety and longevity. Your actionable next step is to ensure each stage, from cleaning to curing, is performed precisely to guarantee a lasting fix.
❓ Frequently Asked Questions
Why did my rearview mirror fall off in the first place?
Common causes include extreme temperature fluctuations, improper original installation, or using the wrong adhesive during a previous reattachment attempt. UV exposure can also degrade adhesive over time, weakening the bond to the windshield.
What specific type of adhesive should I buy for this repair?
You absolutely need a specialized rearview mirror adhesive kit, typically a two-part system with an activator and an adhesive, designed specifically for bonding metal to glass. Brands like Permatex or Loctite offer reliable kits that are engineered for this unique application.
How important is surface preparation before reattaching the mirror?
Surface preparation is critically important; failure to thoroughly clean and dry both the windshield and the metal mirror button will result in a weak, temporary bond. Use alcohol wipes or a kit’s provided cleaner/activator to remove all old adhesive, oil, and grime for maximum adhesion.
What’s the best way to ensure the mirror button is aligned correctly?
Before applying adhesive, lightly mark the exact position on the outside of the windshield with a marker or tape, ensuring it doesn’t obstruct vision. Press the mirror button firmly onto the marked spot for the recommended time without wiggling to ensure proper, straight adhesion.
How long should I wait before attaching the mirror assembly to the button?
After bonding the metal button to the windshield, you must wait for the adhesive to fully cure, which usually takes 24 hours (or as directed by the product instructions). Attaching the full mirror assembly too soon can compromise the button’s bond strength and cause it to detach again.
Can I reattach a rearview mirror if it has a wiring harness for features like auto-dimming?
Yes, the reattachment process for the button to the windshield is the same regardless of wiring. However, be extra careful not to damage the wiring or electrical contacts when removing the old button and ensure all electrical connections are securely reattached to the mirror assembly afterward.