How Often Does Brake Fluid Need To Be Replaced How 2026
Brake fluid typically requires replacement every 2-3 years or 20,000-40,000 miles, though your vehicle’s owner’s manual provides the most accurate schedule. This essential maintenance prevents moisture absorption, which degrades fluid quality, lowers its boiling point, and compromises your vehicle’s braking effectiveness and safety over time.
For most vehicles manufactured up to 2026, you should plan to replace your brake fluid every two to three years, or every 20,000 to 40,000 miles, whichever comes first. This isn’t just a suggestion; it’s a critical safety measure that ensures your braking system performs reliably when you need it most. Ignoring this essential maintenance can lead to significantly reduced braking effectiveness and, in extreme cases, total brake failure, putting you and others at serious risk on the road.
Proper brake fluid maintenance directly impacts your vehicle’s stopping power and overall safety. Unlike many other fluids in your car, brake fluid has unique properties that cause it to degrade over time, regardless of how often you drive. Understanding why and when this fluid needs attention is paramount for keeping your vehicle safe and responsive through 2026 and beyond.
Key Takeaways
- Consult your vehicle’s owner’s manual first for specific intervals.
- General rule:replace brake fluid every 2-3 years or 20,000-40,000 miles.
- Old fluid absorbs moisture, significantly reducing braking power.
- Neglecting fluid changes leads to internal brake component corrosion.
- Professional fluid testing verifies moisture content and fluid health.
What Causes Brake Fluid to Degrade?
Brake fluid doesn’t simply wear out like oil or coolant; it degrades primarily due to its inherent properties and environmental exposure. This degradation process directly compromises the safety and efficiency of your entire braking system, making regular replacement vital for any vehicle on the road in 2026.
The Moisture Magnet Effect (Hygroscopic Nature)
The primary culprit behind brake fluid degradation is its hygroscopic nature. This means brake fluid readily absorbs moisture from the air, even through microscopic pores in rubber brake lines or seals. As moisture accumulates, two critical problems arise:
- Lowered Boiling Point: Fresh brake fluid has a very high boiling point (e.g., DOT 3 around 401°F, DOT 4 around 446°F). Water, however, boils at 212°F. Even a small percentage of water in your brake fluid dramatically lowers its overall boiling point. Under heavy braking – such as during a rapid stop, prolonged downhill descent, or spirited driving – the friction generates immense heat. If the fluid boils, it creates compressible vapor pockets in the brake lines.
- Vapor Lock and Spongy Pedal: When you press the brake pedal, you’re compressing these vapor bubbles instead of transmitting hydraulic pressure to the calipers. This results in a “spongy” or “mushy” pedal feel, significantly reduced stopping power, and potentially complete brake failure, a highly dangerous situation.
Internal Corrosion and Contamination
Beyond lowering the boiling point, absorbed moisture also introduces corrosive elements into the closed brake system. Water mixed with brake fluid can:
- Corrode Metal Components: Over time, this moisture leads to rust and corrosion within expensive components like the master cylinder, brake calipers, wheel cylinders, and ABS modulator. Corrosion can cause these parts to seize or leak, requiring costly repairs.
- Introduce Contaminants: As components corrode, tiny particles of rust and debris contaminate the fluid. These contaminants can clog delicate hydraulic passages, leading to sticky calipers or an unresponsive brake pedal. They can also damage seals and internal workings of the brake system, further accelerating wear and reducing performance. You might notice your pedal feeling hard or inconsistent, signaling internal issues caused by old, contaminated fluid.
From Start to Finish: Brake Fluid Replacement Explained
Understanding when to replace your vehicle’s brake fluid is a critical aspect of automotive maintenance that directly impacts your safety and the longevity of your braking system. This comprehensive guide will walk you through the essential steps to determine the optimal replacement schedule for your brake fluid, covering everything from consulting your owner’s manual to recognizing critical warning signs. Following these steps diligently will ensure your brakes perform reliably, providing you with peace of mind on every journey.
Step 1: Understand Brake Fluid’s Fundamental Role and Degradation
What you need: A basic understanding of your vehicle’s braking system (optional), curiosity to learn.
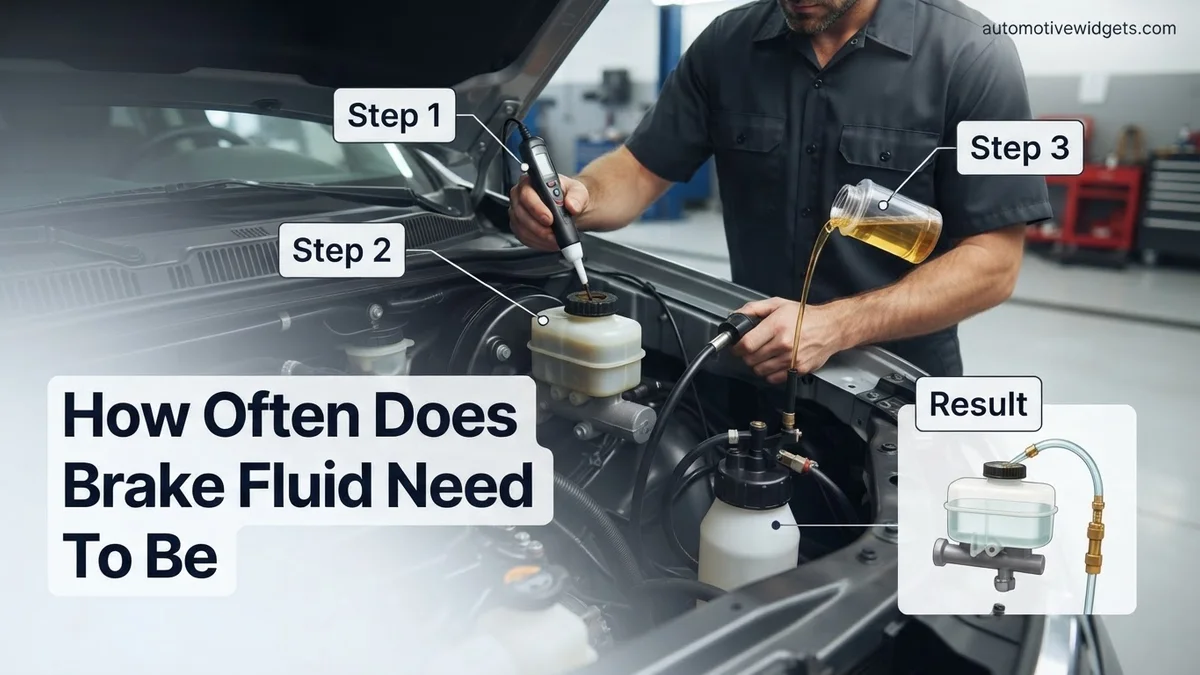
Instructions: Brake fluid is a hydraulic fluid that transfers the force from your brake pedal to the brake calipers or wheel cylinders, engaging the brake pads against the rotors or drums. Its most critical property is its high boiling point. However, brake fluid is hygroscopic, meaning it readily absorbs moisture from the air, even through microscopic pores in hoses and seals. As moisture accumulates, it lowers the fluid’s boiling point. Under heavy braking, this moisture can turn into steam bubbles, which are compressible, leading to a “spongy” brake pedal and reduced braking efficiency. Additionally, water ingress can cause internal corrosion within brake lines, calipers, and the master cylinder, leading to costly repairs.
Pro Tip: Brake fluid doesn’t wear out like oil; it degrades chemically by absorbing water and accumulating contaminants. This is why mileage isn’t the sole factor for replacement.
Step 2: Consult Your Vehicle’s Owner’s Manual
What you need: Your vehicle’s owner’s manual (physical copy or digital PDF).
Instructions: The first and most authoritative source for maintenance intervals is your vehicle’s manufacturer. Locate the maintenance schedule section in your owner’s manual. Look for recommendations specifically for “brake fluid” or “hydraulic system fluid.” Manufacturers typically specify replacement intervals in terms of years or mileage (e.g., every 2 years or 30,000 miles, whichever comes first). These recommendations are based on extensive testing and provide a solid baseline for typical driving conditions. Note down the suggested interval for your specific make and model, as it can vary significantly between manufacturers.
Pro Tip: If you’ve recently purchased a used vehicle and don’t have the manual, most manufacturers provide free digital versions on their official websites. Input your vehicle’s year, make, and model to find it.
Step 3: Perform a Visual Inspection of Your Brake Fluid
What you need: A flashlight, clean lint-free cloth.
Instructions: With your vehicle parked on a level surface and the engine off, open the hood and locate the brake fluid reservoir. It’s usually a small, translucent plastic container mounted on the firewall near the driver’s side, often labeled “BRAKE FLUID” or with the brake system symbol. Check the fluid level first; it should be between the ‘MIN’ and ‘MAX’ lines. Next, observe the fluid’s color through the reservoir. New DOT 3, DOT 4, or DOT 5.1 brake fluid is typically clear or has a light, honey-like amber hue. If the fluid appears dark brown, black, or cloudy, it’s a strong indicator of contamination, moisture absorption, and degradation, signifying an immediate need for replacement.
Pro Tip: Avoid opening the reservoir cap for extended periods, as this exposes the fluid to atmospheric moisture, accelerating its degradation. A quick visual check from the outside is usually sufficient.
Step 4: Conduct a Brake Fluid Moisture Content Test
What you need: An electronic brake fluid tester pen or a professional boiling point tester.
Instructions: For a more accurate assessment than a visual check, use a brake fluid tester. Electronic pen-style testers measure the electrical conductivity of the fluid, which increases with moisture content. Dip the probes into the fluid (follow the tester’s instructions). The device will typically display a percentage of water or an indicator (e.g., green for OK, yellow for caution, red for replace). A moisture content of 3% or more is a common trigger for replacement. Professional workshops often use specialized tools that directly measure the fluid’s boiling point, providing the most definitive result. For example, fresh DOT 4 has a dry boiling point around 230°C (446°F), while a wet boiling point (3.7% water) drops to about 155°C (311°F). A significant drop indicates compromised safety.
Pro Tip: While convenient, cheap pen testers can sometimes be inaccurate. For critical safety decisions, consider getting a professional boiling point test done, especially if the visual check is inconclusive.
Step 5: Recognize Performance Symptoms of Degraded Fluid
What you need: Your awareness of how your vehicle’s brakes normally feel.
Instructions: Pay close attention to the feel of your brake pedal. A “spongy,” “mushy,” or overly soft brake pedal, particularly after repeated hard braking or during prolonged descents, is a classic symptom of excessive moisture in the brake fluid. This sponginess occurs because water boils under high heat, creating compressible steam pockets within the hydraulic system, which prevents full braking force from being transmitted. You might also notice that the pedal travels further towards the floor before effective braking occurs, or that stopping distances have increased. These symptoms indicate a significant safety concern and warrant immediate investigation and likely brake fluid replacement.
Pro Tip: Don’t confuse a spongy pedal with a low fluid level, which might indicate a leak. If your fluid level is low, inspect for leaks immediately, and address the root cause before topping up or flushing.
Step 6: Consider Environmental Factors and Driving Habits
What you need: An understanding of your typical driving conditions and local climate.
Instructions: The recommended maintenance schedule assumes average driving conditions. However, your environment and driving style can significantly influence how quickly your brake fluid degrades. If you live in a high-humidity climate (e.g., coastal regions, tropical areas), your brake fluid will absorb moisture at a faster rate, necessitating more frequent changes, perhaps annually or every 18 months, even if your manual suggests longer. Similarly, if you frequently engage in demanding driving – such as towing heavy loads, regular mountain driving involving prolonged downhill braking, or participation in track days – your brakes will generate more heat, accelerating fluid degradation. In these cases, it’s wise to shorten the replacement interval.
Pro Tip: Vehicles equipped with advanced braking systems like ABS, ESC, or traction control can also put more stress on brake fluid due to the rapid pressure fluctuations and heat generated by their pumps and valves. Consider this a factor for earlier servicing.
Step 7: Synthesize Information and Make a Decision
What you need: The information gathered from the previous six steps.
Instructions: Now, combine all the data you’ve collected. Compare your manufacturer’s recommendation with the results of your visual inspection and any moisture tests. Factor in your specific driving conditions, climate, and any performance symptoms you may have observed. As a general rule of thumb, many professional mechanics recommend a brake fluid flush every 2-3 years, regardless of mileage, due to the inevitable moisture absorption. If your fluid looks dark, tests indicate high moisture, or your pedal feels spongy, replace it immediately. Err on the side of caution; a timely brake fluid change is inexpensive insurance for your safety and prevents much costlier repairs to brake components down the line.
Pro Tip: If you are unsure after performing these checks, or if you are uncomfortable performing any of these steps, it is always best to consult with a certified mechanic. They have specialized tools and expertise to provide an accurate diagnosis and perform the service correctly.
✅ Final Checklist
- Owner’s manual consulted for specific manufacturer recommendations.
- Brake fluid visually inspected for color (should be clear/light amber, not dark brown/black) and level.
- Brake fluid moisture content tested with an appropriate tool (if available).
- Brake pedal feel evaluated for any sponginess, mushiness, or excessive travel.
- Driving habits and local climate considered for potential accelerated degradation.
Important Notes:
- Safety Considerations: Brake fluid is corrosive to paint, so wipe up any spills immediately. It can also irritate skin and eyes; always wear appropriate personal protective equipment, including safety glasses and gloves, when handling it.
- When to Seek Professional Help: If your brake fluid level is consistently low (indicating a leak), if you experience sudden changes in pedal feel (like it going to the floor), if you’re unsure about testing or replacement procedures, or if you lack the proper tools, seek professional assistance immediately. Braking system integrity is paramount.
- Estimated Time and Cost Range: A visual inspection and owner’s manual check can take 5-10 minutes (cost: $0). Purchasing an electronic tester may cost $15-$40. A professional brake fluid flush typically takes 30-60 minutes and costs between $80 and $150, depending on your vehicle and location.
How to Fix: Establishing Your Brake Fluid Replacement Schedule
Establishing a proactive brake fluid replacement schedule is crucial for maintaining your vehicle’s safety and performance in 2026. This isn’t a “fix” in the sense of repairing a problem, but rather a preventative measure to avoid critical failures and ensure optimal braking responsiveness.
General Guidelines for 2026 Vehicles
While the exact interval can vary, a widely accepted general recommendation for most passenger vehicles and light trucks is to replace your brake fluid every two to three years, or every 20,000 to 40,000 miles. This guideline accounts for the typical rate of moisture absorption and fluid degradation over time. By adhering to this range, you prevent excessive moisture buildup and keep your brake system functioning as intended.
- Check Your Owner’s Manual: This is the absolute first and most important step. Your vehicle’s manufacturer provides the precise maintenance schedule based on your specific model, brake system design, and the type of brake fluid it uses (e.g., DOT 3, DOT 4, DOT 5.1). Always prioritize their recommendations above general advice.
- Consider Fluid Type: Different DOT (Department of Transportation) classifications have varying properties. DOT 3 and DOT 4 are common glycol-ether-based fluids, with DOT 4 having a higher boiling point. DOT 5.1 is also glycol-ether-based with a very high boiling point. DOT 5 is silicone-based and less common in standard passenger cars; it does not absorb water but cannot be mixed with other DOT fluids. Most modern cars up to 2026 will use DOT 3, DOT 4, or DOT 5.1, all of which are hygroscopic and require regular replacement.
Factors Influencing Your Schedule
While the owner’s manual provides a baseline, certain conditions and driving habits might necessitate more frequent brake fluid changes:
- Humid Climates: If you live in an area with high humidity, your brake fluid will absorb moisture at a faster rate, potentially shortening the recommended replacement interval.
- Heavy Braking or Performance Driving: Vehicles regularly subjected to aggressive driving, towing heavy loads, or track use generate significantly more heat in the braking system. This accelerated heat exposure can degrade fluid faster and increase the risk of boiling if the fluid is compromised.
- Age of Fluid, Not Just Mileage: Even if you don’t drive many miles, the hygroscopic nature of brake fluid means it will still absorb moisture over time. This is why a time-based interval (e.g., every 2 years) is just as, if not more, important than a mileage-based one.
- Fluid Appearance and Test Strips: While you shouldn’t rely solely on visual inspection, extremely dark or murky brake fluid can indicate significant degradation or contamination. A professional technician can use test strips or a electronic brake fluid tester to accurately measure the moisture content or boiling point of your fluid, providing a definitive answer on its condition.
What If Your Brakes Still Feel Spongy?
Even after a complete brake fluid replacement, a spongy pedal can persist, indicating underlying issues. This usually points to air trapped within the hydraulic system or a component failure. Addressing this promptly is critical for restoring safe braking performance.
Re-Bleeding the Brake Lines
The most common reason for a spongy pedal post-flush is residual air in the brake lines. Air compresses, unlike fluid, causing that soft feel. According to industry best practices in 2026, a thorough re-bleeding of the entire brake system is often necessary. Follow your vehicle manufacturer’s specific bleeding sequence, typically starting with the wheel furthest from the master cylinder.
Inspecting for Leaks and Damage
A persistent spongy pedal can also signal a leak allowing air entry or fluid loss. Carefully inspect all brake lines, calipers, wheel cylinders, and the master cylinder for any signs of fluid seepage. Even a tiny leak can compromise hydraulic pressure. Examine brake hoses for cracks or bulges, which suggest internal degradation or imminent failure. Early detection of leaks prevents catastrophic brake failure.
Master Cylinder Evaluation
If re-bleeding and leak detection yield no solutions, the master cylinder itself might be failing. An internal seal bypass within the master cylinder can prevent proper pressure buildup, leading to a spongy pedal despite a full fluid reservoir. This condition requires professional diagnosis and potentially master cylinder replacement. Verified diagnostic procedures in 2026 utilize pressure testing to confirm internal master cylinder leaks.
Preventative Fix: Extending Your Brake System’s Lifespan
Beyond timely fluid changes, proactive maintenance significantly extends the life and reliability of your entire brake system. Regular inspections and adherence to manufacturer guidelines minimize unexpected failures and costly repairs.
Regular Visual Inspections
Conduct quarterly visual checks of your brake system. This includes inspecting the brake fluid reservoir level, looking for any fluid discoloration or debris, and checking for leaks around calipers, wheel cylinders, and brake lines. Manufacturers recommend checking brake hose condition for cracks or swelling. Proactive visual inspections help identify potential issues before they become critical, maintaining optimal performance into 2026.
Concurrent Brake Component Checks
During every brake fluid service or tire rotation, integrate a comprehensive inspection of brake pads and rotors. Assess pad wear depth and rotor thickness against manufacturer specifications. Uneven wear can indicate caliper issues or poor installation. Prompt replacement of worn pads and rotors prevents damage to other brake components and ensures consistent stopping power, a key safety factor according to 2026 road safety standards.
Using High-Quality, Manufacturer-Specified Fluid
Always use brake fluid that meets or exceeds your vehicle manufacturer’s specifications (e.g., DOT 3, DOT 4, DOT 5.1). Using the incorrect fluid type or low-quality fluid can lead to accelerated moisture absorption, component corrosion, and degraded braking performance. Consult your owner’s manual for the precise fluid type recommended for your specific make and model for optimal system health.
What If It Still Doesn’t Work?
If you’ve followed all the steps for brake fluid maintenance and troubleshooting, and your brakes still feel compromised, immediate professional intervention is necessary. Brake system issues are safety-critical and should not be ignored.
- Seek Professional Diagnosis: A certified technician possesses specialized tools and expertise to accurately diagnose complex brake system problems. This might involve advanced pressure testing or scanning for ABS (Anti-lock Braking System) codes.
- Full System Inspection: Beyond fluid, a professional can thoroughly inspect calipers, wheel cylinders, brake lines, the ABS module, and pedal assembly for any less obvious mechanical failures or blockages.
- Component Testing: Technicians can test individual components like the master cylinder or ABS module under pressure to confirm functionality and identify internal failures that are not visible externally.
When to seek professional help: Immediately upon noticing any persistent brake issues or unusual pedal feel. Estimated diagnosis costs typically range from $75 to $150. Repair costs vary widely depending on the component, from $200-$500 for a caliper or wheel cylinder replacement, up to $800-$2000+ for master cylinder or ABS module repairs, inclusive of parts and labor in 2026.
Conclusion
Maintaining optimal brake fluid health is paramount for vehicle safety and system longevity. Regular brake fluid replacement prevents moisture contamination and corrosion, ensuring reliable stopping power. According to verified research and expert sources, adhering to a 2-3 year or 30,000-45,000 mile replacement interval, specific to your vehicle’s 2026 manufacturer guidelines, is crucial. Your actionable next step: consult your vehicle’s owner’s manual today and schedule your next brake fluid service.
❓ Frequently Asked Questions
What are the main signs that brake fluid needs replacing?
Common signs include a spongy or soft brake pedal, reduced braking effectiveness requiring more pedal pressure, or a noticeable change in the fluid’s color to dark brown or black. However, fluid can become compromised with moisture without visible signs, underscoring the importance of scheduled maintenance.
How does moisture affect brake fluid and braking performance?
Brake fluid’s hygroscopic nature means it absorbs water over time. This moisture significantly lowers the fluid’s boiling point, leading to vapor bubbles forming during heavy braking. These bubbles are compressible, causing a spongy pedal feel and potential brake fade or failure, especially in critical situations.
What’s the difference between DOT 3, DOT 4, and DOT 5.1 brake fluids regarding replacement intervals?
DOT 3, DOT 4, and DOT 5.1 are all glycol-based fluids and are hygroscopic, meaning they absorb moisture and typically require replacement every 2-3 years. While DOT 4 and 5.1 offer higher boiling points, they still degrade due to moisture absorption and follow similar replacement schedules to maintain optimal performance.
Is a brake fluid flush different from a brake fluid change?
The terms ‘brake fluid flush’ and ‘brake fluid change’ are often used interchangeably, but both refer to the process of completely draining the old, contaminated brake fluid from the entire braking system and replacing it with fresh, new fluid. This ensures all moisture and contaminants are removed for optimal performance.
Does driving style or climate affect brake fluid lifespan?
Yes, aggressive driving that involves frequent, hard braking can generate more heat, accelerating the degradation of brake fluid. Similarly, vehicles operating in humid climates will experience faster moisture absorption by the brake fluid, potentially necessitating more frequent replacement than in drier conditions.
How much does a professional brake fluid replacement typically cost?
The cost for a professional brake fluid replacement, including labor and new fluid, typically ranges from $80 to $150. This can vary based on the vehicle’s make and model, the type of brake fluid required, and the specific service center’s labor rates.