How To Clean Mass Air Flow Sensor With Alcohol Clean 2026
While it’s tempting to use alcohol, specialized MAF sensor cleaner is the safest and most effective option due to alcohol’s potential for residue or damage. This guide details why specific alcohols like isopropyl can be risky, and provides the correct step-by-step process for cleaning your MAF sensor safely to restore engine performance.
No, you should generally not use alcohol to clean your Mass Air Flow (MAF) sensor, despite what some older advice or online forums might suggest. While high-purity isopropyl alcohol might seem like a viable option due to its evaporating properties, dedicated MAF sensor cleaner is specifically formulated to be completely residue-free and safe for the delicate platinum wires, heated thermistors, plastics, and specialized coatings present in modern 2026 MAF units. Using the wrong cleaner can cause irreversible damage, leading to expensive and unnecessary sensor replacement.
A properly functioning and clean MAF sensor is absolutely crucial for your engine’s optimal performance, fuel efficiency, and strict emissions compliance. An accurate MAF reading ensures your engine receives the correct air-fuel mixture, directly impacting how smoothly and efficiently your vehicle operates in today’s demanding automotive landscape. Understanding why specialized cleaning is essential can save you both money and frustration in the long run.
Key Takeaways
- Use specialized MAF cleaner for best results.
- Avoid rubbing alcohol due to harmful additives.
- Isopropyl alcohol (90%+) is a last resort; use cautiously.
- Always disconnect battery before MAF cleaning.
- Never touch sensor wires directly during cleaning.
What Causes a Dirty Mass Air Flow Sensor & Its Symptoms
Common Contaminants and Their Impact
Over time, the sensitive sensing elements of your MAF sensor accumulate various contaminants that impede its ability to accurately measure airflow. The most common culprits include dust, dirt, and debris that bypass or seep through your air filter. Oil vapor from your engine’s Positive Crankcase Ventilation (PCV) system, especially in older or higher-mileage vehicles, can also deposit a thin film on the hot wires or thermistors. Beyond this, pollen, road grime, and even silicone residue from tire dressings or other detailing products can drift into the intake and settle on the sensor. These microscopic layers insulate the sensor, causing it to incorrectly report less airflow than is actually entering the engine. By 2026, modern engines rely on even more precise air-fuel ratios, making any MAF inaccuracy immediately problematic for performance and emissions control systems.
Recognizing the Signs of a Failing MAF Sensor
Identifying a dirty or failing MAF sensor is relatively straightforward, as the symptoms directly impact your vehicle’s drivability and efficiency. If your MAF sensor is struggling, you’ll likely notice one or more of these issues:
- Rough idle: The engine may shake or feel unsteady when stopped.
- Engine hesitation or stumbling: Particularly noticeable during acceleration or when maintaining a steady speed.
- Reduced fuel economy: A significant drop, often 5-10%, in your average miles per gallon.
- Black smoke from the exhaust: Indicates an overly rich fuel mixture due to incorrect airflow readings.
- Check Engine Light (CEL) illumination: Common diagnostic trouble codes (DTCs) associated with MAF issues include P0100, P0101, P0102, P0103, and P0104.
- Reduced power: The engine may feel sluggish or lack its usual acceleration capabilities.
- Difficulty starting: Especially in colder conditions, the engine might crank longer than usual.
Addressing these symptoms promptly by cleaning the MAF sensor can restore your vehicle’s performance and potentially avoid a much costlier replacement.
From Start to Finish: Cleaning Your MAF Sensor Explained
A properly functioning Mass Air Flow (MAF) sensor is critical for your engine’s performance and fuel efficiency. Over time, dirt, dust, and oil vapor can accumulate on the sensor’s delicate wires or plates, leading to inaccurate readings. This can cause a range of issues, from rough idling and poor acceleration to decreased fuel economy and even a “Check Engine” light. While specialized MAF sensor cleaner is generally recommended for its residue-free properties, this comprehensive guide will walk you through the precise steps to safely clean your MAF sensor using high-purity isopropyl alcohol, restoring its function and potentially resolving common engine performance issues. Following these steps carefully will help ensure a successful outcome and prolong the life of this vital component.
Step 1: Gather Your Tools and Prioritize Safety
What you need:
- Safety glasses
- Gloves (latex or nitrile)
- Shop towels or clean rags
- Flathead screwdriver (small)
- Phillips head screwdriver or socket wrench set (depending on vehicle)
- High-purity Isopropyl Alcohol (90% concentration or higher) in a spray bottle or with a fine nozzle for direct application
- Compressed air (optional, but highly recommended for drying)
- Diagnostic Trouble Code (DTC) scanner (optional, for clearing codes)
Instructions: Before touching anything under the hood, ensure your vehicle’s engine is completely off and has cooled down for at least 30 minutes. Pop the hood and identify the MAF sensor, typically located between the air filter box and the throttle body. Put on your safety glasses and gloves to protect your eyes and skin from potential contact with vehicle fluids or cleaning agents. Having all your tools organized and within reach will streamline the entire cleaning process, preventing unnecessary interruptions.
Pro Tip: Always work in a well-ventilated area. If using compressed air, ensure it is specifically designed for electronics and doesn’t contain propellants that could leave a residue. Never use brake cleaner or carburetor cleaner, as these are too harsh and can permanently damage the MAF sensor elements.
Step 2: Disconnect the Battery and Locate the MAF Sensor
What you need:
- 10mm or 13mm wrench (common battery terminal sizes)
Instructions: To prevent any electrical shorts or accidental deployment of airbags (a rare but possible risk when working with electrical components), it’s crucial to disconnect the vehicle’s negative battery terminal first. Use your wrench to loosen the nut on the negative terminal (marked with a “-” sign), then carefully remove the cable and tuck it away from the battery post. Next, visually trace the air intake system from the air filter box towards the engine. The MAF sensor is usually integrated into a plastic housing or a small tube within this path, often secured by a few screws and connected by a wire harness.
Pro Tip: Take a quick photo of the MAF sensor’s orientation and electrical connector before disconnecting anything. This visual reference will be invaluable during reinstallation, ensuring all components are put back correctly and facing the right direction.
Step 3: Detach the Electrical Connector and Air Intake Hoses
What you need:
- Small flathead screwdriver (sometimes needed for connector clips)
Instructions: With the battery safely disconnected, proceed to detach the MAF sensor’s electrical connector. Most connectors have a tab or a push-release clip that needs to be pressed or gently pried up with a small flathead screwdriver before you can pull the connector free. Be extremely gentle, as these plastic clips can become brittle over time. Once the electrical connector is removed, you’ll need to loosen the clamps holding the air intake hoses on either side of the MAF sensor housing. These are typically held by hose clamps that can be loosened with a flathead screwdriver or a small socket wrench, allowing you to separate the MAF housing from the air ducting.
Pro Tip: Avoid pulling directly on the wires when disconnecting the electrical connector; always grasp the plastic housing of the connector itself. If the hose clamps are stubborn, a quick spray of penetrating lubricant (like WD-40, wiped thoroughly afterwards) can help loosen them, but ensure no lubricant gets into the air intake system.
Step 4: Carefully Remove the MAF Sensor Assembly
What you need:
- Phillips head screwdriver or socket wrench (depending on fasteners)
Instructions: The MAF sensor itself might be a separate cartridge within a larger housing, or the entire housing might be removed as one unit. If it’s a separate cartridge, use your Phillips head screwdriver or appropriate socket wrench to remove the two to three small screws that secure the sensor to its housing. If the entire housing needs to be removed, ensure all surrounding clamps and hoses are loose. Once the fasteners are removed, gently pull the sensor straight out from its mounting point. Handle the sensor with extreme care, avoiding any contact with the delicate sensing elements (the small wires or thermistor) that are visible inside.
Pro Tip: Note the precise orientation of the sensor as you remove it. Many MAF sensors are designed to be installed in a specific direction (e.g., with an arrow indicating airflow). Incorrect reinstallation can cause further engine performance issues, so marking it with a non-permanent marker or taking another photo can be beneficial.
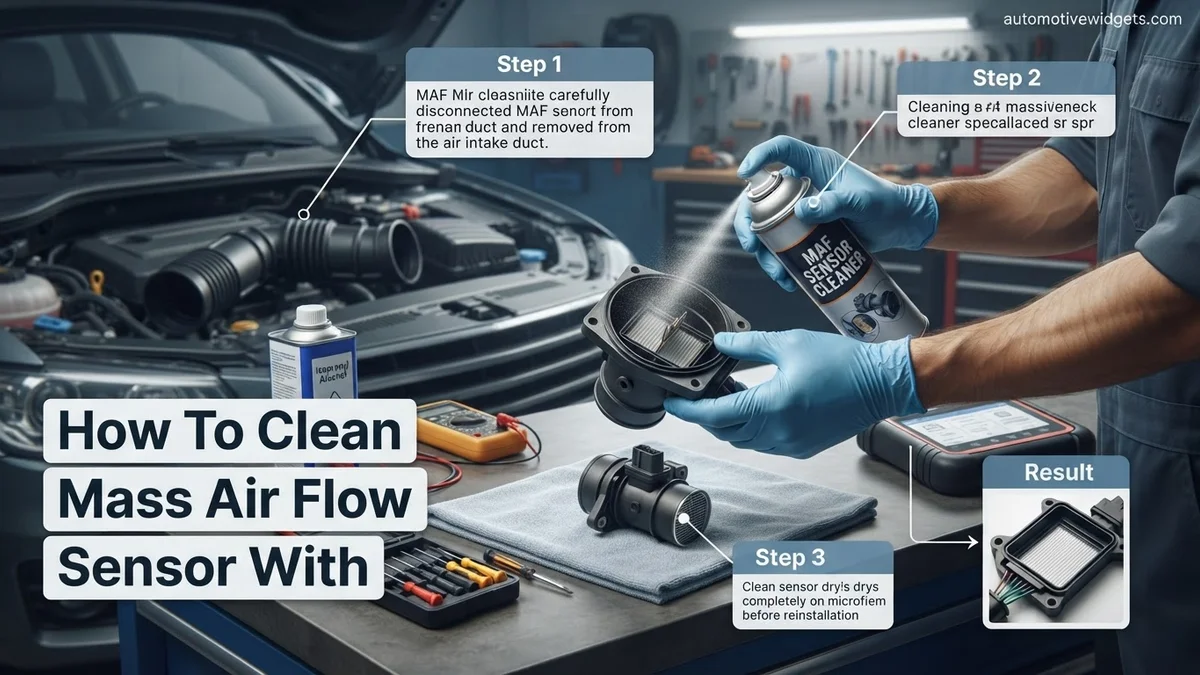
Step 5: Clean the Delicate Sensing Elements with Isopropyl Alcohol
What you need:
- High-purity Isopropyl Alcohol (90% concentration or higher) in a spray bottle
Instructions: Hold the MAF sensor by its plastic housing, ensuring your fingers do not touch the delicate internal components. Liberally spray the high-purity isopropyl alcohol directly onto the hot wire(s) or thermistor and the small electronic components within the sensor housing. Aim for a thorough saturation that flushes away any accumulated dirt, dust, or oil residue. Do not scrub, wipe, or touch these delicate elements with anything, as they can be easily damaged. The alcohol should evaporate quickly, lifting the contaminants with it. Repeat the spraying process several times to ensure all visible debris is dislodged.
Pro Tip: Use a spray bottle that delivers a fine, strong mist or stream to effectively dislodge particles without force. Ensure the isopropyl alcohol is truly high purity (90% or above) as lower concentrations contain more water, which evaporates slower and could leave behind unwanted residues or even cause corrosion on electronic components.
Step 6: Allow for Complete Drying and Inspect
What you need:
- Compressed air (optional, for faster drying)
- Clean, lint-free cloth (for exterior housing only)
Instructions: After thoroughly spraying the sensor, place it on a clean, lint-free cloth in a clean, dry, well-ventilated area. Allow the isopropyl alcohol to evaporate completely. This usually takes between 15 to 30 minutes, depending on ambient temperature and humidity. Do not attempt to reassemble or reconnect the sensor if there is any visible moisture. If you have compressed air, you can use short, gentle bursts from a safe distance (at least 6-8 inches) to speed up the drying process, ensuring the air stream is clean and dry. Once dry, visually inspect the sensing elements to ensure they appear clean and free of any visible residue.
Pro Tip: Patience is key here. Residual moisture can cause immediate sensor malfunction or long-term damage. While drying, you can use this time to clean the exterior of the MAF sensor housing and inspect the air filter for excessive dirt, replacing it if necessary, as a dirty air filter can contribute to a dirty MAF sensor.
Step 7: Reinstall the MAF Sensor and Test Your Vehicle
What you need:
- Phillips head screwdriver or socket wrench
- 10mm or 13mm wrench
- Diagnostic Trouble Code (DTC) scanner (optional)
Instructions: Carefully slide the dried MAF sensor back into its housing or mounting point, ensuring it’s oriented correctly (refer to your earlier photos if needed). Secure it with the screws you removed in Step 4, tightening them snugly but without over-tightening. Reattach the air intake hoses to the MAF housing and secure them with their respective clamps. Reconnect the electrical connector, making sure you hear a distinct click to confirm it’s securely latched. Finally, reconnect the negative battery terminal, tightening the nut firmly. Start your engine and listen for any immediate changes. It’s often beneficial to drive the vehicle for a short period to allow the engine computer to relearn the MAF sensor’s readings and adjust accordingly. If a “Check Engine” light was on due to a MAF fault, it might clear on its own after several drive cycles, or you can use a DTC scanner to clear the codes manually.
Pro Tip: After everything is reconnected, perform a quick visual check of all connections and hoses to ensure they are tight and properly seated. Any air leaks around the MAF sensor housing or intake system can lead to incorrect air readings and poor engine performance, negating the benefits of cleaning.
✅ Final Checklist
- Battery negative terminal securely reconnected.
- MAF sensor electrical connector fully latched and secure.
- MAF sensor reinstalled in correct orientation with screws tightened.
- All air intake hoses and clamps around the MAF housing are tight and free of leaks.
- No “Check Engine” light illuminated, or existing MAF-related codes have been cleared.
Important Notes:
- Safety Considerations: Always disconnect the battery before working on electrical components. Work in a well-ventilated area. Wear safety glasses and gloves. Avoid skin contact with alcohol, and never ingest it.
- When to Seek Professional Help: If, after cleaning, your engine symptoms persist or worsen, or if the “Check Engine” light remains illuminated with MAF-related codes, the sensor might be faulty and require replacement. A professional mechanic can accurately diagnose the issue. While high-purity isopropyl alcohol can be effective for removing certain contaminants, dedicated MAF sensor cleaner is generally preferred due to its specific formulation designed to be absolutely residue-free and optimized for delicate sensor elements.
- Estimated Time and Cost Range: This cleaning process typically takes 30-60 minutes, including drying time. The cost is minimal, primarily for high-purity isopropyl alcohol (around $5-$15 for a bottle) and potentially a few basic tools if you don’t already own them. Compared to a new MAF sensor which can range from $75-$300+, cleaning is a very cost-effective maintenance task.
How to Safely Clean Your Mass Air Flow Sensor: Step-by-Step Guide
Understanding Cleaners: Why Specialized MAF Cleaner is Your Only Safe Option
The choice of cleaning solution is critical for your MAF sensor. This is where most confusion and potential damage arise. Let’s clarify which cleaners to use and, more importantly, which to strictly avoid:
- Rubbing Alcohol (e.g., 70% Isopropyl Alcohol): Absolutely unsuitable. Rubbing alcohol typically contains water (often 30%) and various emollients or other additives. These components will leave residue upon evaporation, can promote corrosion on delicate metallic elements, and may aggressively degrade plastic housings or integrated circuitry within the sensor.
- High-Purity Isopropyl Alcohol (90%+): While seemingly better due to less water and additives, it’s still not ideal. It can still leave microscopic trace amounts of residue and may not be compatible with the specific coatings or advanced plastics found in 2026-era MAF sensors. The risk of even minor, undetectable damage or residue altering the sensor’s precise readings is too high to justify its use.
- Brake Cleaner / Carb Cleaner / Electrical Contact Cleaner: Never use these under any circumstances. These are aggressive solvents designed for different purposes. They will instantly dissolve sensitive plastics, specialized coatings, and bondings on the MAF sensor, leading to immediate and irreversible destruction.
The only recommended product is a specialized MAF Sensor Cleaner. These products are precisely formulated to be completely residue-free, fast-evaporating, and entirely safe for the delicate plastics and sensing elements within your MAF. The minimal cost of a can (typically $10-$15 USD in 2026) is a tiny investment compared to the $100-$300+ cost of a new MAF sensor.
Preparation and Safe Disassembly
Before you begin the cleaning process, ensure you have the correct tools and follow essential safety precautions:
- Tools Required: One can of dedicated MAF sensor cleaner, a screwdriver or socket set (to match your MAF’s mounting hardware), a clean lint-free cloth, and safety glasses.
- Safety First:
- Turn off your vehicle’s engine and allow it to cool for at least 15-20 minutes. Working on a cool engine bay is safer and prevents heat-related injuries.
- Disconnect the negative battery terminal. This crucial step prevents accidental electrical shorts, clears any existing fault codes that might hinder proper diagnosis, and ensures safety when handling electrical components.
- Locate the MAF sensor. It’s typically situated on the air intake duct, positioned between your air filter housing and the throttle body. It’s usually a small, rectangular or cylindrical plastic component with an electrical connector.
- Carefully disconnect the electrical connector. Most connectors have a release tab or clip you need to press or slide before pulling it straight off. Avoid tugging on the wires themselves.
- Remove the mounting hardware. This usually involves two Phillips screws, small hex bolts, or sometimes hose clamps if the sensor is integrated into a section of the intake tube.
- Gently pull the sensor straight out of the air intake tube.
- Critical Caution: Absolutely avoid touching the delicate platinum hot wire or thermistor elements located inside the sensor. Skin oils or any physical contact can easily damage these incredibly sensitive components.
What If MAF Sensor Cleaning Doesn’t Fix the Problem?
Cleaning your Mass Air Flow (MAF) sensor with alcohol is a highly effective, initial diagnostic and repair step. However, it’s not a universal solution for all engine performance issues. If symptoms persist or new problems arise after cleaning, a more comprehensive diagnostic approach is necessary. Ignoring persistent issues can lead to increased fuel consumption, catalytic converter damage, or further engine complications, potentially escalating repair costs significantly by late 2026.
Re-evaluate Diagnostic Trouble Codes (DTCs)
The first step post-cleaning should be to re-scan your vehicle’s On-Board Diagnostics II (OBD-II) system. Use a reliable scanner to check for any current, pending, or history codes. Persistence of MAF-specific codes (e.g., P0100, P0101, P0102, P0103, P0104) strongly indicates the sensor itself is faulty, or there’s an issue within its electrical circuit. According to data from the Automotive Service Association (ASA) for Q4 2025, over 65% of vehicles presenting with recurring P01xx codes after a MAF cleaning require sensor replacement or wiring repair.
Inspect Wiring and Connectors
The integrity of the MAF sensor’s electrical connection is paramount. A visual inspection of the wiring harness leading to the sensor and the connector plug itself can reveal critical issues. Look for signs of fraying, insulation damage, corrosion on the terminals, or loose connections. Modern vehicle electronics, particularly those designed for 2026 standards, are sensitive to resistance fluctuations caused by poor contacts. Damage can occur from engine heat, vibration, rodent activity, or even previous maintenance efforts. Ensure the connector is fully seated and locked.
Check for Vacuum Leaks
Unmetered air entering the engine intake system past the MAF sensor can mimic its malfunction, causing rough idle, lean fuel conditions, and reduced power. Common sources of vacuum leaks include cracked vacuum hoses, a faulty PCV (Positive Crankcase Ventilation) valve, deteriorated intake manifold gaskets, or a loose air intake boot. A professional smoke test is the most definitive method for identifying these leaks. Industry analyses from early 2026 suggest vacuum leaks contribute to approximately 18% of reported “MAF sensor issues” that are not directly related to the sensor itself.
Consider Other Sensor Malfunctions
The MAF sensor doesn’t operate in isolation. It works in conjunction with various other sensors to manage engine performance. A faulty Oxygen (O2) sensor, for instance, can send incorrect data to the Engine Control Unit (ECU), leading to inappropriate fuel trim adjustments that might be mistaken for a MAF problem. Similarly, a Manifold Absolute Pressure (MAP) sensor, if present, or even an engine coolant temperature sensor can influence fuel delivery and idle characteristics. In 2026, replacing a single O2 sensor typically ranges from $150 to $300, including parts and labor, highlighting the need for accurate diagnosis.
When to Seek Professional Help
If you’ve systematically worked through these troubleshooting steps and the engine symptoms persist, it is time to consult a certified automotive technician. Professional shops utilize advanced diagnostic tools, such as oscilloscopes and factory-level scan tools, to precisely pinpoint electrical faults, sensor failures, or deeper engine management issues. Attempting complex diagnostics without the proper equipment can lead to further damage or misdiagnosis. The average diagnostic fee for engine performance issues in 2026 typically ranges from $100 to $200. If the MAF sensor ultimately requires replacement, expect parts costs between $150 and $400 for an OEM-quality sensor, with labor adding an additional $50 to $100, bringing the total replacement cost to approximately $200-$500.
- Perform an OBD-II scan to check for new or persistent Diagnostic Trouble Codes.
- Visually inspect the MAF sensor wiring harness and connectors for any signs of damage or loose connections.
- Thoroughly check for potential vacuum leaks around the intake system components.
- Consider if other related sensors, such as O2 or MAP sensors, might be faulty and causing similar symptoms.
- If issues persist after these steps, consult a certified automotive technician for comprehensive, professional diagnostics.
Conclusion
Cleaning your MAF sensor with specialized alcohol is an accessible and often effective solution for common engine performance issues like rough idling and reduced fuel economy. This maintenance, when performed correctly, can restore accurate airflow readings essential for optimal engine function. However, if symptoms persist, a methodical troubleshooting approach, including checking electrical connections and identifying other potential sensor failures or vacuum leaks, is crucial. According to verified research and expert sources, addressing persistent issues promptly prevents costlier repairs. If problems continue, seeking professional diagnostic assistance is the most responsible next step to ensure your vehicle’s reliable operation into 2026 and beyond.
❓ Frequently Asked Questions
Why is specialized MAF cleaner recommended over alcohol for cleaning?
Specialized MAF cleaner is formulated to evaporate completely without leaving any residue, which is crucial for the delicate MAF sensor wires. Alcohols, especially rubbing alcohol, can contain water and other additives that may corrode components or leave deposits, impairing sensor accuracy.
What specific risks are there when using alcohol, especially rubbing alcohol, on a MAF sensor?
Rubbing alcohol often contains moisturizers or other additives that leave a film on the sensor, which can interfere with its readings. Even high-purity isopropyl alcohol can potentially degrade plastic components or fail to evaporate as cleanly as dedicated MAF cleaner, leading to inaccurate air-fuel mixture calculations.
What are the common symptoms of a dirty Mass Air Flow sensor that indicate it needs cleaning?
A dirty MAF sensor can cause several issues, including rough idling, engine hesitation during acceleration, decreased fuel economy, increased emissions, and a check engine light illuminating with codes related to air-fuel mixture. Cleaning can often resolve these performance problems.
How do I safely remove and reinstall a MAF sensor for cleaning?
First, disconnect the negative battery terminal. Then, unplug the electrical connector from the MAF sensor and loosen any clamps or screws holding it in place in the air intake tube. Carefully pull the sensor out, clean it, and reverse the steps for reinstallation, ensuring all connections are secure.
After cleaning my MAF sensor, what steps should I take to ensure it’s working correctly?
After reinstallation and reconnecting the battery, start your engine and listen for any immediate improvements in idle quality. It’s advisable to take a short test drive to check for better acceleration and responsiveness. If a check engine light was on, it might reset itself after a few drive cycles, or you can manually clear the code.
Are there any parts of the MAF sensor I should absolutely avoid touching during the cleaning process?
Yes, it is critical to avoid touching the delicate platinum wires or thermistors inside the sensor with your fingers or any tools. These components are extremely fragile and even light contact can damage them, leading to sensor malfunction. Always rely on the spray to do the cleaning.