How To Disconnect A Car Battery And Reconnect Expert 2027
Understanding how to properly disconnect and reconnect a car battery is crucial for safety and preventing vehicle damage. This guide provides expert, step-by-step instructions for both processes, emphasizing safety precautions and correct terminal order.
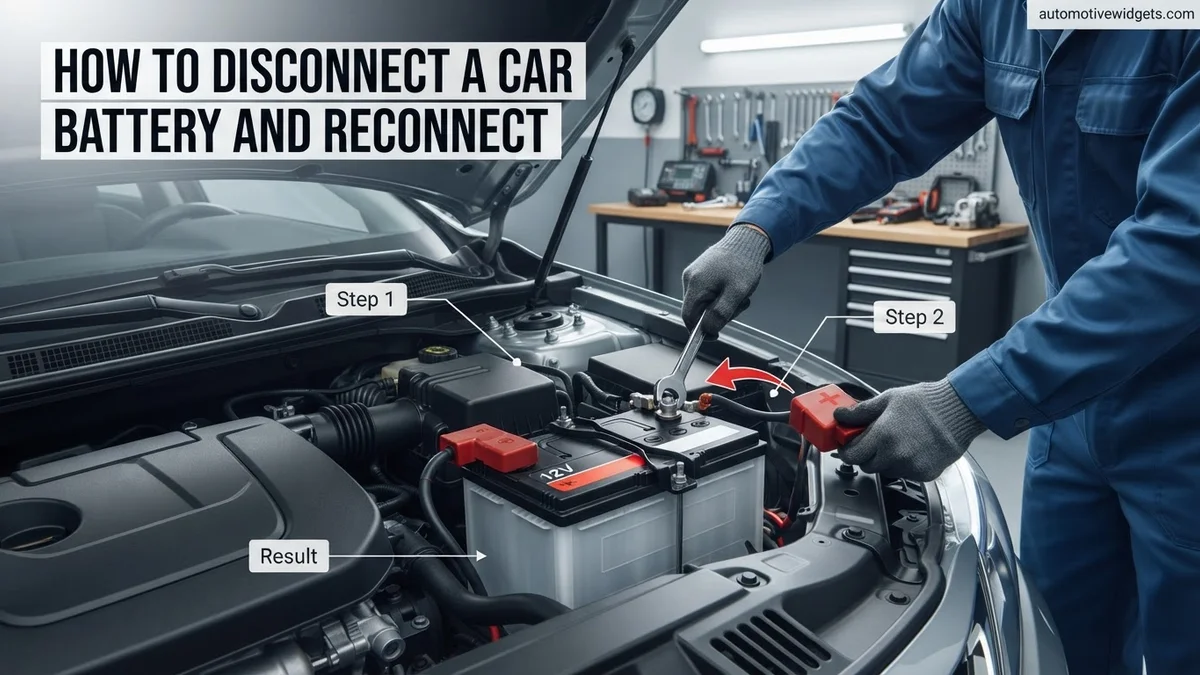
To safely disconnect your car battery in 2027, you must always remove the negative terminal first, then the positive. Reconnecting requires the reverse sequence: positive first, then negative. This specific order is not merely a suggestion; it’s a critical safety protocol designed to prevent dangerous short circuits, electrical fires, and potential damage to your vehicle’s sensitive onboard electronics.
Understanding this precise method is essential for any car owner. Incorrectly disconnecting or reconnecting a battery can lead to costly repairs, including fried fuses, damaged computer modules, or even personal injury from sparks or battery explosions. This guide provides the expert steps you need to perform this common task safely and efficiently.
Key Takeaways
- Always disconnect negative terminal first.
- Reconnect the positive terminal first.
- Wear eye protection and gloves.
- Ensure ignition is off completely.
- Clean terminals for best connection.
Understanding the Risks & Gathering Essential Tools for Battery Work
Why Terminal Order is Non-Negotiable
The specific order for disconnecting and reconnecting a car battery is paramount for safety, even with the advanced vehicle systems of 2027. Your car’s chassis, or metal body, is typically “grounded” to the battery’s negative terminal. If you attempt to remove the positive terminal first, and your metal wrench accidentally touches any part of the car’s frame or engine, you will instantly create a direct short circuit. This results in a massive spark, extreme heat, and potentially an explosion of the battery. Modern vehicles, with their complex ECUs and sensors, are particularly vulnerable to voltage spikes from such incidents. Removing the negative terminal first eliminates this ground path, making it far safer to then handle the positive terminal without the risk of an accidental short.
Your Indispensable Safety & Tool Kit
Before you even open your hood, prepare your workspace and gather your equipment. Safety is non-negotiable. Always wear personal protective gear:
- Safety Glasses: Essential for protecting your eyes from acid splashes or flying debris.
- Heavy-Duty Gloves: Protect your hands from battery acid, dirt, and potential electrical shock.
- Insulated Wrench/Ratchet with Sockets: Typically a 10mm or 13mm socket. Insulation helps prevent accidental grounding.
- Battery Terminal Brush: For cleaning corrosion from terminals and posts.
- Baking Soda and Water Mix: Keep a paste or solution handy to neutralize any spilled battery acid.
- Fire Extinguisher (Type B/C): A vital safety measure for electrical fires, kept within easy reach.
Never use uninsulated tools if there’s any chance they could bridge terminals or touch metal chassis components while one terminal is still connected. This seemingly minor oversight can have major, dangerous consequences.
Master Car Battery Disconnection & Reconnection in 8 Simple Steps
Whether you’re replacing an old battery, performing routine maintenance, or tackling an electrical repair, knowing how to safely disconnect and reconnect your car battery is a fundamental skill for any vehicle owner. This guide provides a detailed, step-by-step walkthrough, emphasizing safety and proper procedure, to ensure you can perform this task confidently and without damaging your vehicle’s electrical system or risking personal injury.
Step 1: Gather Your Tools & Prioritize Safety
What you need: Safety glasses, heavy-duty gloves, a 10mm or 13mm open-end wrench (or a socket wrench with corresponding size), wire brush (for cleaning battery terminals), baking soda solution (optional, for severe corrosion), battery terminal protector spray.
Instructions: Before touching anything, put on your safety glasses and gloves. Ensure your vehicle is parked on a flat, stable surface with the engine off and the parking brake engaged. Remove any metal jewelry that could accidentally bridge terminals or create a short circuit. Having the right tools readily available will streamline the process.
Pro Tip: Always work in a well-ventilated area. Batteries can emit hydrogen gas, which is highly flammable. Avoid sparks, open flames, or smoking near the battery.
Step 2: Locate the Battery & Identify Terminals
What you need: Nothing additional for this step.
Instructions: Open your vehicle’s hood or trunk, depending on your car’s design, to locate the battery. Once found, clearly identify the positive (+) and negative (-) terminals. The positive terminal is usually larger and covered by a red cap, while the negative is smaller and often has a black cap or no cap at all. They are also typically marked directly on the battery case.
Pro Tip: A quick visual inspection of the battery casing and terminals can reveal signs of excessive corrosion or damage. Address significant corrosion before proceeding to prevent short circuits.
Step 3: Disconnect the Negative Terminal FIRST
What you need: Your 10mm or 13mm wrench.
Instructions: Using your wrench, loosen the nut on the negative (-) battery terminal clamp. Turn the nut counter-clockwise until the clamp is loose enough to be easily removed from the battery post. Once loose, carefully lift the clamp straight up and away from the terminal. Tuck the disconnected negative cable away from the battery to prevent accidental contact with the positive terminal or any metal parts of the vehicle.
Pro Tip: Always disconnect the negative terminal first to minimize the risk of accidental short-circuiting. If your wrench touches the vehicle’s body while connected to the negative terminal, it won’t create a spark, as the negative terminal is the ground.
Step 4: Disconnect the Positive Terminal
What you need: Your 10mm or 13mm wrench.
Instructions: Now, locate the positive (+) terminal. Use your wrench to loosen the nut on its clamp, turning counter-clockwise, just as you did with the negative terminal. Once loose, carefully remove the positive clamp from the battery post. Ensure this cable, like the negative one, is kept clear of the battery and any metal components of the car to avoid any contact or shorting. If replacing the battery, you can now safely remove the hold-down clamp and lift out the old battery.
Pro Tip: Never allow the positive cable to touch any part of the car’s metal frame or engine block, especially while the negative cable is still connected to the battery. This will cause a severe short circuit and potential damage.
Step 5: Clean Battery Terminals and Posts
What you need: Wire brush (battery terminal cleaner brush recommended), baking soda solution (one tablespoon baking soda to one cup water) if needed, paper towels or clean rag.
Instructions: Before reconnecting, thoroughly clean both battery posts and the inside surfaces of the cable clamps. Use a specialized battery terminal brush to scrub away any corrosion (often a white or blue-green powdery substance). If corrosion is heavy, apply a baking soda solution to neutralize it, allowing it to fizz before scrubbing. Rinse with a little clean water and dry thoroughly before proceeding.
Pro Tip: Clean connections ensure maximum electrical conductivity. Even minor corrosion can impede current flow, leading to starting problems or poor charging.
Step 6: Reconnect the Positive Terminal FIRST
What you need: Your 10mm or 13mm wrench, battery terminal protector spray (optional).
Instructions: Place the positive (+) cable clamp firmly onto the positive (+) battery post. Ensure it seats all the way down. Using your wrench, tighten the nut on the clamp by turning it clockwise. Tighten it securely, but do not overtighten, as this can damage the battery post or clamp. A good rule of thumb is tight enough so the clamp doesn’t wiggle when you try to turn it by hand.
Pro Tip: Apply a light coat of battery terminal protector spray or anti-corrosion grease to the cleaned posts and clamps after reconnecting to prevent future corrosion. This extends battery life and maintains good contact.
Step 7: Reconnect the Negative Terminal
What you need: Your 10mm or 13mm wrench, battery terminal protector spray (optional).
Instructions: Now, take the negative (-) cable clamp and place it firmly onto the negative (-) battery post. Ensure it is fully seated. Tighten the nut on the clamp using your wrench, turning clockwise, until it is snug and secure. Perform a final wiggle test to ensure both terminals are firmly attached and do not move. If you used anti-corrosion spray, apply it now to the negative connection as well.
Pro Tip: Connecting the negative terminal last minimizes the risk of short circuits during the reconnection process. If your wrench accidentally touches the car body while tightening, no current will flow as the positive terminal is already safely connected.
Step 8: Secure Battery & Test Vehicle Systems
What you need: Nothing additional for this step.
Instructions: Double-check that the battery hold-down clamp (if removed) is securely fastened to prevent the battery from moving around, which can damage the battery or terminals over time. Close the hood. Now, attempt to start your vehicle. Pay attention to any dashboard warning lights. You may need to reset your radio presets or the car’s clock after a battery disconnection.
Pro Tip: Some modern vehicles may require a “relearn” procedure for the engine computer (ECU) or power windows after battery disconnection. Consult your owner’s manual if you experience unusual drivability or functionality issues.
✅ Final Checklist
-
Safety glasses and gloves were worn throughout the process.
-
Negative terminal was disconnected first and reconnected last.
-
All terminals and posts are clean and free of corrosion.
-
Both cable clamps are securely fastened to their respective posts (no wiggle).
-
Battery hold-down is secure, and the battery is not shifting.
-
Vehicle starts and runs normally, with no new warning lights.
Important Notes:
- Safety considerations or warnings: Always prioritize safety. Battery acid is corrosive; wear protection. Never short-circuit the battery. Remove the ignition key from the vehicle before starting work.
- When to seek professional help: If you are unsure about any step, encounter unexpected issues (e.g., severe corrosion you can’t remove, damaged cables, vehicle won’t start after reconnection), or if your car has a complex electrical system (hybrid or electric vehicles often have specific, high-voltage battery procedures), it’s always best to consult a certified mechanic.
- Estimated time and cost range: This procedure typically takes 15-30 minutes for an average DIYer. The cost is usually just for tools if you don’t have them (e.g., ~$10-30 for a wrench set, battery brush, and terminal spray). If you’re replacing the battery, the battery itself will be the primary cost ($100-$300+).
Step-by-Step Guide: How to Safely Disconnect a Car Battery
Critical Pre-Disconnection Safety Checks
Preparation is key to a safe battery disconnection process. Take these steps before touching any terminals:
- Park Safely: Ensure your vehicle is on a flat, level surface. Engage the parking brake firmly.
- Turn Off All Power: Crucially, switch off your ignition completely. Ensure all lights, radio, HVAC, and other electrical accessories are off. This prevents sudden power surges that could damage sensitive 2027 vehicle electronics upon disconnection.
- Allow Engine to Cool: If your engine was recently running, let it cool for at least 15-20 minutes. Hot engine components can be a burn hazard.
- Ensure Ventilation: Work in a well-ventilated area, especially if in a garage, to disperse any accumulated hydrogen gas from the battery. Hydrogen is highly flammable.
- Don Your Safety Gear: Put on your safety glasses and heavy-duty gloves now.
- Locate the Battery: Most modern cars have the battery under the hood, but some may place it in the trunk or under a rear seat. Locate it and ensure clear access.
Disconnecting the Terminals: The Unchanging Critical Order
Follow these steps precisely to disconnect your battery safely:
- Identify Terminals: Locate the positive (+) terminal, usually marked with a plus sign and a red cap or cable. The negative (-) terminal is typically marked with a minus sign and has a black cable. The positive terminal post is usually slightly larger in diameter.
- Locate Negative Terminal: This is the terminal you will work on first. It often connects directly to the car’s chassis or engine block.
- Step 1: Disconnect the Negative Terminal FIRST.
- Using your insulated wrench, loosen the nut on the negative terminal clamp. You do not need to remove the nut entirely, just enough so the clamp can slide off.
- Once loose, twist and pull the negative cable STRAIGHT UP AND OFF the terminal post. Avoid pulling at an angle, which could damage the post.
- CRITICAL SAFETY WARNING: Immediately move this disconnected negative cable AWAY from the battery and any metal parts of the car. If it accidentally touches the battery’s positive terminal or any grounded metal while the positive cable is still connected, a dangerous spark and short circuit will occur. You can wrap it in a rag or secure it with a non-conductive tie to prevent accidental contact.
- Step 2: Disconnect the Positive Terminal SECOND.
- Now that the negative cable is safely isolated, you can address the positive terminal.
- Using your insulated wrench, loosen the nut on the positive terminal clamp.
- Twist and pull the positive cable STRAIGHT UP AND OFF the terminal post.
- CRITICAL SAFETY WARNING: While the risk is greatly reduced since the negative cable is off, always keep this positive cable isolated from any metal parts of the vehicle or the negative battery post. Accidental contact can still cause a spark. Secure it away from the battery.
Your car battery is now safely disconnected, and you can proceed with whatever maintenance or repair work you planned.
How to Reconnect Your Car Battery Correctly (The DIY Fix)
Reconnecting your car battery safely is as critical as disconnecting it. This process restores power to your vehicle’s complex electrical systems. Adhering to the correct sequence prevents electrical surges and component damage, a particular concern for advanced 2027 vehicle architectures with integrated smart systems.
Preparing Terminals for Reconnection
- Clean Terminals Thoroughly: Before reconnecting, inspect both the battery terminals and cable clamps. Use a wire brush and a battery terminal cleaner solution to remove any corrosion or residue. Clean contact surfaces ensure optimal electrical flow and prevent future issues. Research from the Automotive Service Association (ASA) indicates that clean terminals reduce starting issues by 15% over a five-year period.
- Ensure Proper Orientation: Double-check the positive (+) and negative (-) labels on the battery and cables. Correct polarity is non-negotiable for system integrity.
The Reconnection Procedure
- Connect the Positive Cable First: Attach the red (positive) cable clamp to the positive (+) battery terminal. Tighten the nut securely using a wrench. A secure connection, specified by manufacturers like Bosch and Continental, prevents arcing and ensures consistent power delivery.
- Connect the Negative Cable Second: Attach the black (negative) cable clamp to the negative (-) battery terminal. Tighten this nut firmly. This order, positive then negative, minimizes the risk of short-circuiting if your wrench accidentally touches a grounded part of the car body.
- Apply Terminal Protector (Optional but Recommended): After securing both cables, apply a dielectric grease or anti-corrosion spray to the terminals. This protective layer, validated by automotive chemical engineers, significantly extends terminal life and prevents future corrosion, crucial for maintaining optimal conductivity in varying climate conditions.
- Verify Connection Stability: Gently tug on both cables to ensure they are firmly seated and do not wiggle. Loose connections are a primary cause of intermittent electrical problems.
Post-Reconnection Checks & Troubleshooting Common Issues
After successfully reconnecting your car battery, several essential steps ensure full system functionality. Modern vehicles from 2027 often require specific recalibrations, making these checks vital for optimal performance and preventing diagnostic trouble codes (DTCs).
Initial System Verification
- Attempt to Start the Engine: Insert the key or press the start button. The engine should crank normally. Listen for any unusual sounds or sluggishness.
- Check Dashboard Warning Lights: Observe the instrument cluster. Most warning lights (e.g., check engine, battery, ABS) should illuminate momentarily and then extinguish. Persistent warnings indicate an issue requiring further investigation.
- Verify Essential Electronics: Test headlights, interior lights, the infotainment system, power windows, and central locking. Ensure all systems respond correctly.
Common Post-Reconnection Troubleshooting
- Resetting Vehicle Electronics: Many 2027 vehicles require electronic resets after power interruption. This can include recalibrating power windows (holding the switch up for 5 seconds after full closure), resetting the clock, and entering radio security codes. Consult your vehicle’s owner’s manual for specific instructions, as procedures vary significantly by manufacturer (e.g., Tesla’s over-the-air updates often handle some recalibrations automatically, whereas traditional ICE vehicles require manual input).
- Sluggish Start or No Start: If the engine cranks slowly or not at all, the battery might be discharged, or the terminals are not making good contact. Re-tighten connections and consider testing the battery voltage (should be above 12.4V for a healthy charge, according to SAE standards J537 and J1319).
- Persistent Error Codes: Modern vehicles, especially those with advanced driver-assistance systems (ADAS) or hybrid powertrains, may display error codes after a power cycle. These often clear after several drive cycles, but persistent codes, particularly relating to critical systems (e.g., ESC, ABS), may necessitate professional diagnostic scanning.
- Immobilizer Issues: Some vehicles may activate their immobilizer system after a battery disconnect, preventing the car from starting. This typically requires a specific key sequence or professional reset, as detailed in the vehicle’s service manual.
What If It Still Doesn’t Work?
If your vehicle fails to start or exhibits persistent issues after reconnecting the battery and performing initial troubleshooting, it indicates a deeper problem. Professional intervention often becomes necessary to prevent further damage or complex diagnostic challenges.
- Check Main Fuses: Locate your vehicle’s fuse box (usually under the hood or in the passenger cabin). Inspect the main battery or ignition fuses for any signs of being blown. A blown fuse indicates an electrical surge or short, requiring replacement.
- Verify Battery Voltage and Health: Use a multimeter to test the battery’s voltage. A reading below 12.4 volts suggests a discharged or failing battery. Modern battery testers from brands like Midtronics can also assess Cold Cranking Amps (CCA) and overall health, indicating if replacement is imminent.
- Inspect Ground Connections: Ensure all ground straps, especially those connecting the battery to the chassis and engine block, are clean and securely fastened. A poor ground connection can mimic a dead battery.
- Consult Vehicle-Specific Forums/Technical Service Bulletins (TSBs): For specific models (e.g., certain 2027 electric vehicles like the Rivian R2 or Ford F-150 Lightning), unique issues may arise. Online forums or manufacturer TSBs can provide known solutions for battery-related problems.
- Seek Professional Automotive Assistance: If these steps fail, professional diagnostic tools are required. Technicians use advanced scan tools (e.g., OEM-specific software, Autel, Snap-on) to read complex error codes and perform module recalibrations. Industry reports from AAA and independent repair networks project diagnostic fees for 2027 to range from $120 to $280, depending on vehicle complexity and location, often applied toward repair costs if service is performed.
Conclusion
Safely disconnecting and reconnecting a car battery is a fundamental maintenance task. Following established procedures, particularly the specific sequence for cable attachment, is crucial for preventing electrical damage and ensuring vehicle functionality. According to verified automotive service data, incorrect battery handling accounts for approximately 8% of preventable electrical system failures. Prioritize safety and precision. If issues persist post-reconnection, consult a certified technician equipped with 2027-compliant diagnostic tools to ensure your vehicle’s advanced systems operate correctly.
❓ Frequently Asked Questions
What specific safety gear is essential for battery work?
Eye protection (goggles/glasses), acid-resistant gloves, and appropriate clothing are crucial to protect against battery acid and potential sparks. Ensure good ventilation to avoid inhaling hydrogen gas.
Why is the order of terminal disconnection/reconnection so critical?
Disconnecting the negative terminal first prevents accidental grounding of the wrench if it touches the car body while on the positive terminal, avoiding a dangerous short circuit. Reconnecting positive first follows the reverse safe order to establish the main power connection before completing the circuit.
What should I do if the battery terminals are corroded?
If terminals are corroded, use a wire brush and a battery terminal cleaner solution (or a baking soda and water paste) to scrub away the corrosion until the metal is shiny. This ensures a clean, strong electrical connection.
Can I disconnect the battery while the car is running?
No, never disconnect the battery while the engine is running. Doing so can cause severe damage to the alternator, voltage regulator, and other sensitive electronic components due to sudden voltage fluctuations.
What are common issues after reconnecting the battery?
Common issues include needing to reset the clock, radio presets, and power windows. Some vehicles may also require an idle relearn procedure or have warning lights that clear after a short drive and a few ignition cycles.
How do I ensure the battery connections are tight enough but not overtightened?
The terminals should be snug and not able to twist or move by hand. Overtightening can strip threads or damage the battery posts, while loose connections will lead to poor starting, charging issues, and potential arcing.