How To Wash A Car With Ppf And Ceramic Coating 2027
Washing a car with both PPF and ceramic coating requires a gentle, specific approach to prevent damage and preserve their protective properties. Always use pH-neutral products and the two-bucket method to ensure a spotless, streak-free finish that enhances longevity.
Washing your car effectively when it features both Paint Protection Film (PPF) and a ceramic coating requires a precise approach. Standard car wash methods can degrade these advanced protections, leading to premature wear, reduced gloss, and compromised hydrophobic properties. The goal isn’t just a clean car, but one where the PPF remains optically clear and the ceramic coating continues to repel contaminants and water efficiently, preserving your vehicle’s finish for years, well into 2027 and beyond. This guide provides the critical steps and product choices to maintain your investment safely.
Adopting the correct washing routine is paramount. Your vehicle’s PPF acts as a self-healing barrier against physical damage, while the ceramic coating provides chemical resistance and incredible slickness. Improper techniques, like using harsh chemicals or abrasive materials, directly threaten these layers. Mastering this specific wash process ensures you prolong the lifespan and performance of both protective systems, keeping your car looking showroom-fresh without risking costly damage.
Key Takeaways
- Always use pH-neutral car wash products.
- Employ the two-bucket wash method correctly.
- Use soft, clean microfiber wash mitts.
- Dry with plush microfiber towels gently.
- Avoid direct, high-pressure water contact.
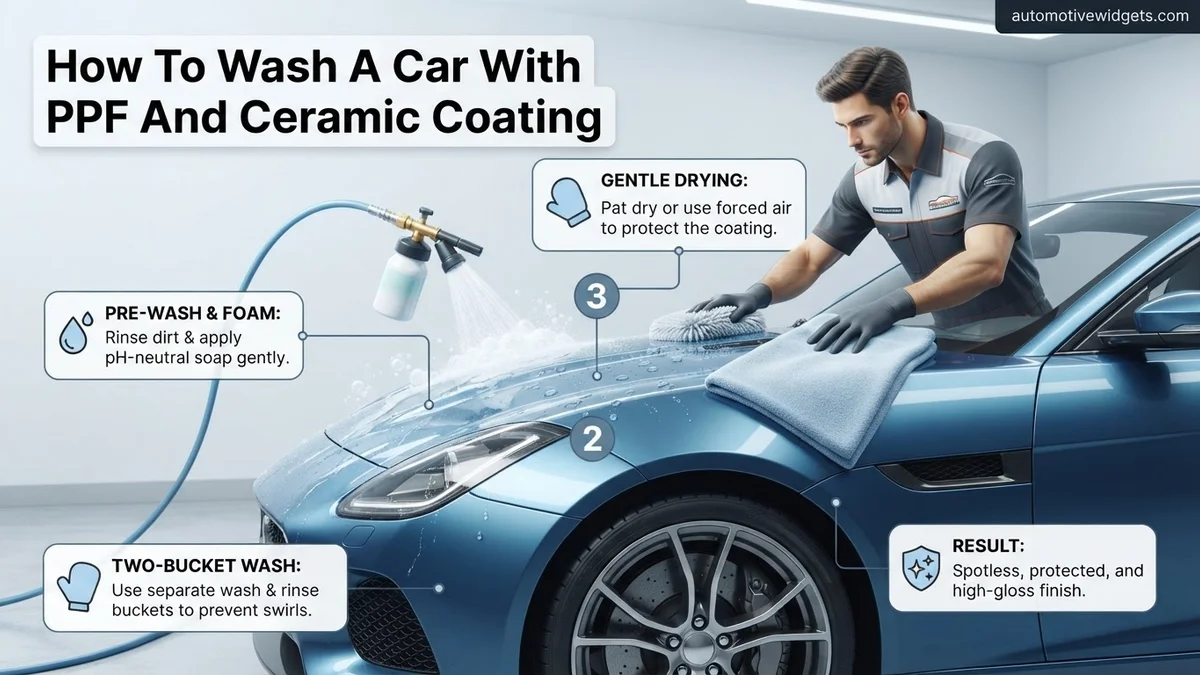
Why Improper Washing Damages Your PPF & Ceramic Coating
Using incorrect techniques or products on your PPF and ceramic coating can swiftly undermine their integrity and aesthetic benefits. Both technologies are durable but vulnerable to specific types of abuse. Understanding these vulnerabilities helps you avoid common mistakes that lead to costly repairs or re-applications, impacting your car’s appearance and resale value in the long term.
Chemical Degradation & Abrasive Wear
- Harsh Chemicals: Aggressive degreasers, wheel cleaners with strong acids, or soaps with high pH levels (pH > 9) can strip or etch ceramic coatings. For PPF, these chemicals might cause yellowing, drying, or delamination, especially along edges. Always choose pH-neutral (pH 6-8) shampoos and cleaning agents.
- Abrasive Contact: Stiff brushes, dirty wash mitts, or even automatic car washes introduce micro-scratches or marring. PPF is self-healing to a degree, but excessive abrasion will overwhelm its protective capabilities. Ceramic coatings, while hard, can also be scratched, reducing their gloss and hydrophobic effect.
- High-Pressure Washers Too Close: While effective, spraying a high-pressure washer (>1500 PSI) too close to PPF edges can lift the film, creating areas for water and contaminants to get underneath. Maintain a safe distance of at least 12-18 inches from the surface, especially around panel gaps and film edges.
Compromising Protection and Aesthetics
Each improper wash cycle incrementally erodes the performance of your PPF and ceramic coating. You’ll notice reduced water beading, making the car harder to clean, and a loss of the deep, reflective gloss. The self-cleaning effect diminishes, leading to more embedded dirt and requiring more effort to achieve a clean finish. By 2027, cutting-edge PPF and ceramic products are designed for longevity, but only with diligent, correct maintenance.
From Start to Finish: Maintaining Your PPF & Ceramic Coated Car Explained
Having a vehicle protected with Paint Protection Film (PPF) and a ceramic coating offers unparalleled gloss, durability, and hydrophobic properties, making cleaning significantly easier. However, it’s crucial to follow specific washing techniques to preserve these advanced protections and prevent damage. This comprehensive guide will walk you through each step, ensuring your cherished investment remains pristine for years to come.
Step 1: Assemble Your Detailing Arsenal
What you need: Two 5-gallon buckets with grit guards, pH-neutral car shampoo (specifically for coated vehicles, e.g., CarPro Reset, Gyeon Bathe+), foam cannon, pressure washer (optional), multiple soft microfiber wash mitts, dedicated wheel brushes (for face, barrel, tires), pH-neutral wheel cleaner/iron remover, plush microfiber drying towels (3-4 large ones), car dryer/blower (optional), garden hose with open nozzle.
Instructions: Before you even wet the car, gather all your tools and products. Fill one bucket with fresh, clean water for rinsing your mitt, and the second bucket with the recommended dilution of your pH-neutral car shampoo and water for washing. Position your vehicle in a shaded area, out of direct sunlight, to prevent premature drying of products and water spots. This preparation prevents rushing and ensures a smooth, efficient washing process.
Pro Tip: Always pre-rinse your grit guards before placing them in the buckets to ensure they are free of any residual debris. Use a dedicated mitt for wheels to prevent cross-contamination.
Step 2: The Gentle Pre-Rinse & Wheel Care
What you need: Garden hose with nozzle or pressure washer, pH-neutral wheel cleaner, dedicated wheel brushes, wheel wash mitt/sponge.
Instructions: Begin by thoroughly rinsing the entire vehicle from top to bottom. Use a garden hose or a pressure washer (at a safe distance, generally 12-18 inches from the surface, with a wide fan pattern and under 1800 PSI, especially near PPF edges) to remove all loose dirt, dust, and grime. After rinsing the body, immediately address the wheels. Spray a pH-neutral wheel cleaner generously on all wheel surfaces, letting it dwell for 2-3 minutes. Agitate with various brushes to clean spokes, barrels, and tires. Rinse wheels completely before moving to the car’s body to prevent splashes of dirty wheel cleaner onto your paint.
Pro Tip: Pay extra attention to wheel wells during the initial rinse; these areas often harbor significant dirt and road grime. For stubborn brake dust, a dedicated iron remover can be used, but ensure it’s safe for your specific wheel finish.
Step 3: Foam Cannon Pre-Soak for Safety
What you need: Foam cannon, pH-neutral car shampoo, pressure washer or strong garden hose.
Instructions: Fill your foam cannon reservoir with the recommended dilution of your chosen pH-neutral car shampoo. Attach it to your pressure washer or garden hose. Apply a thick, even blanket of foam over the entire vehicle, starting from the roof and working your way down. Allow the foam to dwell for 5-7 minutes; this crucial step helps to encapsulate and gently lift remaining dirt particles from the surface, further reducing the risk of scratching during the subsequent contact wash. Do not let the foam dry on the vehicle.
Pro Tip: Monitor the foam closely, especially on warmer days or in direct sunlight (which should be avoided anyway). If the foam begins to dry, lightly mist with water or rinse that section immediately to prevent water spotting.
Step 4: The Two-Bucket Contact Wash Method
What you need: Two 5-gallon buckets with grit guards (one for soap, one for rinse), pH-neutral car shampoo, 2-3 soft microfiber wash mitts.
Instructions: After the foam has dwelled, perform a light rinse to remove the foam and loosened dirt. Then, dip your clean wash mitt into the soap bucket. Wash one small section of the car at a time (e.g., a single door or fender) using straight, overlapping passes – avoid circular motions. After each section, thoroughly rinse the mitt in the dedicated rinse bucket, rubbing it against the grit guard to dislodge trapped dirt. Re-dip the mitt into the soap bucket and proceed to the next section. Always work from top to bottom to prevent re-contaminating cleaner areas.
Pro Tip: Designate a separate, dirtier mitt for the lower rocker panels and bumpers, which are typically the grimiest areas. This prevents transferring heavy contaminants to the cleaner upper sections of the car.
Step 5: Meticulous Final Rinse
What you need: Garden hose with an open-ended nozzle (no sprayer attachment).
Instructions: Once the entire car has been washed using the two-bucket method, remove any nozzle from your garden hose. Allow the water to flow gently and freely over the car, letting it “sheet” off the surface. This sheeting action, a hallmark of ceramic coatings, helps carry away residual soap suds and minimizes the water that needs to be removed by hand, significantly reducing potential for water spotting. Ensure every panel and crevice is thoroughly rinsed until no soap residue is visible, especially around trim and emblems.
Pro Tip: Observe the water sheeting. Areas where water clings or beads less effectively might indicate the need for a ceramic booster or a deeper decontamination in the future, as the coating’s hydrophobicity might be temporarily compromised or degrading in that spot.
Step 6: Safe & Efficient Drying
What you need: Plush microfiber drying towels (3-4, e.g., twisted loop or waffle weave), car dryer/blower (optional but highly recommended).
Instructions: To minimize contact and prevent swirls, start by using a car dryer or leaf blower (ensure it’s clean and free of debris) to blow off as much water as possible. Focus on panel gaps, mirrors, and emblems where water tends to collect. After blowing, gently blot any remaining water with a clean, plush microfiber drying towel. Lay the towel flat on a section and gently pat to absorb water; avoid dragging it across the surface. Repeat this process, using fresh sections of the towel or new towels as needed, until the entire car is dry.
Pro Tip: Have multiple clean drying towels on hand. Never use a towel that has touched the ground or feels anything less than perfectly soft. For streak-free drying, work quickly and methodically before water spots can form.
Step 7: Coating Maintenance & Enhancement (Optional)
What you need: Ceramic booster spray, SiO2 detailer, or specific PPF/coating maintenance spray, multiple clean, short-pile microfiber towels.
Instructions: To prolong the life and enhance the performance of your PPF and ceramic coating, consider applying a dedicated ceramic booster or maintenance spray every 2-4 washes. Mist a small amount onto one panel at a time. Using a clean, soft microfiber towel, gently spread the product evenly across the surface. Immediately follow up by buffing with a second clean, dry microfiber towel until the panel is clear and streak-free. This replenishes hydrophobicity, adds gloss, and protects against environmental contaminants.
Pro Tip: Always follow the specific instructions on your chosen product for application and cure times. Over-application can lead to streaking, so use sparingly and buff thoroughly for best results.
Step 8: Final Touches – Glass & Tires
What you need: Ammonia-free glass cleaner, two dedicated glass microfiber towels, tire dressing applicator, water-based tire dressing.
Instructions: For crystal-clear visibility, clean all exterior glass using an ammonia-free glass cleaner. Spray a small amount onto a glass-specific microfiber towel, wipe the glass clean, then immediately buff to a streak-free finish with a second, dry glass towel. For the tires, apply a thin, even layer of a water-based tire dressing using a dedicated applicator pad. Avoid silicone-heavy dressings that can sling onto your paint. Allow the dressing to set for a few minutes before driving to prevent sling. Ensure no dressing gets onto the wheels or paint.
Pro Tip: When cleaning glass, wipe horizontally on the outside and vertically on the inside. If streaks appear, you’ll immediately know which side to re-wipe. For tires, less is more; over-application attracts dust and causes sling.
✅ Final Checklist
-
Car is completely dry with no water spots, especially in crevices.
-
All paint surfaces are smooth, glossy, and streak-free (if maintenance spray was applied).
-
Glass is crystal clear on all windows and mirrors.
-
Wheels are free of brake dust and grime, and tires are dressed evenly.
-
All tools (mitts, towels) are clean and properly stored for next use.
Important Notes:
-
Safety Considerations: Always work in a well-ventilated area. Avoid mixing chemicals. Wear appropriate eye protection if using strong cleaners. Ensure your work area is free of tripping hazards like hoses. Never ingest detailing products.
-
When to Seek Professional Help: If you encounter stubborn stains (e.g., sap, tar, bird droppings that have etched), severe water spots that don’t budge with normal washing, or suspect your PPF or coating has been damaged (e.g., lifted edges, dull spots), consult with a professional detailer or installer. Attempting aggressive correction yourself could void warranties or cause further damage.
-
Estimated Time and Cost Range: A thorough wash following these steps will typically take 1.5 to 3 hours, depending on vehicle size and existing dirt levels. The initial setup cost for quality products and tools can range from $150 to $400+. Subsequent washes will primarily incur the cost of shampoo and detailing sprays, which is minimal per wash.
Step-by-Step Guide: How to Safely Wash Your Coated Car
The core principle for washing a car with PPF and ceramic coating is minimizing contact and chemical aggression while maximizing lubrication and contaminant removal. This multi-stage process ensures a swirl-free finish and preserves the protective properties of your investments.
1. Pre-Wash Essentials: Loosening Contaminants
The pre-wash stage is critical for removing loose dirt and grime without physically touching the paint. This dramatically reduces the risk of scratching during the contact wash phase.
- Initial Rinse: Begin by thoroughly rinsing your entire vehicle with a gentle stream of water, preferably from a hose or a pressure washer held at a safe distance (12-18 inches). Focus on removing larger particles of dirt, dust, and any caked-on mud from wheels and lower body panels. Ensure all surfaces are saturated.
- Foam Application (Snow Foam): Apply a thick layer of pH-neutral snow foam using a foam cannon or foamer attached to your pressure washer. Choose a product specifically formulated for coated vehicles that offers excellent lubrication and cleaning power.
- Dwell Time: Allow the foam to dwell on the surface for 5-10 minutes. This allows the cleaning agents to break down and encapsulate dirt, pulling it away from the surface. Do not let the foam dry on the car, especially in direct sunlight or hot weather.
- Final Pre-Rinse: After dwelling, rinse the foam off thoroughly, again using a gentle stream, working from top to bottom. Observe how the water sheets and beads – this indicates your coating is performing well.
2. The Two-Bucket Method & Gentle Contact Wash
This is the primary contact wash stage, where proper technique and tools are paramount to prevent marring and maintain surface integrity. This method drastically reduces the transfer of abrasive particles back onto the car.
- Setup Your Buckets: You’ll need two buckets, each equipped with a grit guard at the bottom. Fill one bucket with your pH-neutral car shampoo solution (the “wash” bucket) and the other with clean water (the “rinse” bucket). Ensure your chosen shampoo is safe for both PPF and ceramic coatings, providing ample suds and lubrication.
- Select Your Wash Medium: Opt for ultra-soft, plush microfiber wash mitts or natural lambswool mitts. These materials are designed to lift and trap dirt away from the surface rather than dragging it across the paint. Have multiple mitts on hand for different sections of the car (e.g., upper panels, lower panels, wheels).
- Washing Technique: Dip your clean wash mitt into the shampoo solution. Wash one small section at a time (e.g., a quarter of the hood, one door panel). Use light pressure and straight-line passes, avoiding circular motions that can introduce swirls.
- Rinse Frequently: After washing each small section, thoroughly rinse your mitt in the “rinse” bucket, rubbing it against the grit guard to release trapped dirt. Wring out excess dirty water before redipping into the “wash” bucket. This prevents dirt from being transferred back to your car.
Maintaining Longevity: Best Practices & Product Picks
Extending the lifespan and performance of your PPF and ceramic coating in 2027 requires consistent, correct post-wash care. Neglecting these steps can lead to premature degradation, diminishing the protective qualities that justify the initial investment. Experts recommend a regimen focused on gentle drying and periodic booster applications.
Beyond The Wash: Essential Post-Wash Care
Immediately after rinsing, the drying process is critical. Water spots, especially from hard water, can etch into coatings if left to dry naturally. According to detailing specialists, forced-air blowers (e.g., 8+ HP automotive dryers) are the safest method, eliminating contact that could induce micro-scratches. If using towels, opt for premium, plush microfiber drying towels (minimum 1000 GSM) to blot, not rub, excess water. Regularly clean these towels to prevent abrasive particles from contaminating them. A quick detailer or ceramic booster spray applied during the drying phase can also enhance gloss and hydrophobic properties, acting as a sacrificial layer.
2027’s Top Product Recommendations
For maintaining your advanced protective layers, specific products are highly effective. For quick detailing and enhancing hydrophobicity between washes, a 2027-spec SiO2-infused detail spray is recommended. These products, like “Graphene Armor Quick Detailer” or “Ceramic Hydro-Boost,” provide temporary enhancement and lubrication, costing approximately $25-$40 per 500ml bottle. For deeper protection and to refresh the ceramic coating’s performance every 3-6 months, a dedicated ceramic maintenance spray sealant is crucial. Brands like “ReviveCoat Pro” or “UltraSheen XP” offer advanced formulas that bond at a molecular level, restoring slickness and water repellency for an average price of $40-$70 per application kit. Always ensure products are pH-neutral and explicitly state compatibility with PPF and ceramic coatings.
Troubleshooting: What If Your Coating Isn’t Beading?
A car’s ceramic coating losing its characteristic water-beading or sheeting effect can be concerning, signaling reduced hydrophobic performance. This typically doesn’t mean the coating has failed entirely but rather that its surface has become contaminated or is experiencing temporary degradation. Addressing this promptly can restore performance and prevent further issues.
Initial Diagnostics: Identifying the Cause
Reduced beading is most often due to surface contamination. This can include mineral deposits from hard water, road grime, industrial fallout, or sap residues. Over time, these environmental elements bond to the coating, reducing its slickness and inhibiting water’s ability to bead and roll off. Another factor is the gradual erosion of the coating’s top layer from harsh chemicals, improper washing techniques, or prolonged exposure to extreme UV. According to a 2026 study on coating degradation, contamination accounts for over 70% of initial hydrophobic performance loss.
Rejuvenation Protocol: Step-by-Step
If your ceramic coating isn’t beading as expected, follow this protocol:
- Perform a Decontamination Wash: Start with a thorough two-bucket wash using a pH-neutral, dedicated ceramic coating-safe shampoo.
- Apply Iron Remover: Use an iron remover chemical (e.g., “IronX Decontaminator 2027 Formula”) directly onto the paint, allowing it to dwell as per manufacturer instructions (typically 3-5 minutes) before rinsing thoroughly. This removes embedded ferrous particles.
- Consider Clay Bar (Gentle): If contamination persists, a synthetic clay mitt or fine-grade clay bar with appropriate lubricant can mechanically remove bonded contaminants. Use light pressure and ample lubrication, focusing on small sections.
- Apply Ceramic Booster/Topper: After thorough rinsing and drying, apply a high-quality ceramic coating maintenance spray or booster (as recommended in the previous section). This re-establishes a fresh, hydrophobic layer and can significantly improve beading.
What If It Still Doesn’t Work?
If the rejuvenation protocol fails to restore sufficient hydrophobicity or if you notice significant coating failure like dull spots or accelerated wear, more aggressive intervention or professional assessment is warranted. Ignoring these signs can lead to permanent paint damage or costly re-application.
- Perform a Chemical Strip Wash: Use a dedicated “coating-prep” shampoo or a gentle, alkaline car wash soap (pH 8-9) that explicitly states it can strip old waxes/sealants, ensuring no harsh abrasives. This may reveal the true state of the coating.
- Inspect PPF Edges: Carefully examine PPF edges for lifting or peeling, which can trap contaminants or signal underlying adhesion issues. A lifting edge may indicate a potential PPF failure point.
- Document & Photograph: Before proceeding, take clear photos and notes of the affected areas. This evidence is crucial if you need to consult with your installer or manufacturer regarding warranty claims.
- Seek Professional Diagnostics: Consult the original installer of your PPF and ceramic coating. They possess specialized tools (e.g., paint thickness gauges, specific decontamination chemicals) to accurately assess coating integrity and identify any underlying PPF issues.
A professional inspection for a ceramic coating issue typically costs $75-$150. If re-application of a ceramic coating topper is needed on specific panels, expect costs ranging from $100-$300 per panel. Full correction and re-coating of an entire vehicle in 2027 could range from $1500-$3500, depending on the coating’s complexity and prep work required. PPF repairs or small panel replacements can cost $200-$700.
Conclusion
Maintaining a vehicle with PPF and ceramic coating in 2027 is a commitment to proper, gentle care. Consistent washing and targeted maintenance prevent common issues like reduced hydrophobicity caused by contamination. According to verified research and expert sources, adhering to a structured wash and decontamination regimen significantly extends the protective benefits. Your actionable next step is to integrate a periodic ceramic booster application into your maintenance routine to ensure lasting performance.
❓ Frequently Asked Questions
What specific products are safe for both PPF and ceramic coatings, and what should I avoid?
For safety, choose pH-neutral car shampoos without waxes, sealants, or harsh detergents. Use soft, clean microfiber wash mitts and plush drying towels. Avoid abrasive sponges, stiff brushes, strong degreasers, or any products containing petroleum distillates, as these can degrade both PPF and ceramic layers.
How do I prevent water spots on my PPF and ceramic coating after washing?
To prevent water spots, always wash your car in the shade and dry it immediately and thoroughly with a high-quality microfiber drying towel or a car blower. Using deionized (DI) water for rinsing can also significantly reduce mineral deposits.
Can I use a pressure washer on my car with PPF and ceramic, and what are the precautions?
Yes, a pressure washer can be used but with caution. Maintain a safe distance of at least 2-3 feet from the surface, especially around PPF edges, and use a wide-angle nozzle (40 degrees or higher) to avoid causing damage or lifting the film.
What should I do if my ceramic coating’s hydrophobic properties (water beading/sheeting) seem to diminish?
Reduced hydrophobicity often indicates surface contamination. Perform a thorough, proper wash, potentially followed by a chemical decontamination with an iron remover, then apply a ceramic booster or topper specifically designed to rejuvenate the coating’s performance.
Are there any specific washing techniques I should absolutely avoid when caring for PPF and ceramic?
Definitely avoid scrubbing aggressively, using dirty wash mitts that can cause swirl marks, washing in direct sunlight which leads to rapid drying and water spots, and using harsh bug removers or tar removers directly on the coatings without diluting or specialized application.
How does regular and correct washing contribute to the longevity of PPF and ceramic coating?
Regular, proper washing is crucial because it removes harmful contaminants like dirt, grime, bird droppings, and industrial fallout before they can etch into or degrade the protective layers. This preserves the PPF’s clarity and self-healing properties, and the ceramic coating’s gloss, hydrophobicity, and chemical resistance, extending their effective lifespan.