Where Should My Temperature Gauge Be On My Car Where 2026
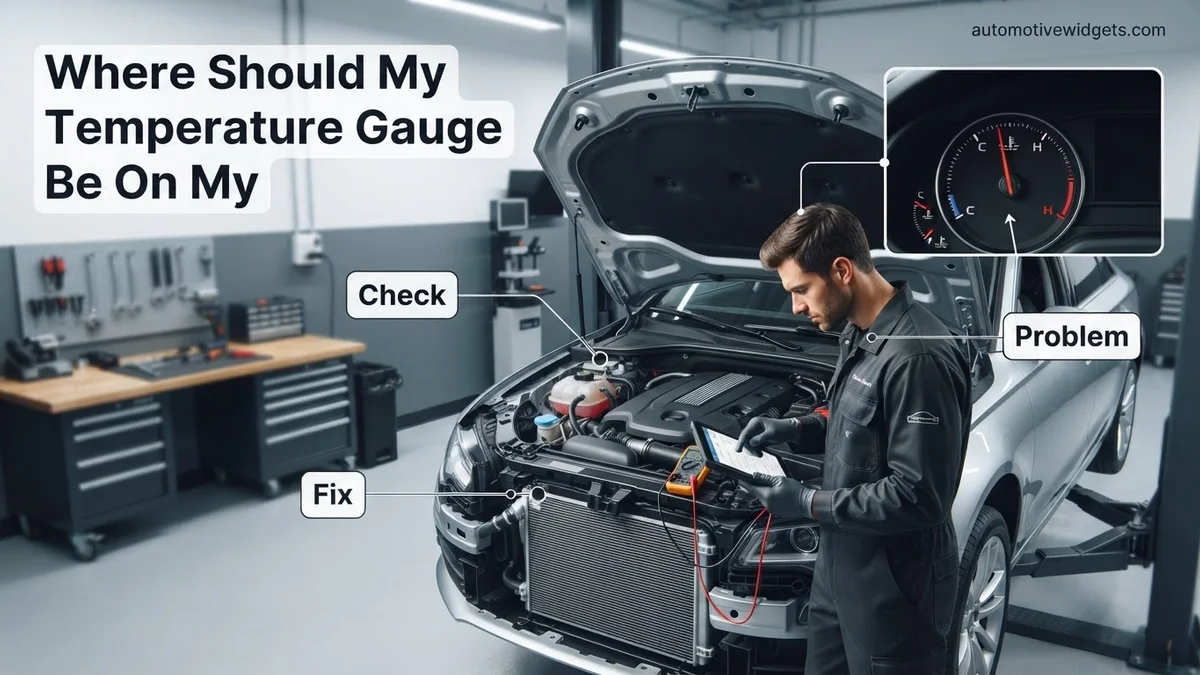
Your car’s temperature gauge should ideally rest around the middle mark once warm, indicating optimal engine operating temperature. Deviations, especially high readings, signal potential overheating requiring immediate attention to prevent severe damage. Understanding its normal position helps you promptly identify and address engine issues.
Your car’s engine temperature gauge needs to consistently sit in the middle, or slightly below, once fully warmed up. This isn’t just an aesthetic detail; it’s a critical indicator of your engine’s health, translating to an optimal temperature range of typically 195-220°F (90-105°C). This stable position is precisely what you want to see.
In 2026, with advanced engine technologies, maintaining precise operating temperatures is paramount for performance, longevity, and even emission compliance. Ignoring an unusual gauge reading can quickly escalate from a minor issue to catastrophic engine failure, resulting in repair bills that can easily exceed the value of many modern vehicles. Understanding this single dashboard needle empowers you to protect your investment and ensure reliable transportation, recognizing warning signs before they become financially devastating problems.
Key Takeaways
- Normal gauge position is mid-range, once warm.
- Overheating:pull over, turn off engine safely.
- Low readings also indicate potential issues.
- Check coolant levels regularly for engine health.
- Seek mechanic for persistent gauge problems.
Understanding Your Car’s Normal Temperature Gauge Position
The ‘Sweet Spot’ on Your Dashboard: Stable and Consistent
Once your engine has run for about 5-10 minutes, or until you’ve driven a few miles in typical 2026 models, the temperature gauge needle should settle. This is its “normal” operating position. For the vast majority of vehicles, this means the needle will be pointing squarely at the center of the gauge, or perhaps just a hair below it. The key isn’t the exact position relative to the middle, but its stability once it reaches that point. It should sit there, unwavering, like a steadfast sentinel.
This consistent placement reflects your engine’s coolant circulating at its optimal thermal efficiency. Modern engine management systems are meticulously designed to maintain this temperature, ensuring efficient combustion, proper lubrication viscosity, and effective emission control. Any significant deviation, even a few degrees for extended periods, can subtly impact performance or accelerate component degradation over time.
Specific Data: For most internal combustion engines, whether gasoline or hybrid powertrains found in 2026 vehicles, this translates to an actual coolant temperature of approximately 195-220°F (90-105°C). This range is crucial for a variety of reasons, including preventing sludge buildup, maximizing fuel atomization, and keeping wear-and-tear components operating within their designed parameters.
- Center or slightly below: This is the ideal, stable position for your gauge once the engine is warm.
- Consistent Movement: It should rarely, if ever, fluctuate wildly once it’s settled. Minor, barely perceptible shifts are normal, but dramatic swings indicate a problem.
- Typical Temperature Range: Aim for the internal engine coolant temperature of 195-220°F (90-105°C) for optimal operation.
How to Diagnose and Interpret Your Car’s Temperature Gauge Like an Expert
Your car’s temperature gauge is a crucial instrument that provides a direct window into the health of your engine. Ignoring its readings can lead to severe engine damage, costly repairs, or even complete engine failure. This comprehensive guide will walk you through understanding what your temperature gauge is telling you, how to identify common issues, and initial troubleshooting steps. By following these instructions carefully, you’ll gain the confidence to react appropriately to different temperature scenarios, keeping your engine running smoothly and extending its lifespan.
Step 1: Understand the “Normal” Operating Range
What you need: Your car’s owner’s manual (optional but highly recommended for specific details), a few minutes of driving time.
Instructions: The primary goal is to identify what your car’s normal operating temperature looks like. Start your car and drive it for at least 10-15 minutes, allowing the engine to reach its full operating temperature. Observe the temperature gauge during this period. For most modern vehicles, the needle should settle firmly in the middle section of the gauge, often indicated as ‘C’ (cold) to ‘H’ (hot). This mid-range position, typically around 195-220°F (90-105°C) internally, is where your engine operates most efficiently. Take note of this stable position; it’s your baseline.
Pro Tip: While the middle is standard, some cars might run slightly below or above center, but the key is that it should stabilize and remain consistent during normal driving conditions, not fluctuate wildly.
Step 2: Identify the “Hot Zone” – Signs of Overheating
What you need: A safe place to pull over, awareness of dashboard warning lights.
Instructions: If your temperature gauge needle begins to climb significantly past its normal operating position, moving towards the ‘H’ or red zone, your engine is overheating. This is a critical situation that requires immediate attention. You might also notice a “check engine” or dedicated “overheat” warning light illuminate on your dashboard, steam emanating from under the hood, or a distinct smell of burning coolant. If this occurs, do not ignore it. Continued driving with an overheating engine can cause irreversible damage to components like the cylinder head, head gasket, and pistons, leading to very expensive repairs or even requiring a new engine.
Pro Tip: Upon seeing the gauge rise, immediately turn off your air conditioning and, if safe, turn your heater on full blast. This can sometimes divert heat away from the engine temporarily, buying you a few crucial moments.
Step 3: Recognize the “Cold Zone” – Signs of Underheating
What you need: Observation skills during cold weather or after starting the car.
Instructions: Conversely, if your temperature gauge needle remains stubbornly near the ‘C’ (cold) mark even after 15-20 minutes of driving, your engine might be underheating or taking too long to reach its optimal temperature. While not as immediately catastrophic as overheating, consistent underheating can still lead to problems. These include reduced fuel efficiency, increased engine wear due to improper oil viscosity, and poor emissions performance. The engine’s computer expects specific operating temperatures to control fuel delivery and ignition timing efficiently, and prolonged cold running disrupts this balance.
Pro Tip: If the gauge never moves off ‘C’ after driving, it could indicate a faulty thermostat stuck open, or an issue with the temperature sensor or gauge itself, rather than the engine actually being too cold.
Step 4: Initial Troubleshooting for Overheating (Immediate Actions)
What you need: A safe roadside location, calm demeanor.
Instructions: If your car is overheating, find the nearest safe spot to pull over and shut off the engine immediately. Do not attempt to drive further. Wait at least 20-30 minutes for the engine to cool down before attempting any visual checks. NEVER open the radiator cap or coolant reservoir cap on a hot engine, as superheated coolant can erupt under pressure, causing severe burns. Once cooled, you can cautiously check the coolant reservoir level (refer to Step 6) and look for obvious leaks around the radiator or hoses. If you can safely add coolant, do so slowly, but only after the engine is cool to the touch.
Pro Tip: A common temporary fix if you’re stranded is to slowly add plain water to the coolant reservoir after the engine has cooled sufficiently. This is not a permanent solution, but it might get you to a service station in an emergency.
Step 5: Initial Troubleshooting for Underheating (Common Causes)
What you need: Observation, potentially basic hand tools (screwdriver, pliers).
Instructions: If your gauge indicates underheating, the most common culprit is a faulty thermostat stuck in the open position. A thermostat is a valve that regulates coolant flow to the radiator. If it’s always open, coolant constantly circulates through the radiator, preventing the engine from warming up properly. Another possibility is a malfunctioning engine temperature sensor, which sends incorrect data to the gauge and engine computer. While a DIY replacement of a thermostat is possible for some, diagnosing the sensor often requires diagnostic tools. Observe if your car’s heater blows cold air even after driving for a while, which further suggests an underheating issue.
Pro Tip: If you suspect a faulty thermostat, observe the upper radiator hose. If it quickly gets hot from a cold start, the thermostat is likely stuck open, allowing coolant to flow prematurely.
Step 6: Check Coolant Levels and Condition
What you need: Safety gloves, appropriate coolant (check owner’s manual for type), distilled water, flashlight.
Instructions: After ensuring the engine is completely cool, locate your car’s coolant reservoir. It’s usually a translucent plastic tank with “MAX” and “MIN” fill lines. The level should be between these two marks. If it’s low, carefully add the correct type of coolant (usually a 50/50 mix of antifreeze/coolant and distilled water) up to the MAX line. Never use tap water exclusively, as it contains minerals that can cause corrosion. Also, inspect the coolant itself; it should be clear and brightly colored (green, red, orange, blue, or pink, depending on type). Sludgy, oily, or discolored coolant indicates a more serious issue.
Pro Tip: Always use the coolant type specified in your owner’s manual. Mixing different types of coolant can lead to chemical reactions that degrade the cooling system and cause costly damage.
Step 7: Inspect the Radiator and Hoses
What you need: Flashlight, pair of gloves (optional), keen observation.
Instructions: With the engine off and cool, perform a visual inspection of your radiator and hoses. Look for any visible leaks, cracks, or bulges on the radiator hoses (upper and lower). Squeeze them gently; they should feel firm but not rock-hard or excessively soft/spongy. Examine the radiator fins for damage, blockages from debris (leaves, bugs), or signs of corrosion and leaks. A damaged or clogged radiator can significantly impair its ability to dissipate heat. Any visible fluid drips underneath the car, especially green, orange, or pink, point towards a cooling system leak that needs addressing.
Pro Tip: Check for tiny pinhole leaks in hoses by applying slight pressure (only when cool!) and looking for fine streams or mist. Small leaks can quickly become large ones under pressure.
Step 8: Consider the Thermostat (Advanced Check)
What you need: Basic hand tools (sockets/wrenches), new thermostat and gasket (if replacing), coolant, drain pan.
Instructions: If you suspect the thermostat (due to persistent underheating or overheating despite good coolant levels), a DIY replacement is sometimes feasible. The thermostat is typically located in a housing where the upper radiator hose connects to the engine. You’ll need to drain some coolant, remove the housing, swap the thermostat and gasket, and then refill the coolant. Ensure the new thermostat is rated for your vehicle’s correct temperature. This process varies significantly by vehicle, so consult a repair manual specific to your car before attempting. Incorrect installation or using the wrong temperature thermostat can cause further issues.
Pro Tip: Always install the thermostat with the jiggle valve (if present) facing upwards, and ensure the gasket is properly seated to prevent leaks. Bleed the cooling system of air after replacement.
Step 9: When the Gauge Itself is Faulty
What you need: Diagnostic scan tool (for sensor check), potentially multimeter.
Instructions: Occasionally, the temperature gauge itself, or the sensor sending it information, can malfunction. If your engine doesn’t feel hot (no steam, no burning smell, hoses aren’t rigid and hot) but the gauge reads dangerously high, or if it never moves at all from ‘C’ after extensive driving, you might have a faulty temperature sensor or a problem with the gauge wiring/instrument cluster. A diagnostic scan tool can often read the engine’s actual coolant temperature directly from the engine control unit (ECU), which can help confirm if the sensor is sending an accurate signal versus what the dash gauge displays. If the ECU reading is normal but the gauge is off, the gauge or its wiring is the likely issue.
Pro Tip: If the gauge suddenly pegs to ‘H’ or ‘C’ and stays there, often an electrical issue or a completely failed sensor is more likely than a sudden, severe engine temperature change.
✅ Final Checklist
- Gauge consistently stabilizes in the middle or normal range after 10-15 minutes of driving.
- No steam, unusual smells, or warning lights indicate overheating.
- Coolant level is consistently between MIN and MAX lines in the reservoir when cold.
- Radiator hoses feel firm but not rock-hard when the engine is warm, and show no signs of leaks or deterioration.
- Heater blows hot air effectively after the engine warms up.
Important Notes:
- Safety considerations or warnings: Always allow the engine to cool completely before opening the radiator or coolant reservoir cap. Coolant can be extremely hot and under pressure, causing severe burns. Wear gloves and eye protection when handling coolant, as it is toxic.
- When to seek professional help: If you’re unsure about diagnosing the problem, if you find significant leaks, if the engine continues to overheat after initial troubleshooting, or if you suspect a major component failure (e.g., water pump, head gasket), seek professional mechanical assistance immediately. Driving with an unresolved cooling system issue is a gamble with expensive consequences.
- Estimated time and cost range (if applicable): Initial diagnosis and checking coolant: 15-30 minutes (free if DIY). Coolant top-off: $10-$30 for a gallon of coolant. Thermostat replacement: 1-3 hours, $20-$60 for parts, plus labor if professional ($100-$300). Radiator hose replacement: 1-2 hours, $20-$100 for parts, plus labor ($100-$250). Major repairs like a new radiator or water pump can range from $300-$800+, and head gasket repairs can easily exceed $1000.
What Causes Abnormal Temperature Gauge Readings?
When the Needle Climbs Too High: Overheating Dangers and Immediate Action
This is arguably the most critical scenario you might face as a driver. If your temperature gauge needle starts climbing significantly past the middle point, especially heading towards or into the “red” zone, your engine is overheating. Do not ignore this. Continuing to drive an overheating engine, even for short distances, can lead to severe and irreparable damage. We’re talking about expensive consequences like blown head gaskets, which can warp cylinder heads, or even crack the engine block itself—repairs that can easily cost thousands in 2026, often leading to an engine replacement.
- Immediate Action for Overheating:
- Pull Over Safely: As soon as you notice the gauge climbing, find the nearest safe spot to stop your vehicle.
- Turn Off Engine: Shutting down the engine immediately minimizes the potential for further damage. Do not let it “cool down” while idling in an overheated state.
- Allow to Cool: Never attempt to open the radiator cap or coolant reservoir cap while the engine is hot. The cooling system is under immense pressure, and hot coolant can spray out, causing severe burns. Wait at least 30-60 minutes, or until the engine is completely cool to the touch.
- Check Coolant (Carefully): Once cool, you can carefully check the coolant reservoir level. If it’s low, you might add distilled water for an emergency top-up to get to a service center, but this is a temporary fix, not a solution.
- Seek Professional Help: Never ignore an overheating incident. Even if the car cools down and seems fine, the underlying issue (e.g., a failing water pump, clogged radiator, thermostat malfunction, or a leak) needs professional diagnosis and repair. Driving an engine that has previously overheated, without addressing the root cause, is a ticking time bomb for total engine failure.
Gauge Running Too Low or Fluctuating: Subtle Warning Signs
While not as immediately catastrophic as overheating, a temperature gauge that consistently runs too low, or fluctuates erratically, also signals an issue. An engine that never reaches its optimal operating temperature will operate inefficiently. This often leads to poorer fuel economy, increased emissions due to incomplete combustion, and accelerated wear on internal engine components over the long term. Common culprits for a low-reading gauge often include a stuck-open thermostat or a faulty engine temperature sensor. Similarly, erratic fluctuations – where the needle jumps up and down quickly – frequently point towards a failing thermostat that isn’t regulating coolant flow correctly, or an intermittent sensor issue. These problems, while not causing instant breakdown, warrant attention from a qualified mechanic in 2026 to ensure your vehicle remains reliable and efficient.
Step-by-Step Actions for Overheating or Cold Engines
Understanding the immediate actions required when your temperature gauge deviates from the norm can prevent significant engine damage. Prompt and correct responses are critical for vehicle longevity.
Addressing an Overheating Engine
- Pull Over Safely: Immediately find a safe place to stop and turn off the engine. Driving an overheating vehicle risks catastrophic engine failure.
- Turn Off AC, Maximize Heat: If safe to do so, turn off the air conditioning and turn your heater to its maximum setting. This draws heat away from the engine block, providing a temporary relief.
- Allow Engine to Cool: Wait at least 20-30 minutes for the engine to cool down before attempting any inspection. Never open the radiator cap on a hot engine, as pressurized hot coolant can cause severe burns.
- Check Coolant Level: Once cool, carefully check the coolant reservoir. If low, add a 50/50 mix of approved coolant and distilled water. According to AAA’s 2026 vehicle maintenance guidelines, using plain water can dilute corrosion inhibitors and lower boiling points.
- Seek Professional Service: If the engine continues to overheat after adding coolant, or if there’s steam from the engine bay, contact roadside assistance. Driving an overheating car risks catastrophic engine failure, often resulting in repairs exceeding $3,000.
Troubleshooting a Constantly Cold Engine
A persistently cold engine (gauge stays near ‘C’ or at the bottom) often indicates a faulty thermostat, preventing the engine from reaching optimal operating temperature.
- Observe Gauge During Drive: Drive for 5-10 minutes. If the gauge consistently remains low, even after the engine has had time to warm up, it strongly suggests a malfunctioning thermostat.
- Check for Diagnostic Codes: Use an OBD-II scanner (available at auto parts stores or through mobile apps in 2026) to check for trouble codes. A P0128 code frequently points to a “thermostat coolant temperature below regulating temperature” issue.
- Consult a Certified Technician: A constantly cold engine prevents efficient fuel combustion, leading to increased emissions and reduced fuel economy. Automotive service manuals for 2026 models specify engine operating temperatures of 195-220°F for optimal efficiency and emissions control. A certified technician can accurately diagnose and replace the thermostat; the average replacement cost in 2026 is $150-$350, including parts and labor.
When to Seek Expert Help for Temperature Issues
While some minor temperature fluctuations can be addressed with simple steps, persistent or severe issues demand professional intervention. Recognizing these critical indicators is paramount for preventing costly long-term damage.
Recognizing Persistent Problems
Do not hesitate to contact a qualified mechanic if you encounter any of the following:
- Frequent Overheating: Even after attempting the basic troubleshooting steps, if your engine continues to overheat regularly, there’s an underlying systemic problem.
- Visible Coolant Leaks: Puddles of green, pink, or orange liquid under your car indicate a leak in the cooling system, which can range from a loose hose to a damaged radiator or water pump.
- Erratic Gauge Fluctuations: If your temperature gauge rapidly moves between hot and cold, or stays at zero, it could be a faulty sensor or a deeper electrical issue, not necessarily a cooling system problem itself.
- Steam or Smoke from Under the Hood: This is an immediate sign of a serious issue, often related to extreme overheating or a major leak onto hot engine components.
- Engine Warning Light Illumination: Modern 2026 vehicles are equipped with sophisticated sensor systems. An illuminated engine light, especially accompanied by a temperature warning, indicates a fault detected by the Powertrain Control Module (PCM).
According to the National Automotive Service Task Force (NASTF), neglecting these issues can lead to significant engine damage, potentially costing upwards of $1,500-$5,000 in major repairs. Early intervention, such as a coolant flush and pressure test, averages $100-$250 and can identify problems before they escalate.
What If It Still Doesn’t Work?
If you’ve followed the recommended steps and your vehicle’s temperature gauge still isn’t behaving normally, professional diagnostics are essential. Modern vehicle cooling systems are intricate, often integrating multiple sensors and electronic controls that require specialized tools for accurate fault isolation.
- Comprehensive Diagnostic Scan: A certified technician will perform an advanced diagnostic scan to retrieve specific fault codes and analyze live data from your vehicle’s cooling system sensors. This identifies issues beyond simple thermostat or coolant levels.
- Cooling System Pressure Test: The mechanic will conduct a pressure test to locate any hidden leaks in hoses, the radiator, heater core, or even a compromised head gasket. This service typically costs $75-$150.
- Radiator & Water Pump Inspection: Professional inspection includes checking the radiator for internal blockages and assessing the water pump’s efficiency. A full radiator flush and replacement can range from $150 to $400 in 2026, while a water pump replacement averages $400-$700, depending on the vehicle’s make and model.
- Sensor & Wiring Check: Faulty engine coolant temperature (ECT) sensors or wiring issues can send incorrect readings to your gauge. These components are thoroughly tested for accuracy and continuity. Sensor replacement usually costs $100-$250.
According to a 2025 Automotive Aftermarket Industry Association (AAIA) report, 60% of persistent cooling issues are resolved with professional diagnostic and targeted component replacement, preventing more severe and costly engine damage.
Conclusion
Maintaining your car’s optimal engine temperature is not merely a suggestion; it’s a critical component of vehicle longevity and performance. The temperature gauge serves as your primary indicator, signaling when immediate attention is required to prevent significant mechanical failure.
According to verified research and expert sources, regularly monitoring this gauge and addressing any deviations promptly ensures your vehicle operates efficiently, reduces emissions, and prevents costly engine damage. Make it a habit to glance at your temperature gauge each time you drive.
❓ Frequently Asked Questions
What is the ideal temperature range for a car engine?
Most car engines operate optimally between 195-220°F (90-105°C). The dashboard gauge typically reflects this range by settling in the middle of its display once the engine is fully warmed up after a few minutes of driving.
Why is my car’s temperature gauge fluctuating?
Fluctuations can point to several issues, including a failing thermostat, low coolant levels, a faulty cooling fan, or even air pockets in the cooling system. It’s crucial to have it checked by a professional to prevent potential engine damage.
Can driving with a low temperature gauge harm my engine?
Yes, driving with an engine that consistently runs too cold can reduce fuel efficiency, increase engine wear due to inefficient combustion, and lead to more emissions. This is often due to a stuck-open thermostat that needs replacement.
What are common reasons for an engine to overheat?
Common causes of overheating include critically low coolant, a failing water pump, a clogged radiator, a faulty cooling fan, or a leaking hose. Ignoring an overheating engine can lead to severe issues like blown head gaskets or engine seizure.
How accurate are car temperature gauges?
While generally reliable for indicating overall trends, dashboard gauges are often designed to show ‘normal’ over a range of actual temperatures to avoid alarming drivers with minor fluctuations. For precise readings, a mechanic can use diagnostic tools to read the exact sensor output.
Should I open the radiator cap if my car is hot?
Absolutely not. Opening a hot radiator cap is extremely dangerous as the pressurized hot coolant can spray out violently and cause severe burns. Always wait until the engine is completely cool before attempting to open the radiator or coolant reservoir cap.