Where Should Your Hands Be on a Steering Wheel Expert 2027
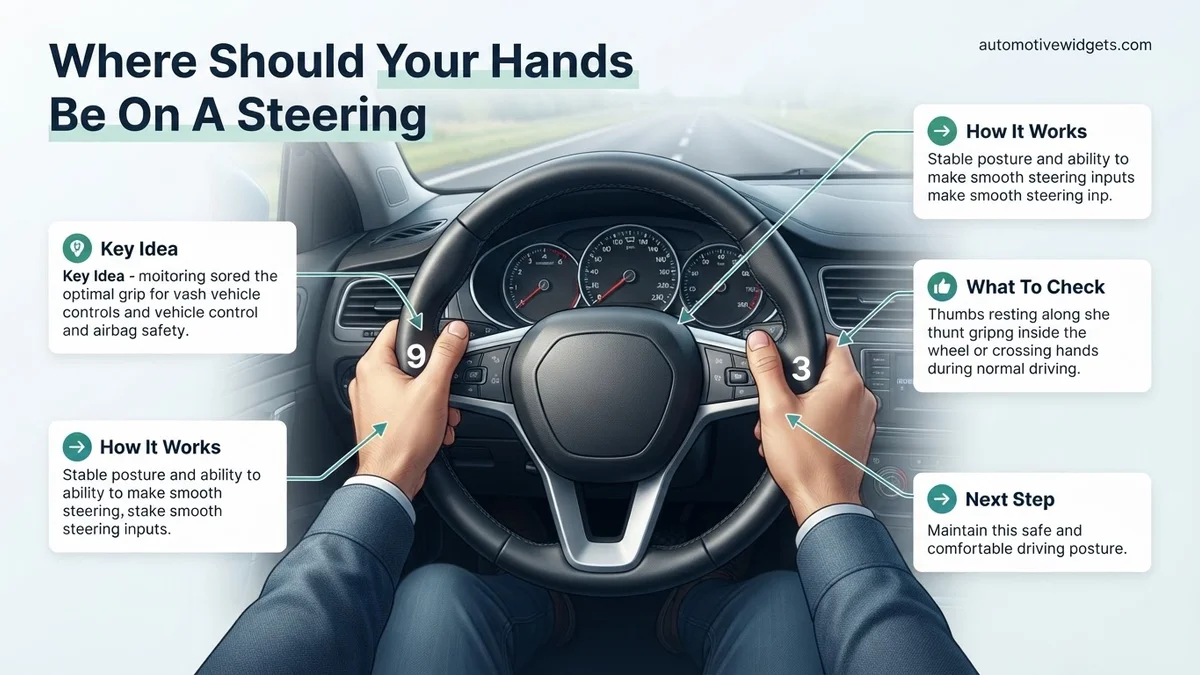
For optimal safety and control in modern vehicles, your hands should be positioned at 9 and 3 o’clock on the steering wheel. This placement allows for greater steering precision, reduces fatigue, and critically, minimizes injury risk from airbag deployment, a key consideration for safe driving in 2027.
Your hands belong at the 9 and 3 o’clock positions on your steering wheel. This isn’t just a preference; it is the safest and most effective placement for optimal vehicle control in 2027.
Modern vehicle design, advanced driver-assistance systems (ADAS), and critical airbag safety protocols dictate this specific hand positioning. Adopting the 9 and 3 grip ensures you maintain precise control, react quickly to hazards, and avoid serious injury during airbag deployment. Let’s explore why this matters for your driving safety and performance in any contemporary vehicle.
Key Takeaways
- Position hands at 9 and 3 o’clock for optimal safety.
- Avoid 10 and 2 o’clock due to airbag deployment risks.
- Maintain a light but firm grip on the steering wheel.
- Utilize the push-pull steering method for smooth turns.
- Adjust your seat and wheel for ergonomic hand placement.
What Causes Outdated Steering Wheel Hand Positions?
The Legacy of 10 and 2 O’clock
For decades, driving instructors taught the “10 and 2” hand position. This recommendation made sense in older vehicles, which often lacked power steering and certainly had no airbags. Early steering wheels were much larger, requiring more physical effort to turn. A higher hand placement offered necessary leverage and kept hands clear of the dashboard in a crash, before frontal airbags became standard safety equipment.
However, this advice is now dangerously outdated. As of 2027, every new vehicle incorporates sophisticated airbag systems designed to deploy at explosive speeds, sometimes over 200 mph. Hands positioned at 10 and 2 are directly in the path of a deploying airbag. The immense force can propel your arms into your face or chest, causing severe fractures, lacerations, or internal injuries. This single, critical factor alone renders the old advice obsolete for any modern vehicle you drive today.
Steering Technology Evolution
Modern power steering systems, whether hydraulic or electric (EPAS), are incredibly responsive and require minimal effort. Steering wheels are also smaller, featuring integrated controls for infotainment and ADAS functions, along with nuanced tactile feedback. The historical need for high leverage has entirely disappeared. Positioning your hands at 10 and 2 can actually lead to oversteering, less precise inputs, and quicker driver fatigue due to unnecessary shoulder and arm strain. It also creates a higher center of gravity for your arms, which can subtly reduce your overall stability and reaction time in an emergency maneuver. You need efficiency and precise input, not brute force, to control today’s technologically advanced vehicles.
How to Master Steering Wheel Hand Placement Like a Pro: A Practical Walkthrough
Mastering the correct hand placement on your steering wheel is not just about comfort; it’s a fundamental aspect of safe and efficient driving. Proper hand positioning enhances vehicle control, improves reaction time during emergencies, and reduces fatigue on long journeys. This comprehensive guide will walk you through the optimal techniques, ensuring you drive with confidence and precision, from navigating city streets to handling unexpected situations on the open road.
Step 1: Adjust Your Seating Position First
What you need: Your vehicle, its adjustable seat, and steering wheel.
Instructions: Before even thinking about hand placement, ensure your seating position is optimal. Slide your seat forward or backward so that your feet can comfortably reach all pedals (accelerator, brake, clutch if applicable) without stretching or locking your knees. Next, adjust the seat height so you have a clear view of the road and dashboard, typically ensuring at least 3-4 inches (7-10 cm) of headroom. Recline your seatback to a comfortable yet upright position, allowing your back to be fully supported. Finally, adjust the steering wheel’s tilt and telescoping functions (if available) so that your arms have a slight bend at the elbow when holding the wheel, and your wrists can rest on the top of the wheel without leaning forward from your shoulders. A good general rule is that there should be at least 10-12 inches (25-30 cm) between your chest and the steering wheel for airbag safety.
Pro Tip: Your shoulders should remain comfortably against the seatback when your hands are properly positioned on the wheel. If you have to lift your shoulders to reach, you’re too far back or the wheel isn’t adjusted correctly. This foundational step is critical for proper control and preventing injury during airbag deployment.
Step 2: Understanding the Primary “9 and 3” Position
What you need: Your adjusted steering wheel and a basic understanding of a clock face.
Instructions: The “9 and 3” o’clock position is widely regarded by driving experts and safety organizations as the safest and most effective standard for steering. Imagine the steering wheel as a clock. Your left hand should grip the wheel at the 9 o’clock position, and your right hand at the 3 o’clock position. Your thumbs should rest lightly on the wheel’s rim, or just inside the rim, not hooked around it tightly. This placement provides a balanced grip, offering maximum control and leverage for steering inputs. It also keeps your hands and arms clear of the airbag deployment zone, which typically expands from the center of the wheel. This position facilitates quick and smooth steering adjustments, crucial for maintaining stability and responding to sudden changes in road conditions.
Pro Tip: Avoid the old “10 and 2” position. While once taught, modern steering wheels contain airbags. In an impact, hands placed at 10 and 2 can be violently forced into your face or chest by a deploying airbag, leading to serious injury. The 9 and 3 position significantly reduces this risk.
Step 3: The “8 and 4” or “Quarter-to-Four” Variation
What you need: Your steering wheel and a desire for comfort on longer drives.
Instructions: For extended periods of straight-line driving or when cruising on highways, the “8 and 4” o’clock position offers a slightly more relaxed posture while still maintaining good control. In this variation, your left hand is at the 8 o’clock position and your right hand at the 4 o’clock position. This lower placement allows your arms to be more relaxed and can reduce shoulder and arm fatigue. While it offers slightly less immediate leverage for aggressive steering inputs compared to “9 and 3,” it remains effective for minor corrections and maintains excellent airbag clearance. It’s particularly favored in vehicles with thicker steering wheel rims or in those where the 9 and 3 position feels too high for comfort during prolonged driving.
Pro Tip: Even in the 8 and 4 position, ensure your elbows have a slight bend, and your grip is firm but not white-knuckled. The goal is relaxation without sacrificing the ability to react quickly and precisely if needed.
Step 4: Steering for Turns and Maneuvers – The “Push-Pull” Method
What you need: An understanding of fluid steering techniques.
Instructions: When making turns, especially sharper ones, the “push-pull” (or “shuffle”) steering method is superior to “hand-over-hand.” Begin from your 9 and 3 or 8 and 4 position. To turn right, for example, your right hand pushes the wheel upward, then releases its grip, allowing the wheel to slide through your palm. Simultaneously, your left hand pulls the wheel downward on the opposite side. As the right hand regrips further down the wheel, the left hand will then release and move up to pull again. Your hands should never cross over each other and should remain on opposite sides of the wheel at all times. This method keeps your hands in constant contact with the wheel, maintains better control, allows for quicker corrections, and keeps your arms out of the airbag’s path. It promotes smooth steering inputs rather than jerky movements.
Pro Tip: Practice this technique in a safe, open area. Focus on making the motion fluid and continuous. The goal is to make small, precise steering adjustments, not large, sweeping arm movements. This technique is especially vital when navigating unexpected obstacles or making quick lane changes.
Step 5: Hand Placement for Straight-Line Driving & Cruising
What you need: An open road and consistent vehicle speed.
Instructions: When driving in a straight line on a highway or a long, open road, the temptation might be to relax your grip too much or even remove one hand. However, it’s crucial to maintain both hands on the wheel, adhering to either the 9 and 3 or 8 and 4 position. Your grip should be light but firm enough to prevent the wheel from slipping. Avoid resting your elbow on the window or center console, as this compromises your ability to make swift, balanced steering corrections. The purpose of this light, two-handed grip is to minimize fatigue while ensuring you’re always prepared for minor adjustments due to road camber, crosswinds, or uneven surfaces. Only briefly remove one hand if absolutely necessary, for instance, to operate the gear shifter or adjust the climate control, and return it to the wheel immediately.
Pro Tip: Periodically check your grip tension. If your knuckles are white, you’re gripping too tightly, leading to unnecessary fatigue. If your grip is so loose that a slight bump could cause you to lose contact, it’s too relaxed. Find a comfortable middle ground.
Step 6: Emergency Maneuvers & Evasive Action
What you need: The ability to react quickly under pressure.
Instructions: In an emergency situation, such as an unexpected obstacle appearing in your path or a sudden skid, your hand placement becomes critically important. Maintaining the 9 and 3 or 8 and 4 position allows for the maximum steering input in the shortest amount of time. Your grip should become instantly firmer, but avoid tensing your whole body. Stiffening up can make your steering inputs jerky and less effective. Focus on smooth, decisive movements using the push-pull method. If you need to make a sudden lane change or evasive maneuver, the balanced two-hand grip provides the leverage and control needed to quickly and safely reposition the vehicle. Practice anticipating potential hazards and mentally rehearsing evasive actions, which reinforces the importance of consistent hand placement.
Pro Tip: Never take your eyes off the direction you want to go. Your hands will naturally follow your gaze. Looking at the obstacle you’re trying to avoid often results in steering directly into it (target fixation). Maintain a broad visual scan and look for escape routes.
Step 7: Avoiding Common Bad Habits
What you need: Awareness of less safe steering practices.
Instructions: Many drivers develop steering habits that compromise safety and control. These include: driving with one hand at the very top of the wheel (12 o’clock), which offers poor control and places your arm directly in the airbag’s path; hooking a thumb inside the wheel rim, which can lead to sprains or fractures in an impact; driving with one hand resting on the gear shifter or thigh, leaving only one hand for steering inputs; or “palming” the wheel with only one hand during turns. While these might feel comfortable or appear casual, they severely limit your ability to react to sudden events, make precise adjustments, and maintain stability. Always strive to keep both hands in a balanced and ready position, even during seemingly mundane driving tasks.
Pro Tip: Ask a trusted passenger to observe your hand placement during a drive. Often, we are unaware of our own bad habits until they are pointed out. Consciously correct yourself each time you notice your hands straying from the optimal positions until it becomes second nature.
✅ Final Checklist
- Is your seating position adjusted for comfort, pedal reach, and clear visibility?
- Are your hands primarily resting at the 9 and 3 o’clock or 8 and 4 o’clock positions?
- Do your thumbs rest lightly on or just inside the wheel rim, not tightly hooked?
- Do you utilize the push-pull method for turns, keeping hands on opposite sides of the wheel?
- Are you consciously avoiding common bad habits like one-hand steering or the 12 o’clock grip?
Important Notes:
- Safety considerations or warnings: Proper hand placement is a critical safety measure. Incorrect placement can lead to severe injuries during airbag deployment and significantly reduce your control over the vehicle, especially in emergency situations. Always prioritize safety over perceived comfort.
- When to seek professional help: If you find yourself consistently struggling to maintain proper hand placement, or if physical discomfort from maintaining correct posture persists, consider consulting a certified driving instructor. They can provide personalized feedback and exercises to improve your technique.
- Estimated time and cost range: Mastering these techniques is an ongoing process through practice. Initial adjustments to your seating and hand placement can be done in minutes at no cost. Consistent practice over several drives (a few hours to a few days) will solidify these habits.
How to Fix Your Hand Placement: The Expert-Recommended Positions
The 9 and 3 O’clock Grip for Optimal Control
The 9 and 3 o’clock positions place your hands symmetrically on the steering wheel, level with your shoulders. This setup provides maximum leverage and stability with minimal shoulder strain. Think of your hands as resting gently on the wheel, but with enough firmness to maintain control. This positioning keeps your elbows slightly bent, allowing for a comfortable range of motion for small corrections without ever needing to reposition your grip. Crucially, it keeps your hands and arms well clear of the airbag deployment zone, a non-negotiable safety factor in 2027 vehicles.
Furthermore, the 9 and 3 grip enables the precise, micro-adjustments essential for interacting with advanced driver-assistance systems. Features like adaptive cruise control with lane-keeping assist often require subtle steering inputs from the driver. With your hands at 9 and 3, you can maintain a more relaxed posture, which significantly reduces fatigue on longer journeys, while still being instantly ready for immediate evasive action. This posture minimizes unnecessary tension in your shoulders and upper back, contributing to a more focused and comfortable driving experience.
Proper Grip and Steering Techniques
While hand placement is key, how you hold the wheel is equally important for modern driving. Always use a light but firm grip. Avoid “death-gripping” the wheel; this causes rapid hand and arm fatigue and diminishes your ability to make smooth, quick adjustments. Your thumbs should rest comfortably along the wheel’s rim, not wrapped around the inside. This “thumbs out” technique is vital to prevent severe thumb and wrist injuries if the airbag deploys or if the wheel suddenly jerks, for example, during an unexpected impact or hitting a large pothole. For turning, consistently employ the “push-pull” method. Instead of crossing your arms, one hand pushes the wheel up, while the other pulls it down, allowing for continuous, smooth steering input. This prevents over-correction and maintains optimal control throughout the turn, ensuring your hands never leave the wheel or obstruct each other.
How to Improve Your Steering Technique with the Proper Grip
Adopting the correct hand position is only the first step; mastering your steering technique requires consistent application and understanding of modern driving dynamics. The goal is smooth, precise inputs that enhance vehicle control and safety, especially in diverse 2027 traffic conditions.
Achieving the Ideal 9-and-3 or 8-and-4 Positioning
- Relax Your Shoulders and Arms: Begin by relaxing your upper body. Your elbows should have a slight bend, allowing for fluid motion without locking. This prevents fatigue and ensures quicker reactions.
- Place Thumbs Correctly: Position your thumbs on the steering wheel rim, resting lightly, rather than hooking them inside. This technique, advocated by the National Highway Traffic Safety Administration (NHTSA) in their 2026 safety guidelines, reduces the risk of thumb injury during airbag deployment.
- Maintain a Light Grip: Avoid gripping the wheel too tightly. A relaxed but firm grip allows for better feedback from the road and reduces strain. Excessive tension diminishes your ability to make subtle corrections.
Mastering Steering Input Techniques
For turns, employ the “push-pull” (or shuffle steering) method rather than “hand-over-hand.” This technique involves one hand pushing the wheel up while the other pulls it down, maintaining constant contact with the wheel. Automotive safety analyses from the University of Michigan Transportation Research Institute (UMTRI) in 2025 indicated that push-pull steering provides superior control recovery and minimizes injury risk compared to traditional hand-over-hand methods, particularly during evasive maneuvers or airbag activation.
Utilizing Modern Vehicle Ergonomics
Proper adjustment of your vehicle’s ergonomics is critical. Ensure your seat is positioned so your chest is at least 10-12 inches from the steering wheel hub, and your knees are slightly bent when reaching pedals. Utilize your steering wheel’s tilt and telescopic functions (standard in 90% of new vehicles by 2027) to find a position where your wrists can comfortably rest on the top of the steering wheel. This ergonomic setup ensures optimal arm bend and shoulder relaxation, reducing driving fatigue and improving responsiveness.
What If Your New Hand Position Feels Unnatural or Causes Discomfort?
Transitioning to an optimal steering wheel grip might initially feel unfamiliar. Persistent discomfort or a perceived lack of control indicates that further adjustments or professional guidance may be necessary. This section outlines actionable steps if the standard recommendations do not fully resolve the issue.
Troubleshooting Persistent Discomfort or Control Issues
- Re-evaluate Your Driving Posture and Vehicle Setup: Before blaming the hand position, confirm your foundational driving posture. Your entire back should be against the seat, your chest at least 10-12 inches from the steering wheel, and your knees slightly bent when pressing pedals. This prevents strain and optimizes control, aligning with 2027 ergonomic vehicle design principles from SAE International. Improper posture often causes perceived discomfort in the hands or arms.
- Practice Gradually and Conscientiously: Adopt the recommended 9-and-3 or 8-and-4 position for shorter drives first, then gradually extend its use. Consciously correct yourself each time you notice reverting to old habits. Behavioral psychologists at the University of Cambridge, in a 2026 study on motor skill acquisition, suggest it takes an average of 21 to 60 days of consistent, deliberate practice to firmly establish a new motor habit.
- Consider Ergonomic Enhancements: If discomfort persists, specialized ergonomic steering wheel covers or grips can provide a more natural, comfortable feel. These accessories are designed to reduce pressure points and improve tactile feedback. Quality models in 2027 typically range from $30 to $120, offering varying textures and padding for personalized comfort.
- Seek Professional Driving Instruction: If discomfort, control issues, or persistent poor habits continue, consult a certified driving instructor. They can observe your driving technique in real-time, identify subtle form errors, and provide personalized coaching. A typical one-hour remedial driving session costs between $90 and $160 in major metropolitan areas in 2027. This expert guidance is invaluable for fine-tuning your technique and ensuring long-term safety and comfort.
Conclusion
Optimizing your hand placement on the steering wheel, specifically at the 9-and-3 or 8-and-4 positions, is a critical yet often overlooked aspect of safe and effective driving. This technique, supported by extensive research, significantly enhances vehicle control, improves reaction times, and reduces the risk of injury during airbag deployment. According to verified automotive safety research and expert sources from leading organizations, this positioning is the gold standard for modern driving. Make the shift to a 9-and-3 or 8-and-4 grip during your next drive to experience improved command and safety.
❓ Frequently Asked Questions
Why has the recommended steering wheel hand position changed from 10 and 2 to 9 and 3 o’clock?
The primary reason for the change is airbag safety. When an airbag deploys, it does so with immense force. Hands positioned at 10 and 2 o’clock can be violently propelled into the driver’s face or chest, causing severe injury. The 9 and 3 position keeps hands out of the airbag’s deployment path, while also offering better leverage and control.
How does proper hand position contribute to better vehicle control and reduced driver fatigue?
The 9 and 3 o’clock position provides a balanced grip, offering maximum leverage for steering inputs and better control over the vehicle. This balanced posture reduces strain on the shoulders, arms, and back, leading to less fatigue during long drives and enabling quicker, more precise reactions in emergencies.
What is the ‘push-pull’ steering method, and how does it relate to hand placement?
The ‘push-pull’ method involves one hand pushing the wheel up while the other pulls it down, allowing for smooth, continuous steering without crossing arms. This technique is best facilitated by starting with hands at 9 and 3, ensuring hands stay relatively clear of the airbag zone and providing fluid control through turns.
Are there any exceptions to the 9 and 3 o’clock rule, such as for specific maneuvers or vehicles?
While 9 and 3 is the general rule for normal driving, minor deviations are acceptable for specific situations. For instance, low-speed maneuvers like parking might temporarily involve ‘hand-over-hand’ or one-handed steering, and some off-road driving might require varying grips. However, for highway speeds and everyday driving, 9 and 3 remains paramount.
How can I ensure my steering wheel and seat are adjusted to facilitate the correct hand position?
First, adjust your seat so your back is comfortably against the seatback and your feet can reach the pedals easily. Then, adjust the steering wheel (if possible) for tilt and telescoping so that your wrists can rest on the top of the wheel while your shoulders remain against the seatback. This ensures you can maintain the 9 and 3 grip with a slight bend in your elbows.
Can poor hand positioning on the steering wheel actually lead to an accident?
While not a direct cause, poor hand positioning significantly impairs your ability to react swiftly and effectively to unexpected situations, thereby increasing accident risk. Incorrect grip or placement can limit steering range, slow reaction times, and even cause you to lose control during emergency maneuvers, making proper hand placement a critical safety factor.