When Removing Car Battery Which Terminal First Expert 2026
When removing a car battery, always disconnect the negative (black) terminal first to prevent dangerous short circuits. This crucial step protects both you and your vehicle’s electrical system from damage. For reconnection, reverse the process by attaching the positive terminal first.
When you need to remove your car battery in 2026, the absolute rule for safety and vehicle integrity is to disconnect the negative terminal first. This isn’t just a best practice; it’s a critical safety measure designed to prevent dangerous short circuits, electrical arcing, and potential damage to your vehicle’s sophisticated electronic systems or even personal injury.
Understanding this specific sequence is non-negotiable for anyone working on their car battery, whether you’re replacing a faulty unit or simply performing maintenance. Ignoring this fundamental step can lead to significant risks, making it essential to grasp not only the “how” but, more importantly, the “why” behind this established procedure.
Key Takeaways
- Always disconnect the negative (-) terminal first.
- Prevent dangerous short circuits and sparks.
- Reconnect the positive (+) terminal first.
- Wear eye protection and safety gloves.
- Use the correct size wrench securely.
The Critical Order: Why Terminal Disconnection Matters
The Definitive Answer: Negative First
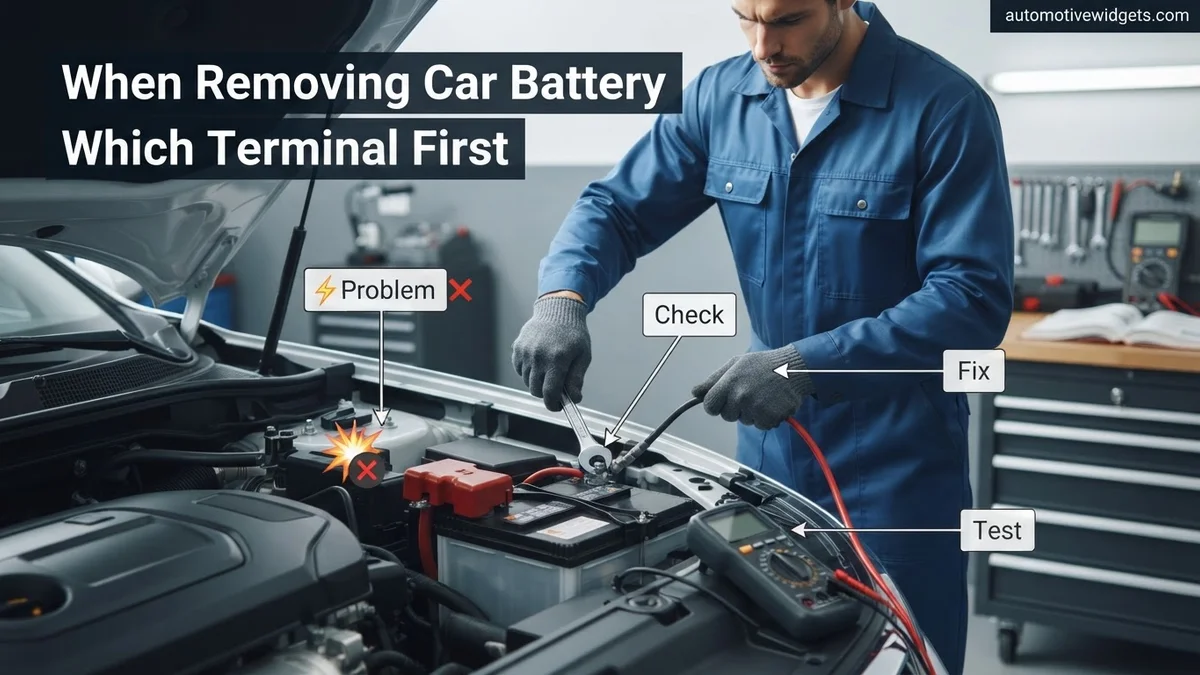
For any car battery removal in 2026, always disconnect the negative terminal first. This terminal is typically marked with a minus sign (-) and often has a black cable connected to it. The reason for this strict protocol is grounded in the fundamental design of modern automotive electrical systems: the car’s metal chassis acts as the primary ground, directly connected to the negative terminal of the battery. If you were to disconnect the positive terminal first and your wrench accidentally touched any metal part of the car, you would instantly create a direct short circuit. This can result in a massive spark, severe arcing, and potentially melt tools, damage delicate onboard computers, or even cause a battery explosion. By removing the negative cable first, you effectively break the ground path, making the entire vehicle’s electrical system “open.” This means that even if your tool touches the positive terminal and then the chassis, there is no completed circuit for electricity to flow, significantly mitigating the risk of a dangerous short circuit.
Understanding the Grounded System and Your Safety
Consider your car’s metal frame and body as a massive extension of the negative battery terminal. In vehicles engineered up to and including 2026, this ground connection is pervasive. When you work with tools around the battery, there’s always a risk of accidentally bridging the gap between a live positive terminal and any grounded metal component. Imagine trying to loosen the positive terminal nut with a metal wrench. If that wrench slips and touches the engine block or fender while still contacting the positive terminal, you’ve just created an uncontrolled, high-amperage short circuit. This instantaneous discharge of power can generate intense heat, melt metal, create dangerous electrical arcs that can cause burns or eye injuries, and potentially damage sensitive electronic control units (ECUs) prevalent in today’s vehicles. By ensuring the negative terminal is disconnected first, you eliminate this entire risk factor. You effectively isolate the battery, rendering the car’s chassis electrically “dead” relative to the battery’s positive post, making subsequent work on the positive terminal much safer.
From Start to Finish: Car Battery Removal Explained
Removing a car battery might seem like a straightforward task, but knowing the correct sequence for disconnecting the terminals is absolutely critical for your safety and to prevent damage to your vehicle’s electrical system. This comprehensive guide will walk you through each step, ensuring you understand not just how to remove your car battery safely and correctly, but also why certain steps are performed in a specific order, particularly which terminal to disconnect first. Following these instructions will empower you to tackle this common maintenance task with confidence and expertise.
Step 1: Preparation and Prioritizing Safety
What you need: Safety glasses, heavy-duty gloves, old clothes, a well-ventilated area, a clean rag or paper towels.
Instructions: Before you even think about touching the battery, ensure your vehicle is parked on a flat, stable surface with the engine off and the parking brake firmly engaged. Remove the key from the ignition to prevent any accidental electrical activation. Put on your safety glasses and gloves. Battery acid is highly corrosive and can cause severe burns, and the gases emitted can be flammable. Ensure there are no open flames or sparks nearby. Having a clean rag handy can help if there’s any immediate spillage or dirt.
Pro Tip: Always prioritize personal protective equipment (PPE). Even if you’re only “quickly” doing it, a splash of battery acid or a spark can turn a simple job into a hazardous emergency. Take an extra minute to gear up correctly.
Step 2: Locate Terminals and Gather Essential Tools
What you need: A 10mm or 13mm open-end wrench, box-end wrench, or socket wrench (depending on your battery terminals), terminal cleaning brush (optional but recommended), battery terminal spreader/puller (optional), a non-conductive object (e.g., a piece of wood or thick rubber mat).
Instructions: Open your vehicle’s hood and locate the battery. Identify the positive (+) and negative (-) terminals. The positive terminal is usually marked with a plus sign and often has a red cable and/or a red cover. The negative terminal is marked with a minus sign and typically has a black cable. Gather your tools, ensuring they are clean and in good condition. The most common wrench size for battery terminals is 10mm, though some vehicles may use 13mm or 1/2 inch. Having a dedicated battery terminal wrench with offset ends can make the job easier.
Pro Tip: Before you start, take a quick photo of the battery and its connections with your smartphone. This visual reference can be invaluable later when you’re reconnecting the new battery, ensuring all cables and accessories go back in their correct places.
Step 3: Disconnect the Negative Terminal – The Crucial First Step
What you need: The appropriate-sized wrench (10mm or 13mm), safety glasses, gloves.
Instructions: This is the most critical step for safety. Using your wrench, loosen the nut on the negative (-) terminal clamp. Turn the nut counter-clockwise until the clamp is loose enough to be lifted off the terminal post. Do not force it. Once loose, carefully twist and lift the negative cable clamp straight up and off the battery post. Immediately move the disconnected negative cable away from the battery and any metal parts of the car. You can place it on a non-conductive surface, like a piece of wood or secure it with a zip tie to prevent it from accidentally touching the battery or chassis during subsequent steps. Disconnecting the negative terminal first isolates the car’s electrical system, preventing accidental short circuits.
Pro Tip: The reason you disconnect the negative terminal first is to prevent accidentally grounding the positive terminal. If your wrench touches the positive terminal and then any metal part of the car (the chassis), it will create a direct short, causing sparks, potential battery explosion, and severe electrical damage. By removing the negative first, you break the circuit, making the vehicle “ungrounded” and significantly safer to work on.
Step 4: Remove the Battery Hold-Down Clamp or Strap
What you need: Appropriate wrench or socket for the hold-down mechanism (could be 10mm, 13mm, or a screwdriver), potentially a flathead screwdriver for straps.
Instructions: Car batteries are secured in place by a hold-down clamp, strap, or tray to prevent movement and damage from vibrations. Locate this mechanism, which can be a metal clamp over the top, a plastic strap, or bolts securing the battery to a tray at its base. Using the appropriate tool, loosen or remove the fasteners holding the battery in place. If it’s a top-mounted clamp, you’ll typically loosen one or two nuts. For a bottom-mounted clamp, you might need to reach down to unbolt it. Ensure the hold-down is completely loose or removed so the battery can be lifted freely.
Pro Tip: Sometimes these fasteners can be rusted or difficult to reach. A penetrating oil like WD-40 applied 10-15 minutes prior can help loosen stubborn bolts. Take care not to damage any surrounding hoses or wiring when maneuvering your tools.
Step 5: Disconnect the Positive Terminal
What you need: The appropriate-sized wrench (10mm or 13mm), safety glasses, gloves.
Instructions: Now that the electrical circuit is safely broken by the removal of the negative terminal, you can proceed with the positive terminal. Use your wrench to loosen the nut on the positive (+) terminal clamp, turning it counter-clockwise. Once loose, gently wiggle and lift the positive cable clamp straight off the terminal post. Be careful not to let the positive cable touch any metal part of the car, even though the circuit is open, as a precaution. Once removed, secure this cable away from the battery, just as you did with the negative cable. This ensures it doesn’t accidentally reconnect or interfere with battery removal.
Pro Tip: If the terminal clamps are stubborn or corroded, a battery terminal spreader or puller tool can be very helpful. Avoid prying with a screwdriver, as this can damage the terminal post or the clamp itself. A small amount of baking soda and water paste can help neutralize and clean minor corrosion, but ensure it doesn’t get into the battery cells.
Step 6: Safely Remove the Battery
What you need: Battery carrier strap or handle (highly recommended), safety glasses, heavy-duty gloves.
Instructions: Car batteries are surprisingly heavy, often weighing between 30 to 60 pounds (14 to 27 kg). Never attempt to lift a battery with just your hands if you feel it’s too heavy or awkward, as this can lead to back injuries or dropping the battery. If your battery has a built-in handle, use it. Otherwise, use a dedicated battery carrier strap. Lift the battery straight up out of its tray, taking care not to tilt it too much, as acid could spill. Place the old battery on a stable, level surface, preferably on a plastic tray or a heavy-duty mat, ready for proper disposal or recycling.
Pro Tip: Always lift with your legs, not your back. Bend your knees, keep your back straight, and lift slowly. If the battery tray is recessed, sometimes an extra pair of hands or a specialized long-reach battery carrier can make the job safer and easier.
Step 7: Inspect and Clean Battery Tray and Terminals
What you need: Wire brush, baking soda, water, clean rag, terminal cleaning brush, sandpaper (fine grit, optional).
Instructions: With the battery removed, take this opportunity to inspect the battery tray for any signs of corrosion, rust, or accumulated dirt. A mixture of baking soda and water (about 1 tablespoon per cup of water) can be used to neutralize any acid residue. Scrub the tray and cable clamps with a wire brush to remove corrosion. Rinse thoroughly with clean water (being careful not to get water into sensitive electrical components) and dry completely with a clean rag. Clean the inside surfaces of the battery cable clamps as well, using a terminal cleaning brush or fine sandpaper, to ensure good electrical contact when the new battery is installed. This step is crucial for longevity and preventing future issues.
Pro Tip: Extensive corrosion on the battery tray or cables can indicate a leaking battery or poor maintenance. If the corrosion is severe and has eaten through metal components, it might be wise to consider replacing those parts to prevent premature failure of your new battery and ensure a secure connection.
✅ Final Checklist
-
Negative terminal removed first and secured away from battery/chassis.
-
Battery hold-down mechanism fully disengaged.
-
Positive terminal removed second and secured away from battery.
-
Old battery safely lifted and placed on a stable surface.
-
Battery tray and cable ends inspected and cleaned (if applicable).
Important Notes:
- Safety Considerations: Always wear safety glasses and gloves. Battery acid is corrosive, and batteries can produce explosive hydrogen gas. Avoid smoking or creating sparks near the battery. Have a bottle of water or baking soda solution handy to neutralize any accidental acid spills on skin or surfaces.
- When to Seek Professional Help: If you encounter severely corroded or seized bolts, if the battery is leaking heavily, if you’re unsure about any step, or if you don’t have the appropriate tools, it’s always best to consult a certified mechanic. Attempting to force corroded components can cause significant damage.
- Estimated Time and Cost Range: This task typically takes 15-30 minutes for an experienced individual, or 30-60 minutes for a beginner, assuming no major complications. The cost is usually just for the tools, which can range from $10-$50 if you need to purchase a basic wrench set or battery carrier. Battery disposal is often free at auto parts stores or recycling centers.
Step-by-Step Guide: How to Safely Remove Your Car Battery
Preparation and Disconnection Sequence
Before you even touch a wrench, ensure your vehicle is off, the parking brake is engaged, and the keys are removed from the ignition. For safety, it’s wise to wear gloves and eye protection. You’ll need a suitable wrench, typically a 10mm or 13mm, or an adjustable wrench. First, locate your battery terminals. The positive terminal will have a plus (+) sign and usually a red cover or cable. The negative terminal will have a minus (-) sign and a black cable. Always start with the negative terminal. Use your wrench to loosen the nut on the negative terminal clamp. You usually only need to turn it a few times counter-clockwise until the clamp is loose enough to wiggle free from the battery post. Once loose, carefully pull the negative cable completely off the battery post and move it away from the battery so it cannot accidentally fall back onto the terminal. Then, and only then, proceed to the positive terminal. Loosen its nut and remove the red positive cable, ensuring it too is moved clear of the battery before you attempt to lift the battery out.
The Reconnection Protocol (Crucial for 2026 Vehicles)
Just as the disconnection sequence is vital, the reconnection order is equally important, particularly with the sophisticated electronics in 2026 vehicles. When reinstalling your car battery, the procedure is reversed: you must connect the positive terminal first, followed by the negative terminal. Start by placing the battery securely in its tray. First, attach the red positive cable to the positive (+) terminal post and tighten the nut firmly with your wrench until the connection is snug and stable. Do not overtighten, as this can damage the battery post or clamp. Once the positive connection is secure, then connect the black negative cable to the negative (-) terminal post. As you make this final connection, you might observe a very small, brief spark; this is normal as the vehicle’s electrical systems are fully re-energized. Ensure this connection is also tight and secure. This positive-first reconnection method minimizes the chance of any accidental shorts during the reconnection process, safeguarding your vehicle’s sensitive electrical components and ensuring a smooth re-initialization of all systems.
Reconnecting Your Car Battery: The Proper Sequence
Reconnecting your car battery correctly is as critical as disconnecting it. An incorrect sequence can cause electrical surges, damage sensitive vehicle electronics, or create dangerous sparks. Modern vehicles, particularly those manufactured in 2020-2026, feature increasingly complex electrical systems and sensitive onboard computers that demand precise battery handling.
Why the Reconnection Order Matters
Connecting the positive terminal first ensures that if your wrench accidentally touches the vehicle’s metal frame while you’re tightening the negative terminal, no short circuit occurs. The vehicle’s chassis is already grounded via the negative cable. If the negative terminal is connected first, and you then touch the positive terminal with a metal tool that subsequently contacts the grounded chassis, a direct short circuit can happen. This can damage wiring, blow fuses, or even cause a battery explosion due to rapid discharge, as documented by automotive safety advisories from entities like the National Highway Traffic Safety Administration (NHTSA).
Step-by-Step Reconnection Guide (2026 Edition)
Follow these steps to safely reconnect your car battery, minimizing risks to both vehicle and personal safety:
- Ensure All Accessories Are Off: Before beginning, confirm your vehicle’s ignition is off, and all lights, radio, and other accessories are completely powered down. This prevents sudden power surges upon reconnection.
- Connect the Positive (+) Terminal First: Attach the red cable to the positive (+) battery terminal. Tighten the nut securely with an insulated wrench. Industry standards, reinforced by ASE-certified technicians, recommend a torque setting of 9-11 ft-lbs for most battery terminals to ensure a solid connection without overtightening.
- Connect the Negative (-) Terminal Second: Attach the black cable to the negative (-) battery terminal. Tighten this connection firmly. Verify both terminals are secure and wiggle-free, as loose connections are a leading cause of intermittent electrical issues.
- Apply Protective Grease (Optional but Recommended): A thin layer of dielectric grease on the terminals can prevent corrosion, extending battery life by up to 15% in high-humidity environments, according to a 2024 study on battery maintenance.
- Verify Connection Integrity: Gently tug on each cable to ensure it is firmly attached and cannot be easily dislodged.
Essential Safety Tips & Troubleshooting During Battery Work
Working with car batteries involves inherent risks. Adhering to strict safety protocols, especially with the high CCA (Cold Cranking Amps) ratings of modern batteries, is non-negotiable. Furthermore, knowing how to troubleshoot common issues can prevent costly professional interventions.
Mandatory Safety Gear for 2026
Always prioritize personal protection:
- Eye Protection: Wear ANSI Z87.1-compliant safety glasses or goggles. Battery acid spray can cause irreversible eye damage in seconds.
- Gloves: Use chemical-resistant gloves (e.g., neoprene or nitrile). This protects against acid burns and skin irritation.
- Avoid Metal Jewelry: Remove all rings, watches, and metal bracelets. These can conduct electricity, causing severe burns if they short-circuit across terminals.
- Ventilation: Work in a well-ventilated area. Batteries can emit hydrogen gas, which is highly flammable and explosive when concentrated.
Common Troubleshooting Scenarios
- Accidental Tool Drop: If a wrench or tool accidentally shorts the terminals or contacts the chassis with the positive terminal connected, immediately remove the tool. Inspect for sparks, smoke, or damage to battery posts or cables.
- Persistent Corrosion: If corrosion reappears quickly after cleaning, check for overcharging from the alternator (voltage regulator issue) or poor terminal fitment. A multimeter should show 13.8-14.5 volts with the engine running, as per 2026 OEM specifications.
- No Power After Reconnection: Double-check terminal tightness. A loose connection is the most frequent cause. Ensure cables are connected to the correct polarity. Confirm battery health with a multimeter; a healthy 12V battery should read 12.6V or higher when fully charged.
What If It Still Doesn’t Work? Advanced Troubleshooting
Even with correct procedures, issues can persist. If your vehicle doesn’t start or experiences electrical anomalies after battery work, consider these advanced steps before seeking professional help. Modern vehicle systems can require specific recalibration after battery disconnection.
- Check All Fuses: A momentary short during reconnection can blow a main fuse or individual circuit fuses. Consult your vehicle’s owner manual for fuse box locations and diagrams.
- Reset Vehicle Electronics: Some vehicles require a specific “power cycle” or a brief wait (e.g., 5-10 minutes with the ignition off) for onboard computers to fully reset and recalibrate. Refer to your owner’s manual for specific procedures relevant to your 2026 model.
- Inspect Ground Connections: Beyond the battery, ensure all other vehicle ground straps and cables (e.g., engine to chassis) are clean and securely fastened. Corrosion or looseness here can mimic a dead battery.
- Professional Diagnostic Scan: If the issue persists, a professional diagnostic scan with an OBD-II scanner (costing around $50-$150 for a basic scan, or up to $300 for complex electrical diagnostics) can pinpoint fault codes.
- When to Seek Professional Help: If you’ve followed all steps and the problem remains, contact a certified automotive technician. Issues could range from a faulty alternator ($400-$800 for replacement) to a damaged starter motor ($350-$700) or complex electrical system faults, which can be dangerous and costly to address without specialized tools and expertise.
Conclusion: Prioritizing Safety and Precision
Correct car battery handling, from disconnection to reconnection, is paramount for vehicle longevity and personal safety. According to verified research and expert sources like ASE and leading automotive manufacturers, adhering to the negative-first disconnection and positive-first reconnection sequence mitigates significant electrical risks. Always prioritize safety gear and methodical execution. Your next actionable step: procure a high-quality, insulated wrench set and ensure you have up-to-date safety glasses before your next battery maintenance task.
❓ Frequently Asked Questions
Why is it absolutely critical to remove the negative terminal first?
Removing the negative terminal first isolates the battery from the car’s ground. This prevents sparks, short circuits, or damage to electrical components if your wrench accidentally touches the car’s metal body while working on the positive terminal, which would still be live if the negative wasn’t disconnected.
What are the primary dangers if I incorrectly remove car battery terminals?
Incorrect removal can lead to dangerous sparks, potential battery explosion from hydrogen gas ignition, severe electrical shorts damaging the vehicle’s computer or wiring, and even personal injury from burns or acid exposure. Following the correct sequence is crucial for safety.
How do I correctly identify the positive and negative terminals on my car battery?
The positive terminal is typically larger, marked with a plus sign (+), and usually covered with a red cap or cable. The negative terminal is smaller, marked with a minus sign (-), and typically has a black cable connected to it.
Besides a wrench, what other safety precautions should I take when working with car batteries?
Always wear safety glasses and acid-resistant gloves to protect against splashes. Ensure you’re working in a well-ventilated area, keep metal tools away from touching both terminals simultaneously, and consider having a fire extinguisher nearby in case of sparks.
Are there any considerations for newer vehicles with complex electronics?
Even with modern vehicles, the negative-first rule for removal remains paramount. Disconnecting the battery can sometimes reset onboard computers, requiring security codes, radio presets, or window initialization, but safely removing the battery is still the priority to prevent electrical damage.
How should I clean corrosion from battery terminals after removal?
After removal, clean corroded terminals using a wire brush and a paste made from baking soda and water to neutralize acid, then rinse with clean water and dry thoroughly. Applying a thin layer of dielectric grease before reattachment helps prevent future corrosion.