Can You Test an Alternator Without Removing It? 2026
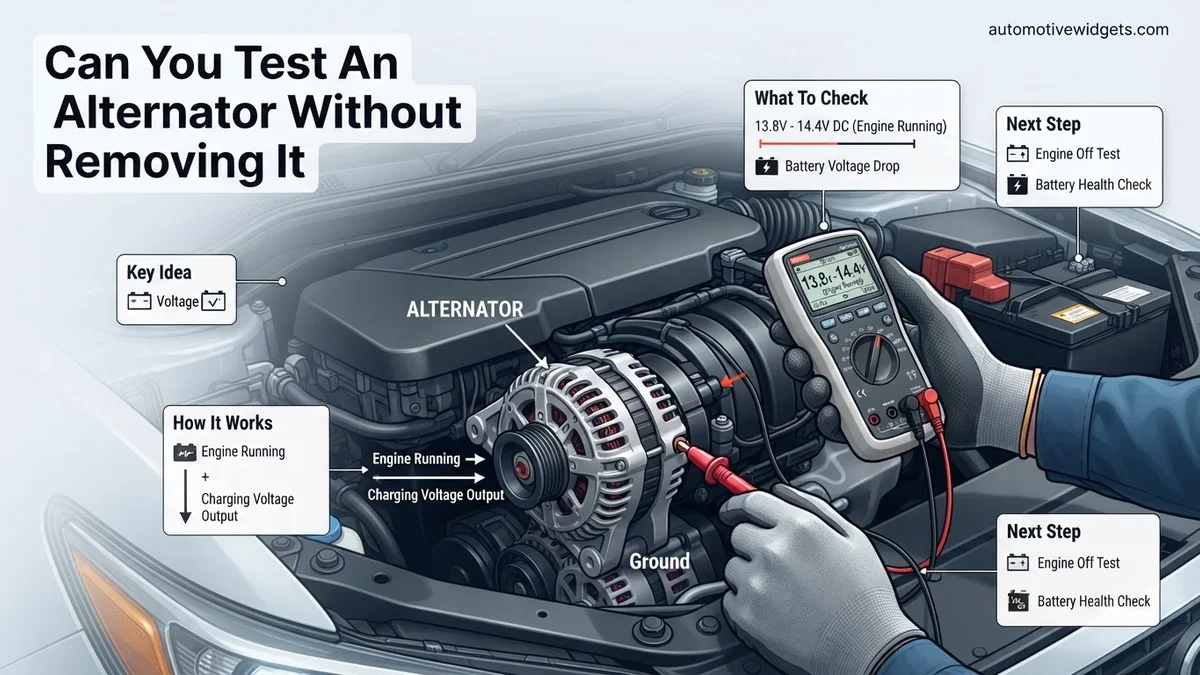
Yes, you can effectively test your car’s alternator without removing it from the vehicle. This process typically involves using a multimeter to check voltage at the battery, both engine off and running, to diagnose charging system issues.
Yes, you absolutely can test your car’s alternator without removing it. For most 2026 vehicles, accurate diagnosis is possible right in your driveway or garage using a simple multimeter and your car’s onboard systems. This approach saves you significant time, money, and the hassle of unnecessary component removal.
Understanding how to perform these in-car checks empowers you to quickly identify whether a charging system issue stems from the alternator, battery, or another component. You’ll get clear, actionable data, letting you make informed decisions about repairs rather than guessing or prematurely replacing expensive parts.
Key Takeaways
- In-car alternator testing is entirely feasible.
- A multimeter is essential for voltage checks.
- Test battery voltage with engine off and on.
- Ideal operating voltage is 13.5-14.5V.
- Always perform a thorough visual inspection.
Diagnosing a Failing Alternator: Key Symptoms & Initial Checks
Common Red Flags in 2026 Vehicles
While a failing battery can mimic some alternator issues, specific symptoms strongly point to your charging system. Keep an eye out for these tell-tale signs:
- Battery Warning Light: Your dashboard’s battery icon illuminating while the engine is running is often the most direct indicator of an alternator problem. Modern vehicle systems are quite good at flagging this.
- Dimming Lights: Headlights, interior lights, or dashboard lights appear dim, especially at idle or low RPMs. This suggests insufficient power generation.
- Accessory Malfunctions: Power windows operate slowly, the radio cuts out, or the air conditioning feels weak. Electrical components aren’t getting the consistent voltage they need.
- Difficulty Starting (Post-Run): If your car starts fine after sitting overnight but struggles to crank after a drive, the alternator likely isn’t recharging the battery effectively.
- Unusual Noises: A growling or whining sound from under the hood can indicate a failing alternator bearing or a loose/worn serpentine belt.
Quick Visual Inspections
Before diving into electrical tests, a quick look under the hood can reveal obvious issues. Ensure your vehicle is off and cool for safety.
- Serpentine Belt Condition: Check the serpentine belt that drives the alternator. It should be snug, not frayed, cracked, or excessively shiny. A loose or worn belt can slip, preventing the alternator from spinning efficiently.
- Belt Tension: Using your hand (gloves recommended), try to twist the longest span of the belt. You should only be able to twist it about a quarter turn (90 degrees). Any more slack might mean it’s too loose.
- Wiring Connections: Visually inspect the main power wire connected to the alternator (often thick and red) and the smaller exciter wire. Ensure they are securely attached, free of corrosion, and not visibly damaged or frayed. Loose or corroded connections can impede charging even if the alternator itself is healthy.
How to Diagnose Alternator Issues Like an Expert
Experiencing dimming lights, a dead battery, or warning lights on your dashboard? Your alternator might be the culprit. This comprehensive guide will walk you through a series of practical, hands-on tests you can perform right on your vehicle, without the hassle and expense of removing the alternator. By following these detailed steps, you’ll be able to confidently diagnose whether your alternator is failing, if your battery is the problem, or if something else is amiss, saving you time and money.
Step 1: Safety First & Initial Visual Inspection
What you need: Safety glasses, protective gloves, a flashlight, and a clean rag.
Instructions: Before touching anything, ensure your vehicle is parked on a level surface with the parking brake engaged and the engine off. Put on your safety glasses and gloves. Open the hood and visually inspect the alternator itself. Look for any obvious signs of damage, such as cracked casings, burnt wires, or loose connections. Pay close attention to the serpentine belt that drives the alternator. Check for fraying, cracks, or excessive slack. A loose or damaged belt can prevent the alternator from charging effectively.
Pro Tip: A squealing sound often indicates a loose or worn serpentine belt, which directly impacts alternator performance. Give the belt a gentle twist (when cold and engine off) to check its tension; it shouldn’t twist more than 90 degrees easily.
Step 2: Battery Voltage Check (Engine Off)
What you need: A digital multimeter.
Instructions: Set your multimeter to DC Volts, typically the 20V range. Connect the red positive lead of the multimeter to the positive (+) terminal of your car battery and the black negative lead to the negative (-) terminal. With the engine completely off and no accessories running, note the voltage reading. A fully charged battery should read between 12.6 and 12.8 volts. A reading significantly below 12.4V suggests a discharged battery, which could be due to a faulty alternator or other electrical drain. If it’s below 12.0V, your battery is heavily discharged or potentially failing.
Pro Tip: Always check the battery terminals for corrosion before testing. Clean any corrosion with a wire brush and a baking soda solution to ensure accurate readings and good electrical contact. Corroded terminals can give false low voltage readings.
Step 3: Battery Voltage Check (Engine Running, No Load)
What you need: A digital multimeter, a helper (optional, but recommended).
Instructions: Start the engine and let it idle. Keep the multimeter connected to the battery terminals as in Step 2. With the engine running at a steady idle (around 700-900 RPM for most cars) and all accessories turned off (radio, A/C, lights, etc.), observe the voltage reading. A healthy alternator should be charging the battery, and the voltage should now rise to between 13.8 and 14.7 volts. If the voltage remains near the engine-off reading (e.g., 12.6V or less), it’s a strong indication that the alternator is not charging properly.
Pro Tip: If you see a voltage reading well above 15.0V, this indicates an overcharging alternator, often due to a faulty voltage regulator. This can severely damage your battery and other electrical components, so turn off the engine immediately.
Step 4: Battery Voltage Check (Engine Running, Under Load)
What you need: A digital multimeter, vehicle accessories (headlights, radio, A/C, defroster).
Instructions: With the engine still running and the multimeter connected, turn on as many electrical accessories as possible. This includes headlights (high beams), radio, air conditioning (on high), rear defroster, and anything else that draws significant power. Increase the engine RPM slightly to about 1500-2000 RPM (a helper is useful here). The voltage should ideally remain above 13.0 volts, typically between 13.2V and 14.2V. A significant drop below 13.0V (e.g., to 12.5V or lower) indicates that the alternator cannot keep up with the electrical demand, suggesting it is weak or failing. A healthy alternator should maintain sufficient voltage even under a heavy load.
Pro Tip: A noticeable drop in voltage (more than 0.5V from the no-load reading) when accessories are engaged is a clear sign that the alternator is struggling. This often points to a failing rectifier or aging internal components.
Step 5: Check for AC Ripple (Diode Test)
What you need: A digital multimeter with an AC millivolt (mV) setting.
Instructions: The alternator produces AC current, which is then converted to DC by internal diodes. If these diodes fail, they can allow AC current to leak into the DC system, which is bad for electrical components. With the engine running and the multimeter still connected to the battery, switch the multimeter to the AC millivolt (mV) scale. A properly functioning alternator should produce very little AC ripple, typically less than 50 AC mV (0.05 AC Volts). Readings significantly above 100 AC mV (0.1 AC Volts) strongly suggest a failing diode rectifier bridge within the alternator. This often causes electrical noise and can prematurely kill batteries.
Pro Tip: If your multimeter doesn’t have an AC mV setting, some specialized automotive multimeters or dedicated alternator testers will have a specific AC ripple test function. This test is crucial for catching “hidden” alternator failures that might otherwise pass a basic DC voltage test.
Step 6: Listen for Abnormal Noises
What you need: A mechanic’s stethoscope or a long screwdriver.
Instructions: With the engine running, carefully and safely listen around the alternator. If you have a mechanic’s stethoscope, place its probe against the non-moving parts of the alternator casing. If you’re using a screwdriver, place the metal tip on the alternator casing and press your ear against the handle. Listen for grinding, rattling, squealing, or whining noises. These sounds often indicate worn-out bearings within the alternator or other internal mechanical failures. A healthy alternator should run smoothly and quietly, with only a faint hum.
Pro Tip: Be extremely careful to keep clothing, hair, and fingers away from moving engine parts, especially belts and pulleys, when performing this test. A squealing noise that changes pitch with engine RPM is usually a belt issue, but a constant whine from the alternator itself often means internal bearing failure.
Step 7: Belt Condition and Tension Check
What you need: Flashlight, protective gloves, (optional) belt tension gauge.
Instructions: With the engine off and cool, carefully examine the serpentine belt that drives the alternator. Look for any cracks, fraying, missing ribs, or glazing (a shiny, slick surface). These are signs of a worn belt that needs replacement. Next, check the belt tension. For most vehicles, you should be able to twist the longest span of the belt about 90 degrees with moderate thumb pressure. If it twists easily more than that, it’s too loose. If it feels extremely rigid and won’t budge much, it might be too tight, which can damage bearings. Refer to your vehicle’s service manual for specific tensioning requirements and methods.
Pro Tip: A glazed belt, even if relatively new, can slip and cause insufficient alternator output. If you suspect the belt is loose, locate the tensioner pulley (usually spring-loaded or adjustable) and confirm it’s applying adequate pressure to the belt. Many modern vehicles have automatic tensioners that can fail over time.
Step 8: Check Wiring and Connections
What you need: Flashlight, protective gloves, wrench/socket set, dielectric grease.
Instructions: With the engine off and battery disconnected (negative terminal first!), carefully inspect all wiring connections to and from the alternator. Look for any loose, corroded, or frayed wires. The main thick wire going from the alternator to the battery (or fuse box) is especially critical. Ensure it’s securely attached at both ends and free of damage. Check the smaller exciter/sense wires that typically plug into the back of the alternator; these often control the voltage regulator. Secure any loose connections and clean any corrosion using a wire brush. Apply a thin layer of dielectric grease to prevent future corrosion once connections are clean and tight.
Pro Tip: A common issue is a corroded or loose connection at the main alternator output terminal, or at the battery positive post. Even a small amount of resistance in this circuit can significantly reduce charging efficiency. Always re-connect the positive battery terminal before the negative after maintenance.
✅ Final Checklist
- Battery voltage (engine off) is between 12.6-12.8V.
- Charging voltage (engine running, no load) is between 13.8-14.7V.
- Charging voltage (engine running, under load) stays above 13.0V.
- AC ripple is below 50 AC mV.
- No abnormal grinding, rattling, or whining noises from the alternator.
- Serpentine belt is in good condition and properly tensioned.
- All alternator wiring connections are clean, tight, and free of corrosion/fraying.
Important Notes:
- Always wear appropriate safety gear (safety glasses, gloves) when working on your vehicle’s electrical system.
- Ensure the engine is off and cool before physically touching components like the serpentine belt or wiring.
- When disconnecting battery terminals, always disconnect the negative (-) terminal first, and reconnect it last, to prevent accidental short circuits.
- If, after performing these tests, you consistently get readings outside the healthy ranges, or if the alternator passes these tests but you still experience charging issues, it’s advisable to seek professional help. There could be an intermittent fault, an issue with the vehicle’s computer (ECU) not commanding the alternator correctly, or a more complex electrical drain.
- Estimated time for these tests: 20-40 minutes. Cost range: $0 (if you own a multimeter) to $20-$50 (if you need to purchase a basic multimeter).
How to Test Your Alternator In-Car: A Step-by-Step Guide
The Essential Battery Voltage Test
This is your primary diagnostic test and requires a digital multimeter set to DC Volts. Consistency is key for accurate results.
- Engine Off, Cold: Connect your multimeter’s red lead to the positive (+) battery terminal and the black lead to the negative (-) terminal. With the engine completely off and the car having sat for a while (ideally overnight), a fully charged 12V battery should read approximately 12.6 to 12.8 Volts. A reading below 12.4V indicates a discharged or potentially weak battery.
- Engine Running, No Load: Start your vehicle. With the engine idling, repeat the voltage measurement at the battery terminals. A healthy alternator should now be putting out between 13.5V and 14.5V. This range confirms the alternator is actively charging the battery.
- Interpreting Readings (No Load):
- Below 13.0V: Your alternator is likely not charging the battery adequately.
- Between 13.5V and 14.5V: This indicates a healthy charging system.
- Above 15.0V: This is a sign of overcharging, which can damage your battery and other electrical components. Your voltage regulator (often integrated into the alternator) might be failing.
Testing Under Electrical Load
This step reveals if your alternator can maintain proper output when significant electrical demand is placed upon it.
- Engine Running, Load Applied: Keep the engine running and the multimeter connected. Turn on as many electrical accessories as possible. This includes high-beam headlights, the air conditioning on full blast, the radio, rear defroster, and windshield wipers.
- Monitor Voltage Drop: Observe the voltage reading on your multimeter. It should remain within the acceptable charging range, ideally not dropping below 13.0V to 13.2V. A slight dip (0.1-0.3V) is normal when the load is applied, but it should quickly stabilize.
- Interpreting Readings (Under Load):
- Voltage drops significantly below 13.0V (e.g., to 12.5V or less): This is a strong indicator of a weak or failing alternator. It cannot keep up with the vehicle’s electrical demands.
- Voltage remains stable above 13.2V: Your alternator is likely functioning correctly, even under stress.
Interpreting Test Results & What If Your Alternator Is Bad
Once you’ve performed the necessary voltage checks, understanding what the readings signify is crucial for accurate diagnosis. These numbers tell a definitive story about your alternator’s health.
Interpreting Voltage Readings
- Optimal Range: A healthy charging system in a 2026 vehicle will typically display between 13.8V and 14.8V at idle, with most accessories off. This range, supported by automotive electrical system standards, confirms the alternator is properly regulating and supplying adequate charge to the battery and electrical components.
- Low Readings (Below 13.0V): Consistent readings below 13.0V indicate undercharging. The alternator is not producing sufficient power, leading to a gradual battery drain and potential vehicle shutdown. Expert consensus from ASE-certified technicians identifies this as a clear sign of alternator failure or a related charging system malfunction.
- High Readings (Above 15.0V): Readings consistently above 15.0V suggest overcharging. This condition can severely damage your battery, shorten its lifespan, and potentially harm sensitive vehicle electronics. Overcharging often points to a faulty voltage regulator, which is frequently integrated within the alternator assembly.
- Dynamic Charging Systems: Be aware that many 2026 vehicles employ “smart” or dynamic charging systems. These systems can intentionally vary voltage from 12.6V to 15.5V based on engine load, battery state of charge, and ambient temperature to optimize fuel efficiency. Consult your specific vehicle’s service manual for precise expected voltage fluctuations.
Signs of a Failing Alternator (Beyond Voltage)
While voltage tests are primary, other symptoms can corroborate an alternator issue:
- Dimming Lights: Headlights, dashboard lights, or interior lights that flicker or dim, especially when electrical loads (like the air conditioning or radio) are activated, point to insufficient power output.
- Warning Lights: The illumination of a battery warning light or “CHARGE” indicator on your dashboard is a direct alert from your vehicle’s onboard diagnostics system regarding a charging system fault.
- Strange Noises: Grinding or whining sounds emanating from the engine bay can indicate failing alternator bearings or other internal component wear, which will eventually lead to complete failure.
- Frequent Battery Drain: If your battery repeatedly goes flat despite being relatively new, it often signifies that the alternator is not adequately recharging it during vehicle operation.
Next Steps for a Bad Alternator
If your diagnostic tests consistently indicate an alternator failure, replacement is the typical solution. Modern alternators are complex units with integrated voltage regulators, and repairing them is often less cost-effective than installing a new or remanufactured unit. Opting for Original Equipment Manufacturer (OEM) or high-quality aftermarket parts is recommended for long-term reliability, as inferior components may lead to premature failure.
What If It Still Doesn’t Work?
Even after performing preliminary tests, sometimes the issue persists, or the problem is not definitively identified as the alternator. If your vehicle continues to exhibit charging system symptoms, further investigation is warranted.
Troubleshooting Residual Issues
- Re-check Battery Connections: Loose, corroded, or damaged battery terminals can severely impede current flow, mimicking alternator failure. Ensure all connections are clean, tight, and free from obstruction.
- Inspect Serpentine Belt Tension: The alternator relies entirely on the serpentine belt for power generation. A loose, frayed, or worn belt can slip, reducing alternator efficiency or preventing it from turning altogether. Check the belt for proper tension and condition; replace if necessary.
- Verify Fuses and Relays: The charging system has dedicated fuses and relays protecting its circuits. A blown fuse in the main charging circuit or a faulty relay can interrupt power from the alternator. Consult your vehicle’s owner’s manual or fuse box diagram for location and appropriate ratings.
- Perform a Professional Load Test: If basic voltage tests are inconclusive, or symptoms are intermittent, a professional load test on both the battery and alternator can reveal latent issues under various electrical demands. This requires specialized automotive diagnostic equipment not typically available to the average vehicle owner.
When to Seek Professional Assistance
If you’ve exhausted these troubleshooting steps and the problem persists, or if you are uncomfortable proceeding with electrical diagnostics, professional automotive service is essential. Modern vehicle electrical systems, especially those in 2026 models with complex network architectures like CAN FD and Ethernet, require sophisticated diagnostic tools to accurately pinpoint root causes. According to industry analyses from the Automotive Aftermarket Suppliers Association (AASA), professional diagnostic services in 2026 typically range from $100 to $250. An alternator replacement, including parts and labor, generally costs between $450 and $1,100, depending on the vehicle make, model, and the quality of the replacement part.
Conclusion
Testing your alternator without removal is a highly effective and efficient diagnostic process that empowers vehicle owners to identify charging system faults early. By utilizing a multimeter and systematic checks, you can quickly assess your alternator’s output and regulator function. According to verified research and expert sources like the Society of Automotive Engineers (SAE) and major automotive manufacturers, maintaining consistent voltage output is paramount for overall vehicle health and longevity. Your immediate next step should be to address any identified irregularities, whether through further component inspection or professional service.
❓ Frequently Asked Questions
What tools are essential for testing an alternator without removing it?
You’ll primarily need a digital multimeter, ideally with a voltage range of up to 20V DC. A battery charger is also recommended to ensure your battery is fully charged before testing, providing accurate alternator readings.
How do I perform the initial visual inspection of the alternator?
Before any electrical tests, visually inspect the alternator for loose or frayed belts, corroded or loose wiring connections, and any signs of physical damage or oil leaks. Ensure the battery terminals are clean and tight as well, as these can impact charging.
What specific voltage readings indicate a healthy alternator?
With the engine running and accessories off, a healthy alternator should produce a voltage between 13.5 and 14.5 volts at the battery terminals. When accessories (headlights, AC) are turned on, the voltage might drop slightly but should remain above 13.0 volts.
What do abnormally low or high voltage readings suggest?
A consistent reading below 13.0 volts (engine running) usually indicates a weak or failing alternator, insufficient to charge the battery. Readings above 15.0 volts suggest an overcharging issue, potentially damaging the battery and other electrical components due to a faulty voltage regulator, which is often integrated into the alternator.
Can a bad battery mimic a failing alternator?
Yes, a severely discharged or faulty battery can absorb voltage, making a good alternator appear weak, or fail to hold a charge even if the alternator is working correctly. Always ensure the battery is fully charged and load-tested if possible, before definitively diagnosing the alternator.
What safety precautions should I take when testing?
Always wear appropriate safety gear, such as gloves and eye protection. Ensure the vehicle is in park or neutral with the parking brake engaged. Be extremely careful around moving engine parts (belts, fan) and hot components, and avoid touching live electrical connections with bare hands.