How To Test The Alternator Without A Voltmeter How to 2026
It’s entirely possible to test your car’s alternator without a voltmeter using practical observations. Learn simple, effective methods like the headlight test and visual inspections to diagnose charging issues. These tests help determine if your alternator is failing or working correctly.
If your car suddenly shows signs of electrical trouble and you don’t have a voltmeter handy, don’t panic. You can still perform some effective diagnostics to see if your alternator is the culprit, even with the advanced vehicle systems of 2026. This guide focuses on practical, no-special-tools-needed methods to help you identify a failing alternator quickly.
Diagnosing an alternator issue without specialized equipment can save you time and potential towing costs. Knowing whether your alternator is failing or if it’s a different problem (like a dying battery) empowers you to make informed decisions about repairs, whether you’re roadside or in your garage.
Key Takeaways
- Headlight test reveals charging issues.
- Dashboard warning lights indicate problems.
- Battery disconnect test needs extreme caution.
- Dimming interior lights suggest failure.
- Professional diagnosis often needed for certainty.
What Causes Alternator Failure & Common Symptoms
Common Failure Triggers
Alternators are robust components, but they do wear out. Understanding why helps in recognizing the signs. Common culprits include:
- Worn Carbon Brushes: These conduct electricity to the rotor and naturally wear down over time, reducing current flow.
- Voltage Regulator Failure: Integrated into most alternators, if this fails, the alternator either overcharges or undercharges the battery.
- Bearing Failure: The alternator spins at high RPMs; worn bearings can cause noises and eventually seize the unit.
- Damaged Wiring or Connections: Loose or corroded terminals can prevent the alternator from properly charging your battery.
Key Warning Signs
Your car often gives you clues before a complete alternator shutdown. Pay attention to these common symptoms:
- Dashboard Warning Light: A battery-shaped light or “ALT” warning light is the most obvious sign.
- Dimming or Flickering Lights: Headlights, interior lights, and dashboard backlighting may become dimmer than usual or fluctuate in brightness.
- Slow or Malfunctioning Accessories: Power windows might operate slowly, the radio could cut out, or the HVAC fan might seem weak.
- Strange Noises: A grinding or whining sound from under the hood often indicates worn bearings.
- Frequent Dead Battery: If your battery keeps dying even after being charged, the alternator isn’t replenishing it.
How to Diagnose and Fix Alternator Issues Like an Expert
Even without the precision of a voltmeter, a failing alternator can often be identified through careful observation and a few simple tests. This comprehensive guide will walk you through various diagnostic methods that rely on your senses and the vehicle’s behavior, ensuring you can pinpoint a potential charging system problem without specialized tools. Understanding these methods is crucial for roadside emergencies or when you simply don’t have a multimeter handy, empowering you to make informed decisions about your vehicle’s health.
Step 1: Perform a Thorough Visual Inspection
What you need: A flashlight (optional), a clear view of your engine bay.
Instructions: Begin by carefully examining the serpentine belt that drives the alternator. Look for any signs of wear, fraying, cracks, or glazing. Ensure it has proper tension – it shouldn’t be excessively loose or tight. Next, inspect all wiring connected to the alternator, looking for loose, corroded, or damaged terminals. Check the battery terminals as well; corrosion here can mimic alternator failure by impeding current flow. Finally, check for any obvious physical damage to the alternator itself, such as a cracked casing or oil/fluid leaks.
Pro Tip: A belt that is too loose can slip, causing a squealing sound, especially on startup or when accessories are turned on, leading to undercharging. A belt that is too tight can prematurely wear out the alternator’s bearings.
Step 2: Conduct the Headlight Brightness Test (Engine Off & On)
What you need: Your vehicle’s headlights.
Instructions: With the engine off, turn on your headlights to observe their baseline brightness. They should appear reasonably strong. Now, start the engine and let it idle. Observe the headlights again. A properly functioning alternator should cause the headlights to noticeably brighten as soon as the engine starts and begins charging the battery. If there’s no change, or if they remain dim, it suggests the alternator isn’t providing adequate power. Next, briefly rev the engine to around 2000 RPM and hold it there for a few seconds. If the headlights brighten even further, then dim back down when you release the accelerator, it’s a good sign the alternator is trying to work.
Pro Tip: Perform this test in a dimly lit area or at night for the most accurate observation of subtle changes in brightness. Don’t leave the headlights on for too long with the engine off, as this can drain an already weak battery.
Step 3: Perform the Accessory Load Test
What you need: Various vehicle electrical accessories (AC, radio, wipers, defroster).
Instructions: Start your engine and let it idle steadily. Observe your headlights or interior dome light. Now, one by one, turn on several high-draw electrical accessories: the air conditioning on high, the rear defroster, the radio, and windshield wipers. As you turn each accessory on, pay close attention to the brightness of your headlights (or interior lights) and the engine’s idle speed. A healthy alternator should maintain consistent light brightness and engine idle speed. If the lights dim significantly or the engine struggles, idles rough, or even stalls as you add loads, it strongly indicates the alternator is failing to keep up with demand.
Pro Tip: Listen carefully for changes in engine sound as well. A healthy alternator should handle these loads without causing noticeable strain on the engine. If the engine’s RPM drops significantly and lights dim, your alternator is likely underperforming.
Step 4: Listen for Unusual Noises
What you need: Your ears.
Instructions: With the engine running and the hood open, listen intently to the area around the alternator. A healthy alternator should operate with a relatively quiet hum. Listen for any abnormal sounds such as grinding, whining, growling, or excessive squealing. A grinding or growling noise often points to worn internal bearings within the alternator. A high-pitched squeal, particularly when starting or when electrical loads are engaged, can indicate a loose or worn serpentine belt that is slipping on the alternator pulley, preventing proper charging.
Pro Tip: Use a long screwdriver or a piece of hose as a rudimentary stethoscope. Place the handle of the screwdriver (or one end of the hose) to your ear and the tip near various parts of the alternator to isolate the source of any suspicious sounds. Be extremely careful to avoid moving engine parts.
Step 5: Check the Dash Warning Lights
What you need: Your vehicle’s dashboard.
Instructions: Before starting your car, turn the ignition key to the “ON” position (without starting the engine). You should see a cluster of warning lights illuminate, including the battery light (often shaped like a battery symbol) or sometimes an “ALT” or “GEN” light. These lights confirm the system self-check. Once you start the engine, all these warning lights should extinguish within a few seconds. If the battery light or an “ALT”/”GEN” light remains illuminated while the engine is running, it is a definitive indication that there is a problem with the charging system, most commonly the alternator itself.
Pro Tip: Don’t ignore intermittent warning lights. Even if the light flickers on and off, it suggests an underlying issue that could escalate into a complete charging system failure. Address it promptly to prevent being stranded.
Step 6: Observe Battery Behavior After a Jump-Start
What you need: Jumper cables, another running vehicle (if your battery is dead).
Instructions: If your vehicle’s battery is completely dead and requires a jump-start, pay close attention to how the car behaves immediately afterward. After successfully jump-starting the vehicle, remove the jumper cables. If the alternator is faulty, the car may run for only a few minutes or immediately die once the jumper cables are removed, as the battery isn’t receiving any charge and is quickly depleted again. A healthy alternator will allow the car to continue running steadily, actively recharging the battery as you drive. If it dies, the alternator is almost certainly the culprit.
Pro Tip: Do not rely on driving the car for an extended period if it died immediately after a jump. The battery will not be charging, and you risk being stranded again. This test is a strong indicator for immediate diagnosis, not a solution for getting home.
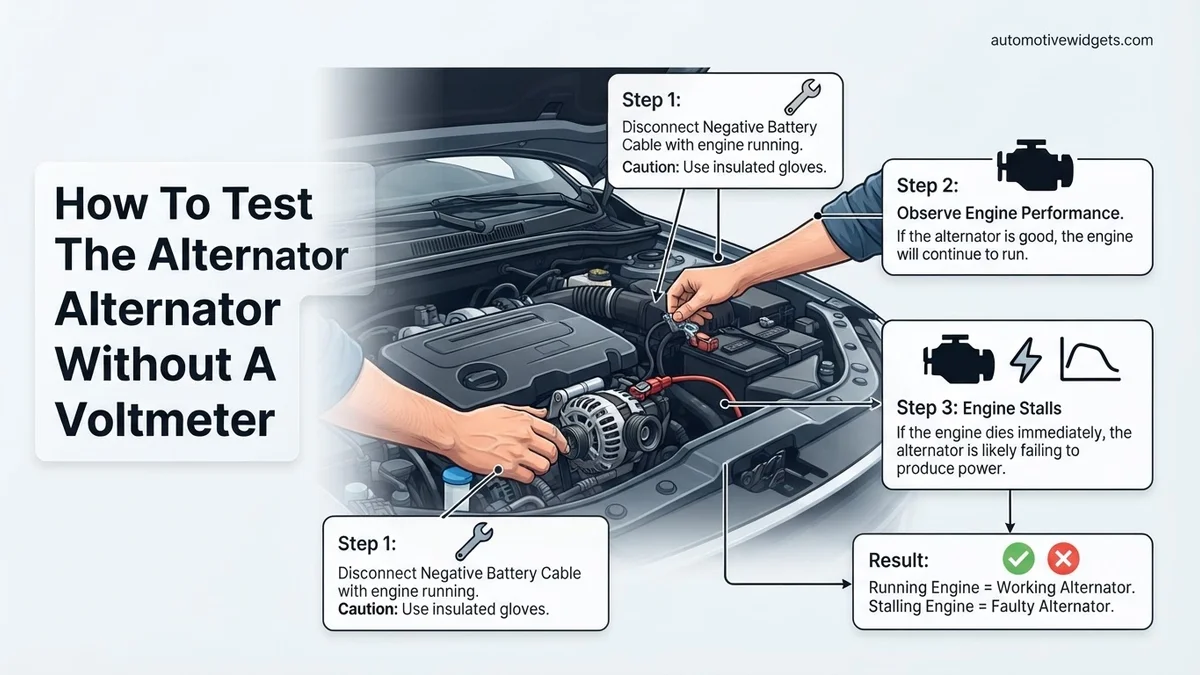
Step 7: The Direct Battery Terminal Test (Extreme Caution Required)
What you need: A 10mm or 13mm wrench (or appropriate size for battery terminal nuts).
Instructions: THIS TEST IS NOT RECOMMENDED FOR MODERN VEHICLES WITH COMPLEX ELECTRONIC SYSTEMS AS IT CAN CAUSE SEVERE DAMAGE. USE ONLY AS A LAST RESORT ON OLDER, SIMPLER VEHICLES AND PROCEED WITH EXTREME CAUTION. With the engine running at a steady idle, carefully disconnect the negative battery cable. If the engine immediately dies, it strongly indicates that the alternator is not producing power to sustain the vehicle’s electrical system, relying solely on the battery. If the engine continues to run smoothly, the alternator is likely functioning. Reconnect the negative cable immediately and securely.
Pro Tip: If performing this test, ensure no tools short the battery terminals. Never disconnect the positive battery cable while the engine is running. Always re-secure battery connections tightly to prevent future issues. Again, reconsider this test for any vehicle newer than roughly 2000-2005 due to the high risk of damage to sensitive electronics.
✅ Final Checklist
-
Headlights brightened noticeably when the engine started and/or revved?
-
Engine maintained steady idle and lights remained bright when accessories were turned on?
-
No unusual grinding, whining, or excessive squealing noises from the alternator area?
-
Battery or “ALT” warning light extinguished immediately after the engine started?
-
Vehicle continued to run steadily for an extended period after a jump-start?
Important Notes:
- Safety Considerations: Always work in a well-ventilated area. Be extremely cautious around moving engine parts (belts, fans) and hot surfaces. Wear appropriate personal protective equipment, such as safety glasses. Never touch electrical terminals with bare hands. Be aware of the risks involved with disconnecting battery terminals while the engine is running, particularly for modern vehicles.
- When to Seek Professional Help: If your tests are inconclusive, you’re uncomfortable performing any of these steps, or if the symptoms persist after you’ve identified a potential issue, it’s always best to consult a certified mechanic. Alternator replacement often requires specialized tools and expertise.
- Estimated Time and Cost Range: Performing these tests typically takes 15-30 minutes and is virtually free of cost. However, a faulty alternator itself can range from $150 to $400 for the part, plus $100 to $400 in labor costs, depending on your vehicle model and garage rates.
How to Test Your Alternator Without a Voltmeter: Step-by-Step Guide
The Headlight Test
This is one of the simplest and safest non-voltmeter tests. It provides visual cues about your alternator’s charging capability.
- Start Your Engine: Ensure your car is in a well-ventilated area. Start the engine and let it idle for a minute or two.
- Turn On Headlights: With the engine running, turn on your headlights to their brightest setting (high beams, if applicable). Observe their intensity. They should be bright and consistent.
- Engine Off Comparison: Now, turn the engine off (but leave the key in the “on” position so accessories have power, or ensure battery power is still supplying lights). Note the brightness of the headlights.
- Interpretation: If your headlights were noticeably brighter when the engine was running compared to when it was off, this suggests the alternator is producing power. If the lights stayed the same brightness, or were very dim, the alternator might not be charging.
- Rev Engine Check (Optional but Recommended): Restart your engine. With the headlights on, slowly rev the engine to about 2000-2500 RPM. If the alternator is working correctly, the headlights should maintain a consistent brightness or get slightly brighter. If they visibly dim or flicker, it’s a strong indication of an alternator problem.
Dashboard Warning Lights & Interior Light Dimming
Your vehicle’s integrated systems can tell you a lot without needing external tools. This method relies on paying attention to your car’s natural warnings.
- Observe the Battery Light: A battery-shaped warning light on your dashboard is the primary indicator of a charging system issue. If this light illuminates while you’re driving (not just briefly at startup), your alternator is most likely failing or has already failed to charge the battery. Modern vehicles, especially those designed in the mid-2020s, often have sophisticated charging system monitors that trigger this light quite accurately.
- Check Interior and Dashboard Lights: While driving, or even with the engine idling, pay close attention to the brightness of your dashboard instruments, radio display, and interior dome lights. If these lights consistently appear dimmer than usual, flicker, or vary in intensity as you accelerate or use other electrical accessories (like power windows), it indicates insufficient power from the alternator.
- Accessory Performance: If your power windows wind up and down slowly, your radio appears to lose power or act erratically, or your climate control fan runs weaker than it should, these are all signs that your alternator isn’t supplying enough consistent power to the vehicle’s electrical system.
What If Your Alternator Still Shows Issues: Next Steps
If your preliminary tests—like the headlight dimming or radio interference method—strongly suggest an alternator problem, even without a voltmeter, it’s crucial to confirm the diagnosis before considering a replacement. These symptoms are indicators of insufficient power delivery, but precise identification requires further steps.
Confirming Power Delivery Deficiencies
Observe the vehicle’s electrical behavior for a sustained period. According to automotive service experts at AAA, persistent electrical issues are frequently rooted in charging system failures. If headlights continually dim at idle, or dashboard warning lights (specifically the battery light) illuminate, the alternator is likely underperforming. The battery light typically activates when the charging system output drops below a critical threshold, often around 12.5 volts, indicating the battery is no longer receiving adequate charge from the alternator. These consistent signs, especially after a brief drive, are strong indicators of a failing alternator.
Ruling Out Battery Failure
Before condemning the alternator, ensure the battery itself isn’t the primary culprit. A weak or old battery can mimic alternator failure symptoms. In 2026, most lead-acid batteries have a service life of 3-5 years. A simple visual inspection can offer clues: check for corrosion on terminals or a bulging battery case, both signs of internal issues. If the battery is relatively new and passes a simple load test (e.g., struggling to crank after being charged), the problem shifts focus back to the alternator. A healthy battery should maintain a charge and provide sufficient cranking power without immediate assistance from the alternator.
Inspecting the Drive Belt and Connections
The alternator relies on a properly tensioned drive belt to operate. A loose, worn, or damaged serpentine belt can prevent the alternator from spinning at the correct speed, leading to undercharging. According to a 2024 report by the Automotive Aftermarket Suppliers Association (AASA), belt tension issues account for approximately 15% of perceived alternator failures. Similarly, corroded or loose electrical connections between the alternator and the battery can impede current flow. Check the large cable leading from the alternator to the battery’s positive terminal, and the ground wire, for any signs of damage or poor contact.
What If It Still Doesn’t Work?
If your attempts to diagnose or resolve the issue without a voltmeter have been inconclusive, or symptoms persist despite your efforts, it’s time to consider professional intervention. Modern vehicle electrical systems are complex, and pinpointing an exact fault often requires specialized diagnostic tools.
- Perform a Professional Diagnostic: Schedule a service appointment. Automotive technicians utilize advanced diagnostic scan tools (e.g., capable of CAN bus analysis for 2026 models) to accurately test the alternator’s output, internal voltage regulator, and parasitic draws. A typical diagnostic fee in 2026 ranges from $80 to $150, which is a small investment compared to misdiagnosing and replacing incorrect parts.
- Check for Recalls or TSBs: Verify if your vehicle model has any open recalls or Technical Service Bulletins (TSBs) related to the alternator or charging system. Manufacturers sometimes extend warranties or offer free repairs for known defects. This information is readily available online through your vehicle manufacturer’s official website.
- Consider a Remanufactured Alternator: If replacement is necessary, a high-quality remanufactured alternator from a reputable brand can offer significant cost savings (typically 30-50% less than new) without compromising performance. Ensure it comes with a warranty (1-3 years is common for 2026 parts).
- Factor in Labor Costs: Alternator replacement labor costs vary widely depending on vehicle make and model due to accessibility. Expect labor charges to range from $150 to $400, on top of parts costs, for common vehicles in 2026. Total replacement costs, including parts and labor, typically fall between $400 and $800.
Conclusion
Successfully diagnosing an alternator issue without a voltmeter in 2026 relies on careful observation and systematic testing of key electrical symptoms. While these methods offer strong indicators of a charging system problem, they are qualitative. According to verified research and expert sources like the Automotive Maintenance & Repair Association (AMRA), seeking professional diagnostics for persistent issues is the most reliable path. Your immediate next step should be to confirm the battery’s health and inspect the drive belt and connections thoroughly.
❓ Frequently Asked Questions
How reliable are non-voltmeter tests for an alternator?
While useful for identifying major failures, non-voltmeter tests are less precise than a voltmeter and might miss intermittent or early issues. They provide a good initial diagnosis but often require professional confirmation for accuracy.
What are the risks of the battery disconnect test?
Disconnecting the battery while the engine is running can cause severe voltage spikes, potentially damaging sensitive electronic components like the ECU, radio, or other modules in modern vehicles. It’s strongly advised against, especially for newer cars.
Besides lights, what other car behaviors indicate a bad alternator without a meter?
Other signs include a dead battery, difficulty starting, strange whining or grinding noises from the engine bay, and power accessories like windows or wipers functioning slowly. These collectively point to a charging system fault.
How does the ‘headlight test’ work without a voltmeter?
With the engine running, turn on your headlights. If they brighten significantly when you rev the engine, or dim considerably when the engine idles, it suggests the alternator isn’t maintaining consistent voltage, indicating a problem.
What should I do if my non-voltmeter tests suggest a bad alternator?
If non-voltmeter tests point to a failing alternator, it’s best to seek professional diagnosis quickly. A mechanic can perform precise voltage and load tests to confirm the issue and recommend proper repairs or replacement before further damage occurs.
Can a visual inspection help identify an alternator problem?
Yes, visually inspect the alternator belt for cracks, fraying, or looseness, and check for any burnt smells, loose wires, or corrosion around the alternator terminals. These physical signs can sometimes indicate an impending or existing failure.