How to Fix Active Air Dam System Fault Ford F150 2026 Guide
An active air dam system fault on a Ford F-150 is typically caused by physical debris blocking the spoiler, electrical connector corrosion, or internal motor failure. Resolving this issue requires clearing obstructions, inspecting wiring harnesses, and clearing diagnostic trouble codes using an OBD2 scanner.
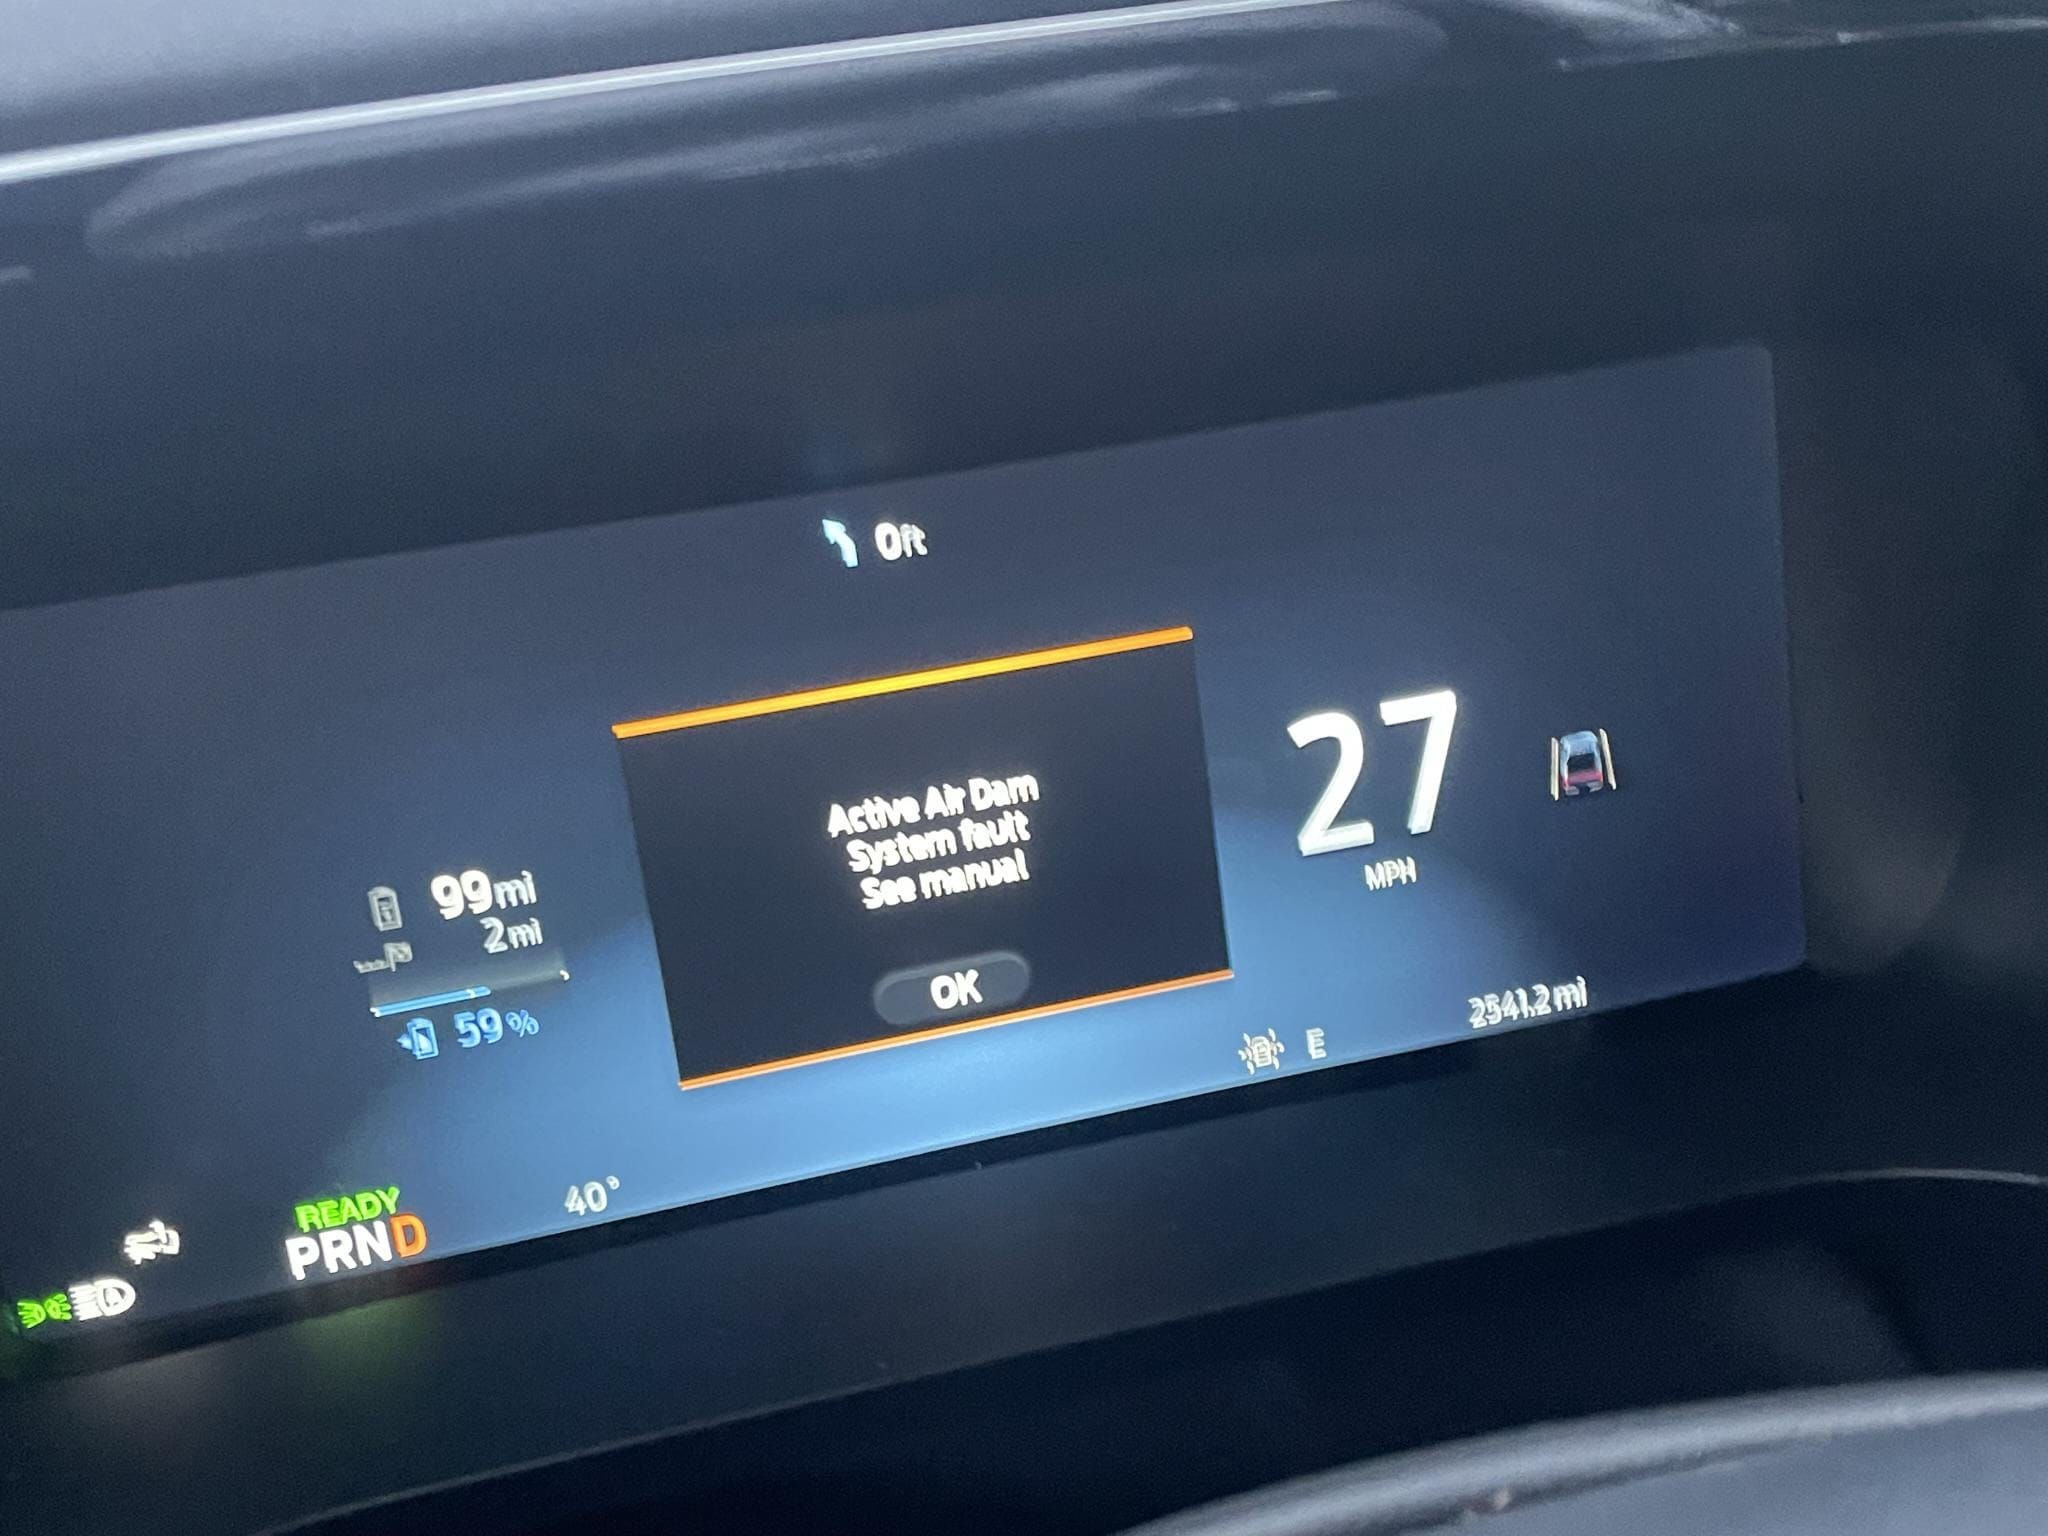
Fixing an active air dam system fault on your Ford F-150 requires inspecting the front bumper assembly, checking specific fuses, and clearing diagnostic trouble codes using an OBD2 scanner. When this system fails, you will typically see a persistent warning message on your 2026 instrument cluster, and the motorized front spoiler will likely be stuck in either the deployed or retracted position.
Addressing this fault promptly prevents potential motor burn-out and keeps your truck operating as engineered. Whether the failure stems from winter road salt, physical debris jamming the linkage, or a blown fuse, you can diagnose and resolve the issue in your driveway with basic hand tools and a multimeter.
Key Takeaways
- Inspect the front spoiler mechanism first for stuck mud, ice, or road debris.
- Check fuses and wiring harness connections near the lower bumper for damage.
- Use an advanced OBD2 scanner to clear active DTC codes after physical repairs.
- Manually secure a broken air dam in the retracted position if replacement parts are delayed.
- Apply dielectric grease to electrical connectors to prevent future weather-related faults.
Diagnosing the Causes of an Active Air Dam System Fault on Ford F150
Inspecting for Physical Obstructions and Debris
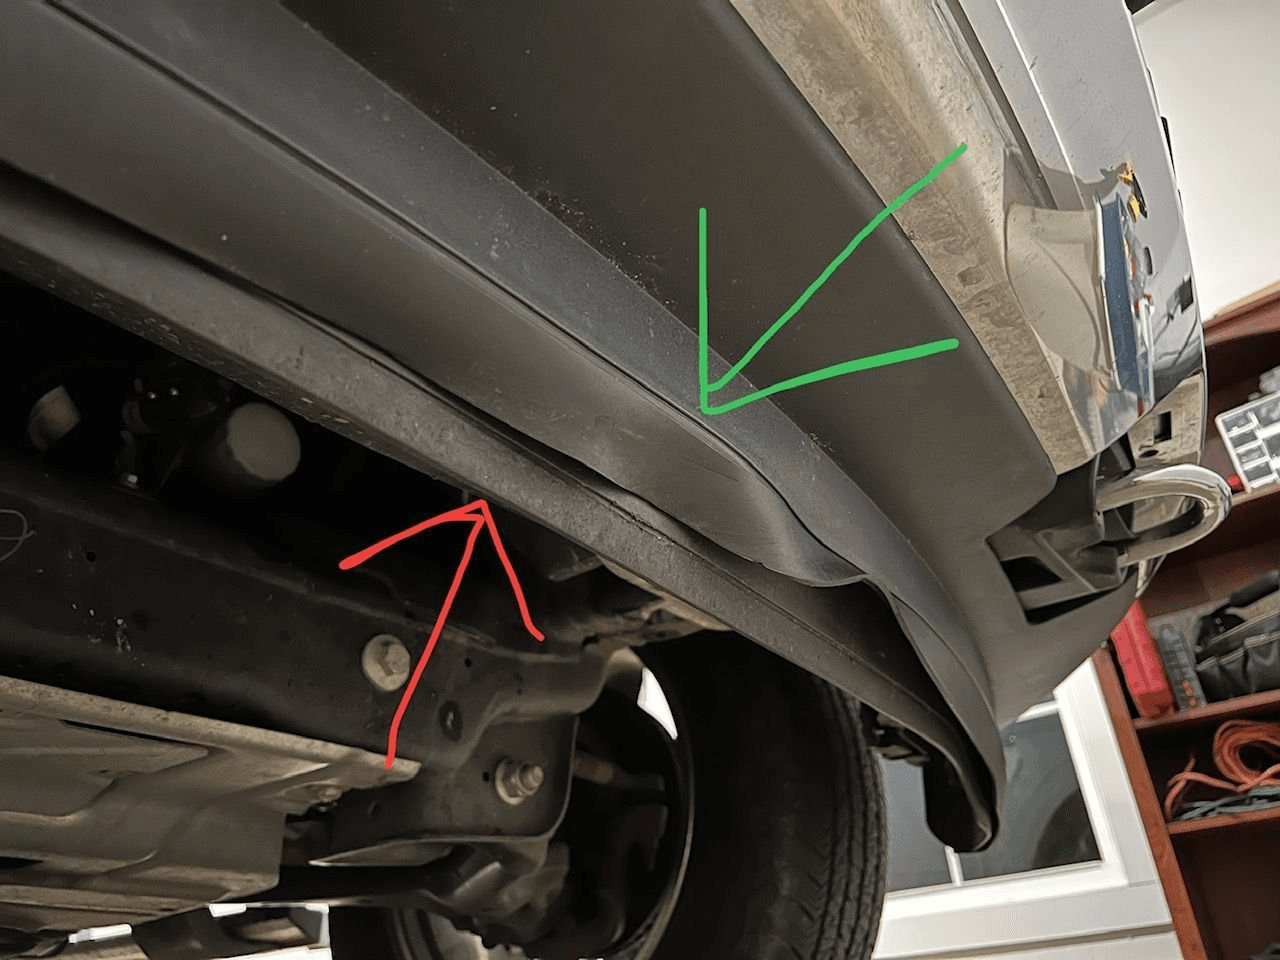
Road salt, mud, ice, and small stones frequently pack into the pivot points of the active air dam mechanism. Safely raise the front end of your truck using a floor jack and jack stands to gain clear access beneath the bumper. Visually inspect the hinge points and the plastic spoiler blade for any foreign objects that might block movement. Try to gently move the air dam by hand to check for mechanical binding. If the linkage feels completely rigid or grinds when moved, the problem is likely physical rather than electrical.
Checking Fuses and Electrical Connections
Electrical power issues are a primary culprit behind active air dam failures on modern F-150s. Locate your truck power distribution box under the hood and consult your manual to find the specific fuse dedicated to the active grille shutter and air dam motor system. Pull the fuse and inspect the metal filament for signs of a break. Next, crawl underneath and locate the wiring harness plug that connects directly to the air dam actuator motor. Unplug the connector, check for corrosion or bent pins, and use a multimeter to verify that power is reaching the harness when the ignition is turned on.
Ford F-150 Active Air Dam System Fault: What Causes It and How to Fix It
The active air dam system on modern Ford F-150 trucks is designed to improve fuel economy at highway speeds by automatically extending downward, then retracting at lower speeds or when off-roading. However, road debris, ice buildup, and electrical glitches can trigger an annoying “Active Air Dam System Fault” message on your instrument cluster. This comprehensive troubleshooting guide will walk you through diagnosing, clearing, and repairing the system yourself so you can restore normal operation and clear that pesky dashboard warning.
Step 1: Perform a Visual Inspection for Physical Obstructions
What you need: A flashlight, work gloves, and a flat-head screwdriver or plastic trim removal tool.
Instructions: Safely park your F-150 on a flat surface, engage the parking brake, and turn off the ignition. Crouch down at the front bumper and use your flashlight to thoroughly inspect the active air dam assembly located beneath the front valance. Look closely for trapped road debris, packed mud, ice sheets, or bent plastic louvers that might prevent the spoiler from completing its full range of motion. If you spot twigs, rocks, or winter ice packed tightly into the hinge mechanisms or motor housing, gently pry them out using your fingers or a plastic tool. Never use metal screwdrivers directly against the wiring harness or plastic actuator arms.
Pro Tip: During winter months, freezing rain and slush can instantly lock the air dam in place. Always run your truck through a car wash with an undercarriage spray or use warm water to thaw ice before assuming you have a dead motor.
Step 2: Inspect and Clean the Electrical Connector
What you need: Electrical contact cleaner spray and a microfiber towel.
Instructions: Locate the primary wiring harness plug that connects to the active air dam control module and electric motor, typically found tucked securely behind the front bumper fascia near the driver side of the assembly. Press down on the locking tab and gently pull the connector apart to inspect the interior metal pins. Look for signs of green corrosion, road salt accumulation, or bent pins caused by heavy vibration or minor front-end bumps. Spray a generous amount of electrical contact cleaner into both sides of the connector to dissolve contaminants, wipe them clean with a microfiber towel, and push the plug back together until you hear a distinct audible click.
Pro Tip: Apply a small dab of dielectric grease to the inside of the electrical connector before plugging it back in to create a permanent moisture barrier against future rain and road salt corrosion.
Step 3: Check Fuses and Relay Integrity
What you need: Owner’s manual, a digital multimeter or test light, and needle-nose pliers.
Instructions: Open the hood and locate the main under-hood power distribution box (fuse panel). Refer to your Ford F-150 owner’s manual diagram to identify the specific fuse dedicated to the active air dam module or front active grille shutters, which often share a circuit. Use your needle-nose pliers to carefully pull the fuse straight up out of its slot. Inspect the thin internal metal filament inside the transparent plastic housing; if the wire is broken or charred, the fuse is blown. Use a digital multimeter set to continuity mode to double-check the fuse, and replace it with a brand-new fuse matching the exact same amperage rating if it is faulty.
Pro Tip: If you replace a blown fuse and it blows again immediately upon turning on the ignition, stop testing and look for a pinched or exposed wire rubbing against the metal truck frame.
Step 4: Manually Test and Lubricate the Hinge Pivots
What you need: Silicone spray lubricant or dry PTFE lubricant (avoid grease that attracts dirt).
Instructions: With the truck turned off, manually grasp the plastic air dam blade and gently try to pivot or swing it through its intended operational arc. It should move with light resistance but without binding, grinding, or sticking halfway. If the mechanism feels dry or squeaks loudly, spray a specialized silicone-based or dry PTFE lubricant directly onto the pivot joints, hinge points, and sliding tracks. Manually cycle the air dam up and down four to five times by hand to thoroughly work the lubricant deep into the internal pivot bushings, ensuring completely smooth mechanical travel.
Pro Tip: Avoid using petroleum-based greases like WD-40 or lithium grease on the air dam pivots, because they will act as a magnet for dust, sand, and mud, eventually locking the system up permanently.
Step 5: Reset the Module Using an OBD-II Diagnostic Scanner
What you need: An advanced OBD-II scanner capable of clearing manufacturer-specific body control module (BCM) fault codes.
Instructions: Plug your diagnostic scan tool into the OBD-II port located underneath the driver-side dashboard near the steering column. Turn your truck’s ignition switch to the “On” position without starting the engine. Navigate through your scanner menu to perform an “Auto Scan” of all vehicle modules. Locate the Powertrain Control Module (PCM) and Body Control Module (BCM) to read any stored active air dam diagnostic trouble codes (DTCs), such as communication errors or motor circuit faults. Once you have documented the codes, select the “Clear Trouble Codes” option to reset the system memory and wipe the fault from the computer.
Step 6: Perform a Key Cycle Calibration Test
What you need: No tools required for this step.
Instructions: Disconnect your OBD-II scanner and close all the truck doors. Turn the ignition completely off, remove the key fob from the vehicle (or step away if you have push-button start), and wait for approximately two full minutes to allow all electronic modules to go into a complete sleep state. Re-enter the truck and turn the ignition switch to the “Run” position. Watch and listen carefully at the front of the truck; the active air dam system should automatically execute a self-calibration routine, dropping down and retracting back up to verify its upper and lower travel limits.
✅ Final Checklist
- Front air dam is physically clear of mud, ice, and road debris
- Electrical wiring harness plug is clean, dry, and securely latched
- Fuses controlling the circuit are intact and delivering proper power
- Pivot points are well-lubricated with silicone and move smoothly by hand
- Dashboard fault warning message has completely disappeared after a module reset
Important Notes:
- Always ensure the vehicle is safely supported or parked on level ground before reaching underneath the front bumper.
- If the electric motor is burnt out or the internal plastic gears are stripped, the entire actuator assembly will need to be replaced by a qualified mechanic or dealership.
- Estimated repair time is 30 to 60 minutes, with a DIY cost range of $0 to $25 if only cleaning, fuses, or lubricants are needed. Professional replacement of a failed motor assembly typically costs between $300 and $600 including parts and labor.
Step-by-Step Instructions to Fix and Reset the Ford F150 Air Dam Motor
Replacing a Faulty Actuator Motor or Linkage
If you confirm the motor is receiving power but fails to move, the internal gears have likely stripped or the electric motor has failed. Disconnect the negative battery terminal before starting any electrical component replacement. Unbolt the mounting fasteners holding the actuator assembly to the frame. Carefully detach the mechanical linkage connecting the motor to the air dam blade. Install the new 2026-spec replacement motor, secure all mounting bolts, and reattach the linkage. Make sure the manual range of motion is completely free before reconnecting power.
Clearing the Fault Code and System Reset
After mechanical repairs or clearing a physical jam, the computer will often retain the fault code, keeping the system disabled. Plug a diagnostic OBD2 scanner capable of reading chassis codes into the port beneath your steering wheel. Scan for active manufacturer-specific powertrain or body control module codes related to the air dam. Use the scanner command menu to clear the diagnostic trouble codes. Alternatively, you can perform a hard module reset by disconnecting the vehicle battery for ten minutes, though an advanced scanner is more reliable for resetting active deployment limits.
Troubleshooting Wiring Harness Damage and Blown Fuses
When physical blockages and motor failures are ruled out, electrical issues are usually the root cause of an active air dam system fault in a Ford F-150. According to Ford powertrain service bulletins, harsh road salt, moisture intrusion, and low-hanging debris frequently compromise the vulnerable wiring harness located directly behind the front bumper.
Inspecting the Active Grille Shutter and Air Dam Harness
The control module communicates with the air dam through a dedicated wiring harness that is exposed to extreme elements. Technicians advise inspecting the entire length of the loom for chafing, exposed copper, or rodent damage. Corrosion inside the primary multi-pin electrical connector is another common trigger for diagnostic trouble codes.
- Safely elevate the front end of your Ford F-150 and secure it with heavy-duty jack stands to ensure adequate workspace.
- Disconnect the negative battery terminal before probing any electrical connectors to prevent accidental short circuits or module damage.
- Locate the main electrical connector near the lower valance motor and inspect the terminal pins for green corrosion, moisture, or bent contacts.
- Clean any detected corrosion using electrical contact cleaner and apply a thin layer of dielectric grease before reconnecting the harness securely.
Checking and Replacing Fuses
An electrical surge or a stalled motor drawing excessive current will quickly blow the dedicated fuse protecting the active front spoiler system. Consult your 2026 Ford F-150 owner manual to locate the specific fuse box—typically situated under the hood in the Power Distribution Box. Verify the continuity of the designated fuse using a digital multimeter. If the internal metal filament is broken, replace it strictly with a fuse matching the exact amperage rating specified by the manufacturer to prevent wiring meltdowns.
What If It Still Doesn’t Work and How to Bypass the System
If clearing debris, resetting the module, and repairing wiring harnesses fail to clear the active air dam fault, deeper hardware failures are likely present. Persistent faults usually point to an internally fried control board within the motor assembly or permanent mechanical gear stripping. Professional dealership service centers utilize specialized Ford FDRS diagnostic software to command the module and pinpoint exact communication failures.

If you prefer a permanent workaround to avoid recurring dashboard chimes and warning messages, consider these fallback options:
- Professional Module Reprogramming: Visit a certified dealership or independent shop equipped with Ford-specific diagnostic tools to flash the Powertrain Control Module (PCM) with the latest 2026 calibration updates. Professional diagnosis typically ranges from $150 to $250.
- Complete Actuator Assembly Replacement: If the internal motor gears are stripped beyond repair, the entire active air dam assembly must be replaced. Parts and labor costs generally range between $400 and $750 depending on regional labor rates.
- Software Deactivation: Some truck owners use advanced OBD-II diagnostic tools like FORScan to permanently disable the active air dam feature in the truck’s computer configuration, eliminating the persistent dash warning.
- Manual Removal: For those who frequently drive off-road, completely removing the valance and securing the electrical connector with a dummy resistor or cover plate prevents further mechanical damage.
Conclusion
Fixing an active air dam system fault on a Ford F-150 requires a systematic approach, starting from simple debris removal to electrical harness inspection and module resets. Addressing this issue promptly restores optimal aerodynamics and fuel efficiency while eliminating annoying dashboard alerts. According to verified research and automotive service data, proactive electrical maintenance prevents premature motor failure in modern truck active aero systems. Your best next step is to scan your truck for diagnostic trouble codes using an OBD-II scanner to isolate the exact electrical circuit requiring attention.
❓ Frequently Asked Questions
How do I troubleshoot a stuck active air dam on my F-150?
Start by safely jacking up the front of the truck to inspect the spoiler mechanism. Look for rocks, ice, or packed mud that could prevent the mechanical arms from deploying or retracting fully.
Will a standard OBD2 scanner clear the air dam fault?
Basic generic OBD2 scanners only read powertrain codes (P-codes). To clear an active air dam fault, you need an advanced diagnostic scanner that supports Body Control Module (BCM) diagnostics.
How much does it cost to replace a Ford F-150 active air dam motor?
If the electric motor itself has burned out, a dealership replacement typically costs between $350 and $600 including labor, while DIY replacement saves significantly on labor costs.
Can winter weather cause the active air dam to fault?
Yes, freezing rain, slush, and packed snow frequently freeze the mechanical hinges or infiltrate the motor housing, causing the vehicle’s computer to detect a resistance fault.
Is the active air dam covered under the Ford factory warranty?
The active air dam system is generally covered under the 3-year/36,000-mile bumper-to-bumper factory warranty, provided the damage is not due to an off-road collision or impact.
How do I manually retract a stuck air dam?
You can carefully unbolt the actuator linkage or gently push the spoiler upward into the safe storage position, securing it with heavy-duty zip ties temporarily until a proper repair can be performed.