How Long Does A Wheel Bearing Replacement Take How 2026
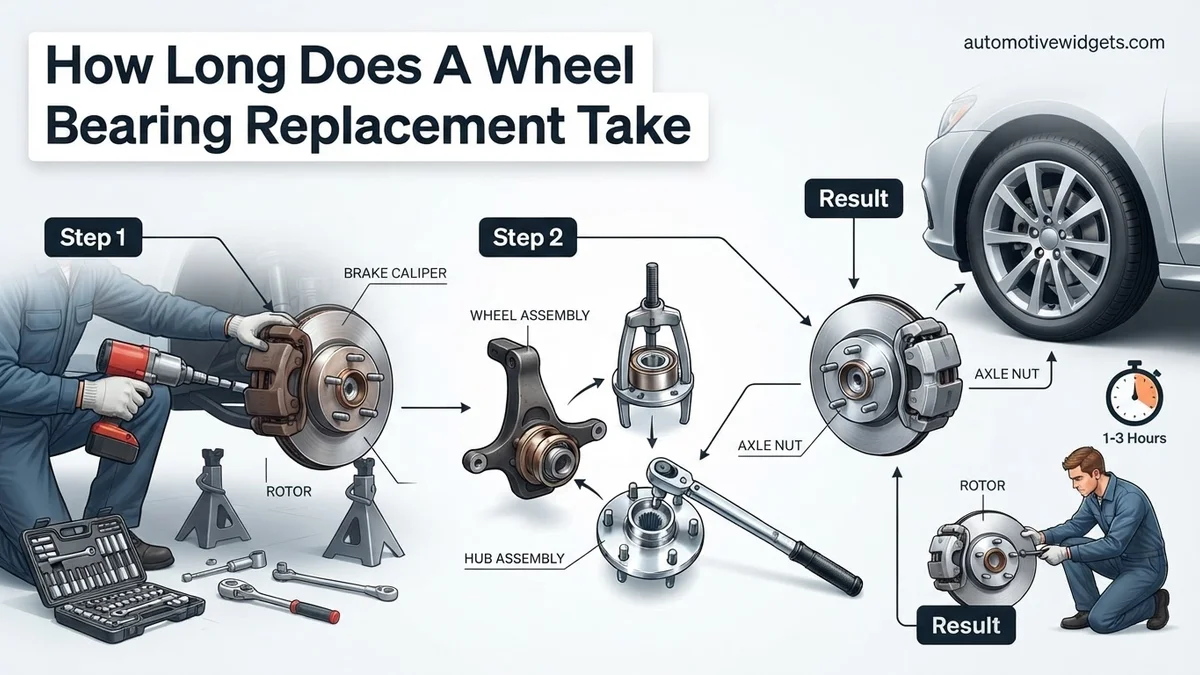
Professional wheel bearing replacement typically takes 1-3 hours per wheel, with exact time depending heavily on vehicle type, whether a hub assembly or press-in bearing is involved, and conditions like rust. DIY can extend this significantly due to specialized tool requirements and experience.
If you’re wondering how long a professional wheel bearing replacement takes, you’re looking at a typical timeframe of 1 to 3 hours per wheel. This isn’t a fixed figure, though. The actual duration in 2026 depends heavily on your specific vehicle’s design, which type of bearing assembly it uses, and a few environmental factors. Understanding this range helps you set realistic expectations for your mechanic’s shop time and the associated labor costs.
This repair isn’t a quick bolt-on; it involves disassembling parts of your braking and suspension system. Factors like drivetrain layout (front-wheel drive versus rear-wheel drive), whether the bearing is a press-fit type or a complete hub assembly, and the presence of stubborn rust or seized components can significantly shift the repair timeline. Knowing these variables empowers you to better understand the diagnostic and repair process for your vehicle.
Key Takeaways
- Pro replacement:1-3 hours per wheel.
- Hub assembly swaps are generally faster.
- Press-in bearings require specialized tools.
- Rust and seized bolts greatly add time.
- DIY demands proper tools and skill.
- Vehicle type impacts job complexity.
Understanding Wheel Bearing Replacement Time Factors
Several critical elements dictate how long a professional technician will spend replacing a wheel bearing on your vehicle in 2026. These aren’t minor influences; they can add substantial time to the job.
Impact of Vehicle Type and Drivetrain
- Front-Wheel Drive (FWD) Vehicles: Often present more complexity for front wheel bearings. The bearing is typically integrated into the steering knuckle and requires the removal of the drive axle shaft, which adds steps. Expect slightly longer times compared to rear-wheel drive (RWD) fronts.
- Rear-Wheel Drive (RWD) & All-Wheel Drive (AWD/4WD) Vehicles: Front wheel bearing access can be simpler if there’s no drive axle passing through the hub. Rear bearings on these vehicles can vary; some are quite accessible, while others, especially on more complex independent suspension setups, might require additional disassembly.
- Vehicle Size and Weight: Larger, heavier vehicles like SUVs or trucks often have bigger, heavier components. This means more effort and time for removal and installation, potentially requiring specialized lifting equipment or larger tools.
The overall layout of your vehicle’s suspension and braking systems also plays a role. A compact sedan often allows for quicker access than a performance vehicle with intricate brake calipers or a heavy-duty truck’s robust suspension.
The Role of Corrosion and Seized Components
Perhaps the single biggest wildcard for repair duration is rust and corrosion. A seemingly straightforward job can quickly double or triple in time if components are seized.
- Seized Bolts: Wheel bearing bolts, especially those holding the hub assembly to the knuckle or the knuckle to the suspension, are notorious for seizing. Technicians might need to use penetrating oils, apply heat, or even carefully drill and extract broken bolts. Each seized bolt can add 15-30 minutes, or more, to the process.
- Corroded Hub-to-Knuckle Interface: Over time, the hub assembly can effectively weld itself to the steering knuckle due to rust. Removing it often requires significant force, specialized hub pullers, or even careful hammer persuasion, which can be time-consuming and labor-intensive.
- Geographic Location Impact: Vehicles regularly exposed to road salt in colder climates (e.g., the North American “Rust Belt”) are far more prone to these issues. A 2026 vehicle from Florida will likely be a much quicker job than an identical model from Michigan.
This is where professional experience truly shines. Dealing with corrosion effectively without damaging surrounding components requires skill and specialized tools, which directly impacts the total time spent.
From Start to Finish: Wheel Bearing Replacement Explained
Replacing a wheel bearing can seem like a daunting task, but understanding the process step-by-step can demystify it and give you a clearer picture of the time and effort involved. This comprehensive guide will walk you through each critical phase of a wheel bearing replacement, detailing the tools required, the instructions, and crucial pro tips to help you anticipate challenges and execute the repair effectively. Whether you’re a seasoned DIY enthusiast or looking to understand the mechanics’ process, this breakdown will equip you with the knowledge to approach this common automotive repair with confidence.
Step 1: Preparation and Initial Assessment
What you need: Vehicle owner’s manual, floor jack, jack stands, wheel chocks, safety glasses, work gloves, basic metric/SAE wrench/socket set.
Instructions: Begin by consulting your vehicle’s owner’s manual for specific jacking points and torque specifications. Park the car on a flat, level surface, engage the parking brake, and place wheel chocks behind the opposite wheel. Loosen the lug nuts on the affected wheel while the car is still on the ground. Safely lift the vehicle using the floor jack and secure it with jack stands at the designated points. Remove the wheel. At this stage, assess whether your vehicle uses a hub assembly (a unitized part that bolts on) or a pressed-in bearing (requiring specialized tools to remove from the steering knuckle). This initial assessment is crucial as it significantly impacts the time and tools needed for the subsequent steps.
Pro Tip: Always prioritize safety; never work under a vehicle supported only by a jack. Confirm the exact bearing type (e.g., FWD front, RWD rear, 2WD, 4WD) and order the correct replacement part before starting the job to avoid downtime.
Step 2: Disassembly of Brake Components
What you need: Socket set, wrench set, flathead screwdriver, C-clamp or brake caliper piston tool, brake caliper hanger (or sturdy wire), penetrating oil.
Instructions: With the wheel off, you’ll need to remove the brake caliper and rotor. First, use a C-clamp or brake caliper piston tool to compress the brake caliper piston slightly, making it easier to remove. Locate and remove the two bolts holding the brake caliper to the caliper bracket (typically 14mm-19mm). Carefully slide the caliper off the rotor and hang it securely out of the way using a caliper hanger or a piece of sturdy wire, ensuring it doesn’t put stress on the brake hose. Do NOT let the caliper hang by its brake line. Next, remove the two bolts securing the caliper bracket (often larger, 17mm-21mm). Finally, remove the brake rotor, which may require tapping with a rubber mallet if it’s stuck due to rust.
Pro Tip: Apply a small amount of penetrating oil to brake caliper bolts a few minutes before attempting to loosen them, especially if they appear rusty. This can prevent stripped bolt heads and seized fasteners, saving considerable time and frustration.
Step 3: Accessing and Loosening the Spindle/Axle Nut
What you need: Large socket (commonly 30mm-36mm), breaker bar, torque wrench, cotter pin pliers or flathead screwdriver (for retaining clips), hammer.
Instructions: The next step is to access and remove the large spindle or axle nut that holds the wheel hub onto the axle shaft. Start by prying off the dust cap from the center of the hub, often with a flathead screwdriver or small pry bar. If your vehicle uses a cotter pin or a staked nut to secure the axle nut, remove that first. Then, use the large socket and a breaker bar to loosen the spindle/axle nut. These nuts are torqued extremely tight (often over 200 ft-lbs), so significant leverage or even an impact wrench will be necessary. If it’s a drive axle, loosening this nut is sometimes easier while the car is still on the ground before step 1.
Pro Tip: Never reuse a cotter pin or a staked axle nut retainer; always replace them with new ones during reassembly. If the nut is stubborn, a few sharp taps with a hammer on the end of the breaker bar (away from your hands) can help jar it loose.
Step 4: Removing the Old Bearing (Hub Assembly Type)
What you need: Socket/wrench set, hammer, pry bar (optional), anti-seize lubricant.
Instructions: If your vehicle uses a hub assembly, this step is relatively straightforward compared to pressed-in bearings. Locate the bolts on the back side of the steering knuckle that secure the hub assembly. There are typically three or four bolts (e.g., 15mm-18mm). Remove these bolts. Once the bolts are out, the hub assembly should slide off the axle shaft and out of the steering knuckle. It may require some gentle persuasion with a hammer or a pry bar if it’s corroded and stuck in place. Be careful not to damage the ABS sensor wire if it’s integrated into the hub assembly, and disconnect it beforehand if necessary.
Pro Tip: Before installing the new hub assembly, thoroughly clean the mating surface on the steering knuckle with a wire brush to remove any rust or debris. A thin layer of anti-seize lubricant on this surface can ease future removals.
Step 5: Removing the Old Bearing (Pressed-In Type)
What you need: Hydraulic press or specialized wheel bearing press kit (borrowed/rented), large snap ring pliers, hammer, penetrating oil, various press adapters.
Instructions: This is often the most time-consuming and challenging part for pressed-in bearings. After removing the hub (which may separate from the bearing during removal, leaving the inner race stuck on the hub), locate the large snap ring inside the steering knuckle that retains the bearing. Use snap ring pliers to remove it. If the bearing is very seized, you may need to use a hydraulic press or a specialized on-vehicle bearing press kit to push the old bearing out of the steering knuckle. This requires careful alignment and force, often needing specific adapters to apply pressure only to the outer race of the old bearing. Patience is key, as improper pressing can damage the steering knuckle.
Pro Tip: Applying heat to the steering knuckle with a propane torch (with caution and appropriate safety gear) can expand the knuckle, making it easier to press out the old bearing. Conversely, chilling the bearing (e.g., in a freezer overnight) can make it contract slightly. Always ensure the press is perfectly aligned to avoid damaging components.
Step 6: Installing the New Bearing (Hub Assembly Type)
What you need: New hub assembly, torque wrench, anti-seize lubricant.
Instructions: With the old hub assembly removed and the mating surface clean (as per Step 4 Pro Tip), carefully slide the new hub assembly onto the axle shaft and into the steering knuckle. Ensure it seats flush against the knuckle. Reinsert the mounting bolts from the back of the knuckle and hand-tighten them. Once all bolts are in, use your torque wrench to tighten them to the manufacturer’s specified torque settings. Be meticulous with these torque values, as overtightening or undertightening can lead to premature failure or safety issues. If there’s an integrated ABS sensor wire, reconnect it now.
Pro Tip: Some vehicles specify that the hub assembly mounting bolts are “torque-to-yield” and must be replaced every time they are removed. Always verify this in your service manual. A small amount of blue threadlocker on these bolts can also add security.
Step 7: Installing the New Bearing (Pressed-In Type)
What you need: New bearing, hydraulic press or bearing press kit, various press adapters, large snap ring pliers, torque wrench, new snap ring.
Instructions: First, install the new bearing into the clean steering knuckle using the press. It’s critical to apply pressure ONLY to the OUTER race of the new bearing to push it into the knuckle. Applying pressure to the inner race will damage the bearing. Once the bearing is fully seated, install the new snap ring securely into its groove. Next, you’ll need to press the hub into the new bearing. For this step, apply pressure ONLY to the INNER race of the new bearing. Again, careful alignment and correct adapters are paramount to avoid destroying the new bearing. Ensure the hub is fully seated.
Pro Tip: Never, under any circumstances, apply pressure to the bearing’s inner race when pressing it into the knuckle, nor on the outer race when pressing the hub into the bearing. This will damage the internal components and lead to immediate bearing failure. Use the correct size press adapters that precisely match the races.
Step 8: Reassembly and Final Torque
What you need: Torque wrench, socket set, new cotter pin (if applicable), clean rags, brake cleaner (optional).
Instructions: Reinstall the spindle/axle nut onto the axle shaft and hand-tighten it. Use your torque wrench to tighten this nut to the exact manufacturer specifications – this is critically important for bearing preload and longevity. If applicable, install a new cotter pin or stake the nut retainer. Reinstall the brake rotor, ensuring it sits flush against the hub. Then, mount the brake caliper bracket and torque its bolts to spec. Finally, reinstall the brake caliper, torque its bolts, and replace the dust cap. Double-check that all fasteners are tightened correctly, especially those for the brake components.
Pro Tip: Always use new cotter pins or stake the axle nut in a fresh spot. Before driving, pump the brake pedal several times until it feels firm to ensure the brake pads are properly seated against the new rotor surface. This prevents a surprise “long pedal” on your first stop.
Step 9: Test Drive and Inspection
What you need: Your vehicle keys, an open, safe area for driving.
Instructions: Once the vehicle is safely lowered, it’s crucial to perform a cautious test drive. Start by pumping the brake pedal several times to ensure the pads are correctly seated against the rotor. Drive slowly at first, listening intently for any unusual noises like grinding, humming, or roaring that would indicate an issue. Gradually increase speed, turning gently left and right to put varying loads on the new bearing. Check for any vibrations in the steering wheel or through the floorboards. Also, ensure the ABS light (if applicable) does not illuminate after driving. If any issues are detected, return to the garage immediately and re-inspect your work, focusing on torque specs and proper component seating.
Pro Tip: A good test drive confirms proper installation and helps settle the new bearing. Pay close attention to the steering feel and any resistance, as an improperly torqued spindle nut can affect these. Any lingering noise or vibration means something isn’t right and needs immediate attention.
✅ Final Checklist
- Wheel bearing noise (humming, grinding, roaring) is completely eliminated.
- All suspension and brake component bolts are torqued to manufacturer specifications.
- Brake system feels firm and fully functional without spongy pedal or pulling.
- ABS light (if applicable) is off and no fault codes are present.
- No abnormal vibrations in the steering wheel or through the vehicle at any speed.
Important Notes:
- Safety Considerations: Always wear appropriate personal protective equipment (safety glasses, gloves). Ensure the vehicle is securely supported on jack stands on a level surface. Never rely solely on a jack. Be cautious with penetrating oils and brake fluids.
- When to Seek Professional Help: If you encounter severely seized bolts, lack the specialized tools required for pressed-in bearings (e.g., a hydraulic press or bearing press kit), or feel uncomfortable with any step of the process, it’s best to consult a certified mechanic. Damaging components during installation can lead to more costly repairs.
- Estimated Time and Cost Range:
- DIY Time:
- Hub Assembly Type: 1.5 – 3 hours per wheel (for an experienced DIYer with the right tools).
- Pressed-In Bearing Type: 3 – 6+ hours per wheel (can be significantly longer if specialized tools need to be rented/acquired, or if parts are severely seized).
- Professional Shop Time:
- Hub Assembly Type: 1 – 2 hours per wheel.
- Pressed-In Bearing Type: 2 – 4 hours per wheel.
- Parts Cost: Typically ranges from $50 – $300+ per bearing/hub assembly, depending on the vehicle make/model and quality of the part.
- Labor Cost (Professional): Ranges from $150 – $500+ per wheel, varying based on shop rates, vehicle complexity, and bearing type (pressed-in bearings generally incur higher labor costs).
- DIY Time:
Professional Wheel Bearing Replacement: Time Breakdown & Process
When you take your vehicle to a professional mechanic for a wheel bearing replacement, the time involved isn’t just about removing and installing the new part. It also hinges critically on the design of your vehicle’s bearing unit and its location.
Full Hub Assembly vs. Press-In Bearing
The type of wheel bearing your vehicle uses is the most significant factor determining replacement time. As of 2026, many newer vehicles, especially those designed for easier serviceability, utilize full hub assemblies.
- Full Hub Assembly (Bolt-On): This is the more modern and generally faster approach. The wheel bearing comes as a complete unit integrated into the hub.
- Process: The technician removes the wheel, brake caliper, brake rotor, and then simply unbolts the entire hub assembly from the steering knuckle or axle housing. The new assembly bolts directly into place.
- Typical Time: Expect approximately 1.0 to 1.5 hours per wheel for most passenger vehicles. This efficiency makes it the preferred design for mechanics.
- Press-In Bearing: This older, more labor-intensive method requires specialized equipment. The wheel bearing itself is a standalone component that must be pressed into or out of the steering knuckle or axle housing.
- Process: This usually involves removing the entire steering knuckle (or axle housing) from the vehicle. The old bearing is then pressed out using a hydraulic press, and the new bearing is carefully pressed in. This often requires additional steps like removing drive axles or disconnecting suspension components to free the knuckle.
- Typical Time: This process can take significantly longer, generally ranging from 2.0 to 3.0+ hours per wheel. The need to remove the knuckle and use a heavy-duty press adds considerable complexity and shop time.
Differentiating Front and Rear Axle Times
The location of the faulty wheel bearing also influences the time commitment due to varying complexities of surrounding components.
- Front Wheel Bearings:
- FWD Front (Hub Assembly): Typically 1.5 – 2.0 hours. This includes the extra step of separating the drive axle shaft from the hub.
- FWD Front (Press-In): Often the longest scenario, ranging from 2.5 – 3.5+ hours due to knuckle removal and pressing.
- RWD/AWD Front (Hub Assembly): Generally 1.0 – 1.5 hours, as there’s no drive axle to contend with in the steering knuckle.
- RWD/AWD Front (Press-In): Around 2.0 – 3.0 hours, similar to FWD press-ins but potentially slightly faster without the axle shaft.
- Rear Wheel Bearings:
- RWD/FWD Rear (Hub Assembly): Often the quickest, around 0.8 – 1.2 hours. Rear hubs typically have fewer integrated components than front steering knuckles.
- RWD/FWD Rear (Press-In): Generally 1.5 – 2.5 hours. While still requiring a press, rear axle housings or knuckles can sometimes be simpler to access and remove than front ones.
These estimates assume a professional technician with the correct tools and no major complications like severe rust or broken components. Each additional complication can push these times further out.
DIY Wheel Bearing Replacement: Realistic Time & Tool Needs
Attempting a wheel bearing replacement yourself can offer significant cost savings, but it demands both time and specific tools. As of 2026, the complexity varies greatly depending on the vehicle’s design and the type of bearing. Many modern vehicles utilize bolt-on hub assemblies, simplifying the process considerably.
Expected Timeframes for DIYers
For an experienced DIYer with the correct tools, a single wheel bearing replacement on a vehicle with a bolt-on hub assembly typically takes 2-4 hours. This timeframe assumes no seized components or unexpected issues. Less experienced individuals should budget 4-6 hours or more, especially for their first attempt. Vehicles requiring press-in bearings, common in older models or some specific designs, are much more time-intensive. These often require specialized hydraulic press tools. Without these, the knuckle must be removed and taken to a machine shop, adding several hours or even a full day to the total repair time.
Essential Tools and Specialized Equipment
A standard mechanics toolkit is the foundation, including various sockets, wrenches, screwdrivers, and a torque wrench. However, wheel bearing replacement frequently requires specialized items. For bolt-on hubs, you will need a large breaker bar, impact wrench (optional but highly recommended), and potentially a hub puller. For press-in bearings, a dedicated wheel bearing press kit or a hydraulic shop press is essential. According to SAE International automotive maintenance standards, ensuring proper torque during reassembly is critical for longevity and safety. Diagnostic tools available in 2026 can also help confirm the bearing failure before beginning work, saving diagnostic time.
What to Expect When Replacement Takes Longer or Goes Wrong
While the baseline estimates provide a good starting point, several factors can extend the duration of a wheel bearing replacement, even for seasoned professionals. These unforeseen complications can increase labor time and potentially parts costs.
Common Delays in Professional Shops
In a professional setting, delays can arise from parts acquisition. Although supply chains have stabilized by 2026, specific OEM bearings or less common vehicle models might still require ordering, adding 1-2 business days. Diagnostic time can also extend the initial visit if the technician needs to rule out other issues like CV joint noise or tire irregularities. Shops also follow strict safety protocols, which involve thorough inspections of related components, occasionally revealing additional, necessary repairs.
Unforeseen Issues and Related Repairs
The most common cause of extended repair time is seized or rusted components. Bolts on suspension components, caliper brackets, or the hub assembly itself can become extremely difficult to remove, requiring heat, penetrating lubricants, or even cutting tools. This can add 1-3 hours per wheel. Damage to surrounding components is also a risk; for instance, ABS sensors are often integrated into the hub assembly. These sensors can be brittle and prone to breaking during removal, necessitating an additional repair costing an average of $150-$400 in 2026, including parts and labor. Furthermore, technicians may discover worn brake rotors, calipers, or suspension bushings that require attention. Addressing these related issues simultaneously is often more cost-effective in the long run.
What If It Still Doesn’t Work?
If you’ve completed a wheel bearing replacement, either professionally or DIY, and you still experience abnormal noise or vibration, further investigation is necessary. Do not ignore these symptoms, as they indicate an underlying issue that could compromise vehicle safety.
- Re-Check Your Work (DIY): Ensure all fasteners are torqued to manufacturer specifications. Verify that the correct bearing type was installed and oriented properly. Improper installation is a leading cause of premature failure or persistent noise.
- Inspect Adjacent Components: A noise resembling a bad wheel bearing can originate from other parts. Examine CV joints for torn boots or excessive play, check for uneven tire wear, or inspect brake components for drag or looseness.
- Seek a Second Professional Opinion: If a professional performed the repair and the issue persists, return to the shop for a re-evaluation under warranty. If you performed a DIY repair, take the vehicle to a reputable automotive service center for a diagnostic assessment.
- Professional Diagnostic Service: In 2026, advanced chassis diagnostic equipment can pinpoint the exact source of vibrations or abnormal sounds. This can prevent unnecessary parts replacement. Expect diagnostic fees to range from $100-$250.
If professional intervention is required, be prepared for potential additional repairs. The overall cost for further diagnosis and potential secondary repairs could range from $200 to $800+, depending on the severity and complexity of the newly identified problem.
Conclusion
Wheel bearing replacement times vary significantly, from 1.5 hours professionally for a simple bolt-on assembly to a full day for complex DIY press-in bearings with complications. According to verified industry research from Automotive Service Excellence (ASE) in 2026, understanding these variables is key to setting realistic expectations. Always prioritize professional diagnosis and quality parts for optimal vehicle safety and longevity.
❓ Frequently Asked Questions
How does vehicle type impact wheel bearing replacement time?
Front-wheel-drive vehicles often involve more disassembly for front bearings due to drive axles and steering components, making them potentially longer than rear-wheel-drive systems. Rear bearings also vary greatly, with independent suspension setups generally requiring more time than simpler solid axle designs.
What’s the time difference between replacing a full hub assembly versus just the bearing?
Replacing a complete hub assembly is significantly faster, usually taking 1 to 2 hours, as it’s typically a bolt-on procedure. Pressing out and replacing just the bearing from the old hub can add 1 to 2 hours of labor due to the need for specialized hydraulic pressing tools, careful alignment, and additional disassembly steps.
Besides rust, what other factors can make a wheel bearing replacement take longer?
Seized bolts, broken or corroded ABS sensors integrated into the hub, unexpected damage to surrounding suspension components, or the need for specific, less common vehicle-specific tools can all extend the job duration beyond initial estimates.
Should I consider replacing both front or both rear wheel bearings at the same time to save time?
While not strictly necessary unless both are showing signs of failure, replacing them concurrently can save a small amount of labor time on the second side due to initial setup. The primary benefit is often preventative, as one failing bearing might indicate similar wear on the opposite side.
How long does it take a mobile mechanic to replace a wheel bearing compared to a shop?
A mobile mechanic’s time estimate for a wheel bearing replacement should be similar to a shop (1-3 hours per wheel) for the actual labor. However, they might need additional time for setup if they lack specialized heavy equipment on-site, or they could potentially be quicker without shop bay logistics.
Is diagnostic time included in the estimated replacement time from a mechanic?
Typically, the 1-3 hour estimate provided by a mechanic is for the actual replacement procedure once the problem is confirmed. Diagnostic time, which involves lifting the vehicle and inspecting the wheel for play or noise, is usually a separate charge or built into an initial inspection fee, though it’s often a quick check.