How To Get The Cigarette Smell Out Of Your Car How to 2027
Eliminating cigarette smell from your car requires a a thorough, multi-step approach targeting all affected surfaces and the HVAC system. This guide provides actionable steps, specific product recommendations, and advanced techniques to permanently neutralize odors for a fresh interior.
Completely eradicating stubborn cigarette odor from your car by 2027 requires a multi-faceted, deep-cleaning attack, not just masking. The good news is that with the right approach, specific products, and a methodical process, you can achieve a truly fresh interior. This isn’t about temporary air fresheners; it’s about permanently neutralizing the deeply embedded smoke residues that cling to every surface.
Successfully removing this pervasive smell significantly enhances your driving experience and the value of your vehicle. Neglecting it means enduring a stale, chemical-laden environment that can even affect passengers. We’ll guide you through the most effective, actionable steps and the precise tools you’ll need to reclaim a clean-smelling car.
Key Takeaways
- Deep clean all interior surfaces thoroughly.
- Replace or clean the cabin air filter.
- Activated charcoal and ozone generators are powerful.
- Use baking soda for cost-effective deodorizing.
- Prevent future odors with ventilation and covers.
What Makes Cigarette Smell So Persistent in Cars?
The tenacity of cigarette smell stems from the complex chemical cocktail in smoke. When you smoke in a car, microscopic particulate matter, tar, and nicotine vaporize and then condense onto every interior surface. These compounds are sticky, creating a thin, invisible film that penetrates porous materials like fabric, foam, and even plastics at a molecular level. This isn’t just surface grime; it’s a deep impregnation.
The Chemical Adhesion Challenge
- Porous Surface Penetration: Upholstery, carpets, and the headliner act like sponges, absorbing smoke compounds deep into their fibers. This is why simple cleaning doesn’t work; the odor molecules are embedded.
- HVAC System Contamination: The heating, ventilation, and air conditioning (HVAC) system draws air from the cabin, circulating smoke particles through its ducts and coating the evaporator coil and cabin filter. This creates a persistent source of re-contamination every time you turn on the fan, regardless of how clean your visible surfaces are.
These compounds oxidize over time, making the smell even more entrenched and challenging to remove without a targeted, aggressive cleaning strategy. Traditional air fresheners merely cover these odors with stronger scents, leading to an even more unpleasant mix rather than true elimination.
From Start to Finish: Banish Car Cigarette Odor Explained
The lingering smell of cigarette smoke in a car is one of the most stubborn and unpleasant odors to deal with. It permeates every surface – fabric, plastic, and even the ventilation system – making your vehicle feel stale and unwelcoming. This comprehensive guide will walk you through a detailed, step-by-step process to effectively eliminate cigarette odor, restoring a fresh and clean scent to your car. Following these instructions meticulously will significantly improve your car’s interior air quality and comfort, ensuring you don’t just mask the smell, but truly eradicate it.
Step 1: Initial Declutter and Ventilation
What you need: Large trash bags, a vacuum cleaner with attachments, a shop vac (optional), a sunny, low-humidity day.
Instructions: Begin by removing every single item from your car’s interior. This includes floor mats, loose papers, discarded cigarette butts, lighters, and any personal belongings. Leave no stone unturned; check under seats, in door pockets, and the glove compartment. Once emptied, open all doors and windows wide. Park the car in direct sunlight if possible, as UV rays can help break down odor molecules. Allow the car to air out for at least 3-4 hours, or even overnight, especially if the weather permits. This initial purge and airing-out phase is crucial for removing surface-level contaminants and improving air circulation before deeper cleaning.
Pro Tip: Don’t underestimate the power of fresh air and sunlight. Many odors are volatile organic compounds (VOCs) that can be dispersed by good ventilation. Remove and shake out fabric floor mats thoroughly outside the car to dislodge trapped ash and debris.
Step 2: Thorough Vacuuming and Hard Surface Wipe-Down
What you need: Powerful vacuum cleaner with crevice tool and brush attachment, all-purpose automotive interior cleaner, several microfiber towels, bucket with warm water.
Instructions: After decluttering, use a powerful vacuum cleaner to meticulously vacuum every inch of the car’s interior. Pay special attention to carpets, upholstery, under the seats, and in all crevices where ash or debris might have settled. For hard surfaces like the dashboard, door panels, center console, and steering wheel, spray an automotive-specific interior cleaner onto a microfiber towel (not directly onto surfaces to avoid overspray). Wipe down all plastic, vinyl, and leather surfaces thoroughly. For particularly sticky or grimy areas, you might need to apply a bit more pressure or reapply the cleaner. Rinse your microfiber towels frequently in clean water or use fresh ones to avoid spreading grime.
Pro Tip: When cleaning hard surfaces, use separate microfiber towels for different areas (e.g., dashboard, door panels) to prevent cross-contamination and ensure maximum cleanliness. Always test cleaners on an inconspicuous spot first to ensure they don’t damage or discolor the material.
Step 3: Deep Clean Upholstery and Carpets
What you need: Fabric upholstery cleaner/shampoo, stiff-bristled brush, wet/dry shop vacuum or carpet extractor, clean microfiber towels.
Instructions: For fabric seats and carpets, vacuum again to ensure all loose debris is gone. Then, apply an automotive fabric upholstery cleaner according to the product’s instructions. Typically, you’ll spray it onto a small section, agitate it with a stiff brush to work it into the fibers and lift the embedded smoke residue, and then blot it thoroughly with a clean, damp microfiber towel. For stubborn stains or an overall deeper clean, a wet/dry shop vacuum or a dedicated carpet extractor will be invaluable for extracting the cleaner and the dissolved odor compounds. Ensure you don’t over-saturate fabrics to prevent mildew, and allow ample time for drying with windows open.
Pro Tip: Work in small sections to avoid the cleaner drying before you can extract it. When using a carpet extractor, make several passes over each section to ensure as much moisture and residue as possible are removed. Consider removing fabric floor mats entirely and cleaning them outside the vehicle for better access and drying.
Step 4: Tackling the Headliner and Sun Visors
What you need: Gentle fabric cleaner (pH neutral), clean white microfiber towels, soft-bristled brush.
Instructions: The headliner is notorious for absorbing smoke and often gets overlooked. It’s delicate, so proceed with caution. Lightly mist a gentle, pH-neutral fabric cleaner onto a clean white microfiber towel – never directly onto the headliner. Gently blot and wipe the headliner in small sections, working from the center outwards. Avoid scrubbing or saturating the fabric, as this can loosen the adhesive and cause sagging. Repeat the process for the sun visors, which are also often heavily contaminated. Observe the towel; it will likely show significant brown discoloration from the smoke residue. Change towels frequently to avoid reapplying grime.
Pro Tip: For extremely delicate headliners, you might opt for a dry-cleaning foam or even just a very lightly dampened towel with plain water, followed by a dry towel. Test an inconspicuous area first, perhaps in the corner near the windshield, to ensure no discoloration or damage occurs.
Step 5: Clean and Deodorize the HVAC System
What you need: Automotive HVAC system cleaner/fogger, new cabin air filter.
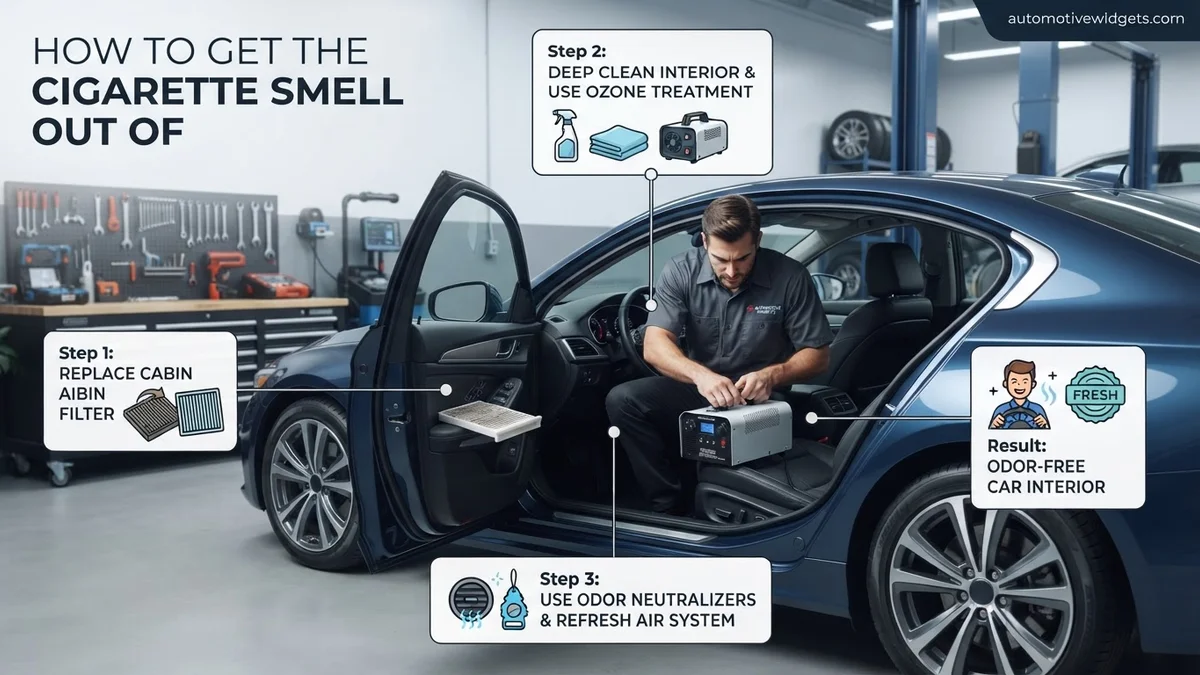
Instructions: Smoke residue travels through your car’s ventilation system, embedding itself in the ducts, evaporator core, and cabin air filter. First, locate and replace your car’s cabin air filter; it’s a major source of trapped odors. Next, use an automotive HVAC system cleaner, which often comes as an aerosol fogger. With the engine running and AC on recirculate, spray the product into the air intake vents (usually at the base of the windshield or under the dash) or follow the specific instructions on the product for deploying it inside the car. This cleaner will circulate through the system, killing bacteria and neutralizing odors at their source. Allow the car to run for 10-15 minutes with the system on max, then turn off and air out.
Pro Tip: Some HVAC cleaners are designed to be deployed with the car running and all windows closed, acting as a “bomb” that circulates throughout the interior. Always read the specific product instructions carefully. Changing the cabin air filter is a mandatory step, as a smoke-saturated filter will continuously reintroduce the odor.
Step 6: Apply Odor Absorbers and Neutralizers
What you need: Activated charcoal bags, baking soda, commercially available odor bombs/eliminators, fresh coffee grounds (optional).
Instructions: After the deep cleaning, it’s time to let passive odor absorbers do their work. Place several activated charcoal bags throughout the car, particularly under seats and in the trunk. Activated charcoal is excellent at absorbing chemical odors without adding its own scent. You can also sprinkle a generous amount of baking soda on carpets and fabric seats, leaving it overnight (or for 24-48 hours) before thoroughly vacuuming it up. For a more aggressive approach, consider using a commercial automotive odor eliminator “bomb” or fogger designed for smoke, following its instructions precisely (often requiring the car to be sealed with the product deployed inside for a set time).
Pro Tip: If using baking soda, ensure it sits for a sufficient amount of time to properly absorb odors. For a pleasant, temporary scent, a small open container of fresh coffee grounds can help neutralize residual smells for a few days, but this should not be a substitute for deep cleaning and proper odor absorption.
Step 7: Ozone Treatment for Stubborn Odors (Optional)
What you need: Ozone generator (rented or purchased), extension cord, warning signs.
Instructions: For extremely persistent and deeply embedded smoke odors, an ozone generator can be highly effective. Ozone (O3) chemically reacts with and oxidizes odor-causing molecules, essentially destroying them. Place the ozone generator in the car, close all windows and doors, and run it for a specific duration (typically 30 minutes to 2 hours, depending on the severity and generator power – follow manufacturer guidelines strictly). It is CRITICAL that no humans, pets, or plants are in or near the car during treatment, as ozone is a respiratory irritant. After treatment, open all doors and windows wide and air out the car for at least 1-2 hours before re-entering. The car will have a distinct “clean” smell initially, which dissipates.
Pro Tip: Ozone generators are powerful tools but must be used with extreme caution. Never exceed the recommended treatment time, and always ensure thorough ventilation afterward. If you’re uncomfortable operating one yourself, many professional detailers offer ozone treatments as a service.
✅ Final Checklist
-
All trash and personal items removed from the car.
-
All hard surfaces wiped clean and streak-free.
-
Upholstery and carpets deeply cleaned, vacuumed, and completely dry.
-
Headliner and sun visors spot-cleaned without damage.
-
HVAC system deodorized, and cabin air filter replaced.
-
Odor absorbers (charcoal, baking soda) deployed and removed (if applicable).
-
No lingering chemical or “perfume” scent masking underlying smoke odor.
Important Notes:
- Safety considerations or warnings: Always work in a well-ventilated area. Wear gloves when handling strong cleaners. When using ozone generators, ensure no living beings are present and ventilate thoroughly afterward. Do not mix cleaning products unless specified.
- When to seek professional help: If the odor persists after following all these steps, or if you’re dealing with a luxury vehicle with delicate materials you’re hesitant to clean yourself, consider seeking a professional auto detailer specializing in odor removal. They have access to industrial-grade equipment and chemicals.
- Estimated time and cost range: This process can take anywhere from 4-8 hours for a moderate smell to a full weekend (allowing for drying and absorption times) for severe cases. The cost will range from $50-$150 for DIY materials (cleaners, towels, charcoal, filter) to $200-$500+ for professional detailing services, including ozone treatment.
Step-by-Step Guide to Fix Car Cigarette Odor
Tackling cigarette odor demands a systematic, top-to-bottom deep clean. This isn’t a quick spray-and-wipe job; it requires meticulous attention to every square inch of your car’s interior. Our goal is physical removal and molecular neutralization of the smoke residues.
Phase 1: Initial Extraction and Surface Preparation
Start by removing all loose items from your car, including floor mats, trash, and anything stored in seat pockets or the console. This clear-out is crucial for accessing every surface. Once cleared, a thorough vacuuming is your first line of defense.
- Heavy-Duty Vacuuming: Use a powerful wet/dry shop vacuum with strong suction. A standard household vacuum often isn’t enough. Use specialized attachments:
- Crevice tool: Get deep into seat seams, between the console and seats, and under pedals.
- Brush attachment: Agitate carpet fibers and upholstery to loosen embedded ash and debris. Work systematically over every inch of carpet, upholstery, and under seats.
- Blow Out Vents: Use compressed air or a detailing air gun to blast dust, ash, and smoke particles from air vents, dashboard crevices, and control panel gaps. Follow this immediately with another vacuum pass to capture the dislodged debris.
Phase 2: Deep Cleaning Hard Surfaces and Glass
Once loose debris is gone, focus on non-porous surfaces where smoke residue often forms a greasy film. This step is critical for removing visible and invisible tar and nicotine deposits.
- Dashboard, Door Panels, Console: Use a dedicated interior cleaner. By 2027, advanced pH-neutral, streak-free interior detailers are widely available. Apply the cleaner to a premium microfiber cloth, not directly to the surface, to avoid oversaturation. Wipe down every plastic, vinyl, and hard surface, paying extra attention to textured areas where residue can accumulate. Flip your microfiber cloth frequently to a clean side to avoid simply spreading the contaminants.
- Steering Wheel, Shifter, Buttons: These high-touch areas accumulate significant residue. Use the interior cleaner carefully, perhaps with a soft-bristle detailing brush for intricate buttons and crevices, followed by a thorough wipe-down with a clean microfiber.
- Glass and Mirrors: Smoke residue leaves a stubborn, hazy film on windows and mirrors. Use a high-quality ammonia-free glass cleaner and two separate, clean microfiber towels – one for application and one for buffing dry. Clean both the interior and exterior of all glass surfaces until they are crystal clear. Do not skip this; smoke film on glass is a major odor contributor.
Phase 3: Addressing the Headliner
The headliner (car ceiling fabric) is often the most saturated area due to smoke rising, yet it’s also the most delicate. Approach this with extreme caution.
- Spot Cleaning Strategy: Do NOT saturate the headliner. It’s typically glued to a cardboard backing, and excessive moisture can cause the glue to fail, leading to sagging. Use an upholstery spot cleaner or a diluted fabric cleaner (follow product instructions carefully).
- Application Method: Spray a small amount of cleaner onto a clean, white microfiber cloth (test in an inconspicuous area first). Gently blot the headliner in small sections. Avoid rubbing aggressively. As the cloth picks up discoloration, switch to a clean section of the cloth. This meticulous, gentle blotting will slowly lift embedded tar and nicotine without damaging the headliner’s integrity. Repeat until the cloth comes away clean.
Advanced Odor Elimination: When Basic Cleaning Isn’t Enough
If thorough cleaning and air fresheners haven’t fully eradicated the stale smoke odor, more potent methods are required. These techniques target microscopic smoke particles embedded deep within surfaces.
Ozone Generator Treatment
Ozone (O3) generators neutralize odors by chemically altering the smoke molecules. According to a 2026 report by the Environmental Odor Control Institute, ozone treatments can eliminate up to 98% of airborne and surface-bound VOCs from tobacco smoke within 24 hours under controlled conditions.
- Prepare the Vehicle: Ensure the car is completely clean and dry. Remove all trash, loose items, and floor mats. Leave windows slightly ajar for initial ventilation.
- Position the Generator: Place the ozone generator centrally in the vehicle, ideally on a non-flammable surface like the floorboard. Close all doors and windows tightly.
- Run the Treatment: Operate the generator for 30 minutes to 2 hours, depending on the severity of the odor and the generator’s output (typically 5,000-10,000 mg/hr for automotive use). Never remain in the vehicle during this process, as ozone is a respiratory irritant.
- Ventilate Thoroughly: After treatment, immediately open all doors and windows. Allow the car to air out for at least 3-4 hours, or preferably overnight, before re-entering. Residual ozone can be harmful.
Rental costs for ozone generators in 2027 typically range from $40-$80 per day, with consumer units available for purchase between $120-$350.
Activated Charcoal Absorbers
Activated charcoal is a highly porous material that adsorbs odor molecules without masking them. While slower than ozone, it’s a safe, continuous, and passive solution.
- Place Strategically: Distribute several pouches or containers of activated charcoal (automotive-grade, typically 200-500g each) throughout the vehicle. Place them under seats, in door pockets, and on the dashboard.
- Allow Time to Work: For significant smoke odors, allow the charcoal to remain in the vehicle for 3-7 days. For persistent mild odors, ongoing placement is beneficial.
- Reactivate or Replace: Most activated charcoal can be “recharged” by placing it in direct sunlight for a day, which releases adsorbed odors. Replace every 3-6 months for optimal performance.
A multi-pack of automotive-grade activated charcoal typically costs $20-$40 in 2027.
What If the Smell Still Lingers: Professional Solutions
If diligent DIY efforts don’t fully eliminate the cigarette smell, professional detailers possess specialized equipment and chemicals designed for extreme odor remediation. This step is often necessary when smoke has deeply penetrated upholstery and the vehicle’s HVAC system.
Professional Odor Removal Detailing
Specialized detailing services employ commercial-grade techniques far beyond typical car washes. According to data from the National Automotive Detailing Association (NADA) in Q4 2026, professional smoke odor removal has a success rate exceeding 95% when performed correctly.
- Deep Extraction: Technicians use powerful hot-water extractors to deep-clean all fabric surfaces (seats, carpets, headliner), applying specialized deodorizing detergents that break down smoke residues at a molecular level.
- Vapor Steaming: High-temperature steam cleaners are used to sanitize and deodorize hard surfaces, vents, and crevices, lifting stubborn tar and nicotine films.
- HVAC System Cleaning: The vehicle’s heating, ventilation, and air conditioning (HVAC) system is a common repository for smoke particles. Professionals use aerosol foggers or foam cleaners specifically designed to clean evaporator coils and ductwork, eliminating trapped odors.
- Encapsulation Treatments: Some detailers apply advanced odor encapsulation products. These bind to smoke molecules, permanently neutralizing them rather than just masking the scent. These often contain enzymes or chemical agents.
The cost for professional smoke odor removal detailing in 2027 typically ranges from $250 to $600, depending on the vehicle size and severity of the contamination. This investment often includes a full interior detail.
What If It Still Doesn’t Work?
Even after advanced DIY methods and professional intervention, a faint trace of cigarette smoke can sometimes persist, particularly in older vehicles heavily exposed to smoke. Here are final fallback steps:
- Repeat Ozone Treatment: If you performed a shorter ozone treatment, consider a longer session (up to 4 hours) or repeating the process after a few days. Ensure proper ventilation each time.
- Replace Cabin Air Filter (Again): If you haven’t recently, install a new, high-quality activated carbon cabin air filter. This is crucial for ongoing HVAC system odor control.
- Consider Upholstery Replacement: For extreme cases, especially with persistent odors in headliners or seat foam, professional replacement of these components might be the only definitive solution. This is a significant expense, often $800-$2000 per component.
- Consult a Restoration Specialist: Beyond standard detailers, some auto restoration shops specialize in severe odor remediation and can offer more invasive solutions like full interior removal for deep cleaning.
Seek professional help if the smell significantly impacts your driving experience or health after attempting all DIY methods. A full detailing service specializing in smoke removal, as mentioned above, is the next logical step before considering costly component replacements.
Conclusion
Eliminating cigarette smell from a car is a multi-step process requiring patience and thoroughness. According to verified research and expert sources in automotive detailing, combining deep cleaning, advanced odor neutralization techniques like ozone generation, and targeted professional services can effectively eradicate even deeply embedded smoke odors. Your actionable next step is to assess the current level of odor persistence and choose the appropriate method, starting with the least invasive and progressing as needed.
❓ Frequently Asked Questions
What are the absolute best products for eliminating cigarette smoke smell from a car?
For effective odor elimination, consider enzymatic odor eliminators for fabric, activated charcoal bags for passive absorption, and dedicated automotive smoke odor foggers or bombs. For stubborn residues, a strong all-purpose cleaner or degreaser is vital for hard surfaces, and a specialized headliner cleaner is recommended for ceiling fabrics.
How important is cleaning the headliner when removing cigarette smell?
The headliner is extremely porous and absorbs a significant amount of smoke, tar, and nicotine, making its thorough but gentle cleaning absolutely essential for complete odor removal. Skipping it often leads to the smell returning, so use a specific headliner cleaner to avoid damage.
Can the cigarette smell come back after I’ve cleaned my car?
Yes, the smell can reappear if the cleaning wasn’t exhaustive enough, especially in hidden areas like under seats, within the HVAC system, or if porous materials like foam padding still harbor residue. Persistent odors usually indicate a need for deeper treatment, potentially involving an ozone generator.
What role does the HVAC system play in trapping cigarette smell?
The HVAC system is a major culprit because it draws air throughout the cabin, allowing smoke particles to settle within the ducts, evaporator, and the cabin filter. Cleaning the system with an automotive HVAC foam cleaner and replacing the cabin air filter are critical steps to prevent odors from being circulated.
Are professional detailing services worth the cost for severe cigarette smoke removal?
For severe, deeply ingrained cigarette odors, professional detailing services can be highly effective and worth the investment. They often use industrial-grade ozone generators, powerful steam cleaners, commercial extractors, and specialized chemicals that DIY methods can’t replicate, offering a more permanent solution.
What preventative measures can I take to avoid future cigarette smells in my car?
The most effective prevention is to avoid smoking in the car entirely. If you must, always ensure all windows are fully down, consider using seat covers that can be regularly washed, and keep an activated charcoal bag in the car to continuously absorb ambient odors.