How to Test an Alternator Without a Multimeter 2026
Diagnosing an alternator issue without a multimeter is possible using simple observations and tests. Learn practical methods like headlight and dashboard checks to identify a failing alternator and prevent further car trouble. These quick checks can help you decide your next steps.
You can reliably test your car’s alternator for proper function even without a multimeter. In 2026, quick, on-the-spot diagnostics are more important than ever, and knowing these non-traditional methods can save you from being stranded or incurring unnecessary repair costs. The key is to observe your vehicle’s electrical system behavior, listen for specific sounds, and perform a few simple checks that reveal whether your alternator is generating the necessary power.
Understanding these practical tests empowers you to diagnose potential issues rapidly, helping you decide if you need immediate professional attention or just a battery top-up. This knowledge is crucial for any car owner looking to maintain their vehicle efficiently and avoid costly guesswork, especially when you’re far from a mechanic or a diagnostic tool.
Key Takeaways
- Headlight dimming indicates a charging system issue.
- Dashboard battery light signals a critical problem.
- Engine sounds (whining) can reveal bearing wear.
- A bad alternator won’t be ‘fixed’ by jump-starting.
- Always ensure safety when performing under-hood checks.
What Are the Symptoms of a Failing Alternator (Diagnosis)
Before you begin any hands-on testing, recognizing the warning signs of a failing alternator is your first diagnostic step. These symptoms often appear subtly before escalating into more serious problems. Being attentive to these cues can help you identify an issue early and prevent your vehicle from failing to start.
Dashboard Warnings and Electrical Glitches
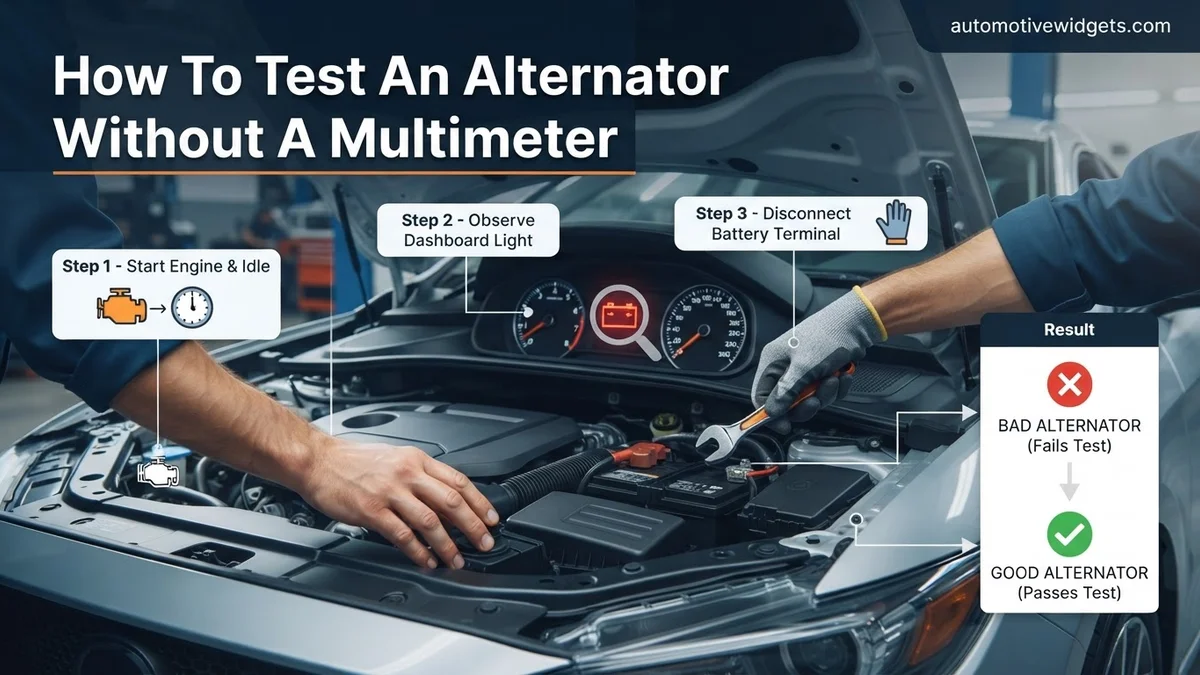
- Battery Warning Light: The most obvious indicator. If the battery light (often shaped like a car battery) illuminates on your dashboard, it almost always signals a problem with your car’s charging system, not necessarily the battery itself. In 2026 models, this light might even show a specific charging system malfunction code.
- Dimming or Flickering Lights: Your headlights, interior lights, or dashboard lights might appear dimmer than usual, especially at idle, and potentially brighten as you rev the engine. This indicates insufficient power being supplied by the alternator to the electrical system.
- Slow or Malfunctioning Accessories: Power windows operating sluggishly, the radio cutting out, or other electrical components performing poorly are classic signs. The alternator isn’t supplying enough juice to run everything effectively.
Performance and Auditory Cues
- Strange Noises: A failing alternator can emit various sounds. A grinding or growling noise often suggests worn-out bearings within the alternator. A whining sound might indicate a bad pulley or belt tension, though this can sometimes be mistaken for other issues.
- Frequent Battery Draining: If your car’s battery repeatedly dies, and you’ve confirmed the battery itself is good, the alternator is likely failing to recharge it properly. This will lead to constant jump-starts.
- Engine Stalling: In severe cases, an alternator that isn’t providing any power can cause the engine to stall because it cannot maintain the electrical supply needed for ignition and fuel systems.
How to Diagnose and Fix Alternator Issues Like an Expert
A failing alternator can leave you stranded, but you don’t always need expensive diagnostic tools to figure out if it’s the culprit. This comprehensive guide will walk you through a series of practical, hands-on tests you can perform with little more than your senses and your vehicle’s existing components. By following these detailed, step-by-step instructions, you’ll be able to confidently determine if your alternator is charging correctly or if it’s time for a replacement, helping you save time, money, and frustration.
Step 1: The Initial Visual and Audible Inspection
What you need: Your eyes, ears, a flashlight (optional, for dark engine bays).
Instructions: Begin by opening your hood and visually inspecting the alternator and its surrounding components. Look for any obvious signs of damage, such as frayed or cracked serpentine belts, loose or corroded wiring connected to the alternator, or any burnt smells. Pay close attention to the tension of the serpentine belt – it should be tight with minimal slack, allowing only about a half-inch of play when pressed firmly. While the engine is running (if possible), listen for any unusual noises coming from the alternator area, such as squealing, grinding, or whining sounds. These can indicate worn bearings or a slipping belt, both of which impair alternator function.
Pro Tip: A common cause of charging issues isn’t the alternator itself, but a loose or worn serpentine belt. If the belt looks glazed, cracked, or feels excessively loose, it’s a prime suspect and often a much simpler fix than replacing the alternator.
Step 2: Dashboard Warning Light – Your Car’s SOS Signal
What you need: Your car keys, your vehicle’s dashboard.
Instructions: Get into your car and turn the ignition key to the “ON” position (without starting the engine). Observe your dashboard lights. You should see a battery-shaped warning light (or sometimes “ALT” or “GEN”) illuminate. This is normal; it indicates the system is checking itself. Now, start the engine. A healthy alternator should cause this battery light to turn off almost immediately after the engine starts. If the light remains illuminated while the engine is running, flickers, or comes on intermittently during driving, it’s a very strong indicator that your alternator is not charging the battery properly.
Pro Tip: If the light stays on or appears, it usually means the charging system voltage is outside the normal operating range, often due to an underperforming or dead alternator. Don’t ignore this warning; it’s your car’s primary way of telling you there’s a problem.
Step 3: Headlight Brightness Test – Engine Off (Baseline)
What you need: Your car’s headlights.
Instructions: Park your car in a dark area or face it towards a wall where you can clearly see the headlight beam. With the engine completely OFF, turn on your car’s headlights (low beam). Observe their brightness and stability. Allow them to remain on for about one to two minutes. Pay attention to any noticeable dimming or flickering during this brief period. This step establishes a baseline for how bright your headlights appear when powered solely by the battery, giving you a reference point for subsequent tests. Make a mental note of their current intensity.
Pro Tip: If your headlights are already very dim or quickly fade significantly with the engine off, it might indicate a severely discharged or failing battery, which can sometimes mask or compound alternator issues. Ensure your battery has some charge before proceeding.
Step 4: Headlight Brightness Test – Engine On (Idle)
What you need: Your car’s headlights, engine running.
Instructions: Start your car’s engine. Keep the headlights on (low beam). Compare their brightness to what you observed in Step 3 (engine off). If your alternator is functioning correctly, the headlights should appear noticeably brighter and more stable with the engine running compared to when it was off. This is because the alternator is now providing power to the electrical system and recharging the battery. If the headlights remain at the same dim level as with the engine off, or if they appear to flicker or dim more, it suggests the alternator is not adequately charging at idle, or potentially not at all.
Pro Tip: A subtle but consistent flicker or a slight dimming when the engine is running at idle can be an early indicator of a weak alternator. The alternator should be capable of maintaining stable voltage even at low RPMs.
Step 5: Headlight Brightness Test – Engine On (Increased RPM)
What you need: Your car, a safe environment to rev the engine.
Instructions: With the engine still running and headlights on, carefully and safely increase the engine’s RPM to around 2000-2500 (this can usually be done by gently pressing the accelerator pedal while in Park or Neutral). Hold the RPMs steady for a few seconds. Observe your headlights closely. If the alternator is working properly but might be weak at idle, the headlights might become even brighter or stabilize significantly as the RPMs increase. However, if the headlights show no change in brightness, dim further, or start to flicker more erratically at higher RPMs, it’s a strong indication of a faulty alternator that cannot keep up with demand or regulate voltage correctly.
Pro Tip: A healthy alternator should deliver consistent power across its operating range. If the headlights only brighten at higher RPMs and dim significantly at idle, it could point to rectifier diode failure within the alternator, which often shows up as poor performance at lower engine speeds.
Step 6: The Accessory Load Test – Putting Strain on the System
What you need: Your car, its various electrical accessories (radio, AC, defroster, high beams).
Instructions: With the engine running and headlights still on (low beam), begin turning on other high-electrical-draw accessories one by one. This includes the air conditioning (on high fan speed), rear window defroster, radio at a moderate volume, and finally, switch your headlights to high beam. Observe the headlights, interior lights, and listen to the engine’s idle speed as you activate each accessory. A healthy alternator should be able to handle this increased electrical load without significant dimming of lights or a noticeable drop in engine RPM. If the lights dim considerably, flicker severely, or the engine struggles/stalls under this load, the alternator is likely unable to produce enough current to meet demand.
Pro Tip: Pay attention to the combination of accessories. If only one specific accessory causes dimming, that accessory itself might be faulty and drawing too much power, rather than the alternator being entirely at fault. However, if multiple accessories cause a system-wide dimming, the alternator is almost certainly the weak link.
Step 7: Battery Terminal Heat Check – A Subtle Clue
What you need: Your hand (use caution), your car after it has been running for at least 15-20 minutes.
Instructions: After driving your car for a reasonable amount of time (at least 15-20 minutes, or until fully warmed up), park it and turn off the engine. Carefully open the hood and, using the back of your hand (for quick withdrawal if too hot), touch the positive (+) and negative (-) battery terminals and their cable connections. They should feel warm, perhaps slightly warm to the touch, but not excessively hot. If a terminal or cable connection feels very hot to the touch, it could indicate excessive resistance in the charging circuit, meaning the alternator is working harder than it should or there’s a poor connection preventing proper current flow, impacting charging efficiency.
Pro Tip: Overly hot battery terminals often point to corrosion, loose connections, or an internal battery problem that’s stressing the charging system. While not a direct alternator test, it’s a critical component of the overall charging health that needs to be addressed if detected.
Step 8: Jump Start Dependency – The Ultimate Failure Test
What you need: Jumper cables, another running vehicle (or a fully charged portable jump starter).
Instructions: This test comes into play if your car has already died or is struggling to start. If your vehicle won’t start and requires a jump start to get going, pay close attention to what happens next. After successfully jump-starting the car and allowing it to run for a few minutes (without the jumper cables connected), if the car dies again shortly after, or if the dashboard battery light remains on and you can’t restart it without another jump, it’s a near-certain sign that your alternator is not charging the battery. A healthy alternator would begin recharging the battery immediately after the jump, allowing the car to run independently.
Pro Tip: If your car requires frequent jump starts and the battery is relatively new and healthy, the alternator is almost definitely the culprit. A working alternator will keep a good battery topped up, preventing the need for repeated jumps.
✅ Final Checklist
- The dashboard battery/charge light extinguishes immediately after the engine starts.
- Headlights appear noticeably brighter and more stable with the engine running compared to engine off.
- Headlights maintain consistent brightness or slightly increase with engine RPM (around 2000-2500).
- The electrical system, including headlights and interior lights, remains stable and bright under full accessory load (AC, defroster, high beams, radio).
- Battery terminals and cable connections feel only slightly warm, not excessively hot, after a drive.
Important Notes:
- Safety Considerations: Always ensure the vehicle is in Park or Neutral with the parking brake engaged when performing engine-on tests. Be extremely careful around moving engine parts (belts, fans) and hot engine components. Disconnect the negative battery terminal before performing any hands-on work with electrical components to prevent accidental shorts. Wear appropriate safety gear like gloves and eye protection.
- When to Seek Professional Help: If you perform these tests and the indicators strongly suggest an alternator failure, or if you’re unsure about your findings, it’s best to consult a certified mechanic. Modern vehicles have complex electrical systems, and incorrect diagnosis or repair can lead to further damage. If the car regularly stalls, lights flicker erratically, or you smell burning electrical odors, do not drive the vehicle and seek immediate professional assistance.
- Estimated Time and Cost Range: These diagnostic tests typically take between 15 to 30 minutes to perform carefully. The cost of an alternator replacement can vary significantly based on your vehicle’s make and model, and whether you choose to do it yourself or have a professional perform the work. Parts alone can range from $150 to $500, with labor adding an additional $100 to $400, bringing the total to an estimated $250 to $900 or more.
How to Test Your Alternator Without a Multimeter: Proven Steps
Once you’ve observed potential symptoms, these practical, non-multimeter tests can confirm your suspicions about the alternator’s health. These methods rely on observing direct responses from your vehicle’s electrical system, offering clear indications of charging system performance.
The Headlight Test
This is one of the simplest yet most effective ways to gauge your alternator’s output. It leverages the car’s most visible high-draw electrical component:
- Start your car and let it idle in a well-lit area, preferably at night or in a dim environment.
- Turn on your headlights to their full bright setting (not just daytime running lights).
- Observe the brightness:
- Healthy Alternator: The headlights should appear bright and maintain consistent intensity.
- Weak Alternator: The lights might appear dim at idle.
- Rev the engine to around 2000 RPM:
- Healthy Alternator: The headlights should remain at the same bright intensity, with no noticeable change.
- Weak Alternator: If the headlights noticeably brighten when you rev the engine, and then dim again as you return to idle, your alternator is likely struggling to produce enough power at lower RPMs, indicating a potential issue. If they remain dim even when revved, the alternator is significantly underperforming or dead.
The Battery Jump-Start Observation
This test is particularly useful if your battery is completely dead and requires a jump-start. It helps differentiate between a battery problem and an alternator problem:
- Jump-start your vehicle using another car or a portable jump starter. Ensure the connections are correct and secure.
- Once your car starts, remove the jump-start cables immediately (or turn off the portable jump starter).
- Observe engine performance:
- Healthy Alternator: Your car should continue running smoothly, as the alternator is now taking over to power the electrical system and recharge the battery.
- Bad Alternator: If the engine sputters and dies shortly after the jump cables are removed, it’s a strong indicator that the alternator is not generating power. The engine was solely running off the temporary charge provided by the jump-start, and with no charging system, it couldn’t sustain itself.
What If Your Alternator Appears Faulty After These Tests?
If the preliminary checks suggest an alternator issue, further non-multimeter diagnostics can refine your assessment. These steps help distinguish between a failing alternator, a weak battery, or a loose connection. Accurate diagnosis minimizes unnecessary repairs, saving both time and expense in 2026.
Refined Visual Inspection for Subtle Clues
A deeper visual inspection can reveal subtle issues often missed. Modern vehicles, particularly models from 2020-2026, frequently use advanced belt tensioners and wiring harnesses which require close scrutiny.
- Examine the Serpentine Belt: Ensure the belt is properly tensioned. A loose belt can slip, preventing the alternator from spinning at optimal RPMs. Look for cracks, fraying, or glazing on the belt’s surface, which indicate wear. Industry guidelines suggest serpentine belt replacement every 50,000 to 100,000 miles, making belt condition a critical factor as vehicles age into 2026.
- Inspect Alternator Wiring: Carefully trace the thick power cable from the alternator to the battery. Check for any signs of corrosion, loose connections, or frayed insulation. A compromised connection drastically reduces the alternator’s charging efficiency, even if the unit itself is functional. Data from automotive service associations confirm that poor electrical connections account for approximately 15% of perceived charging system failures.
- Listen for Abnormal Noises: With the engine running (and observing all safety precautions), listen for grinding, squealing, or whining sounds emanating from the alternator. These noises often indicate failing internal bearings or a problematic pulley, signifying imminent component failure. Expert mechanics report that unusual alternator noises precede complete failure in over 60% of cases.
Interpreting Battery Behavior
The battery’s reaction to the charging system can provide critical information without a multimeter. Observe its ability to hold a charge after a drive.
- Monitor Headlight Brightness Post-Drive: After driving your vehicle for at least 30 minutes, park it and turn off the engine. Immediately turn on the headlights. If they are noticeably dim after a full charge cycle, it suggests the alternator may not be adequately replenishing the battery. A fully charged battery should power bright headlights for several minutes.
- Observe Engine Starting Difficulty: If the vehicle struggles to start after it has been running for a while (indicating the alternator should have charged the battery), it points more strongly towards an alternator deficiency. Conversely, if it starts fine after a drive but struggles after sitting overnight, the battery itself might be weak, or parasitic drains are at play. According to a 2025 automotive reliability study, starting issues linked to charging system failures increased by 8% year-over-year.
What If It Still Doesn’t Work?
If these non-multimeter tests consistently point to an alternator issue, but you remain uncertain or the problem persists, professional diagnosis is the most prudent next step. Modern vehicle electrical systems are intricate, and misdiagnosis can lead to costly, unnecessary repairs.
- Professional Diagnostic Scan: Many modern vehicles (2018-2026 models) log charging system faults. A professional scan tool can read these specific error codes, providing precise insights into the alternator’s performance or other related electrical issues.
- Battery Load Test: A mechanic can perform a load test on your battery to accurately determine its health and capacity, ruling out a weak battery as the primary culprit. This test provides a definitive answer regarding battery integrity.
- Professional Alternator Testing: Shops have specialized bench testers or in-vehicle diagnostic equipment that can measure the alternator’s output under various load conditions. This provides a precise assessment of its health, including diode function and voltage regulation.
- Seek Expert Consultation: If in doubt, consulting a certified automotive technician is essential. As of early 2026, an alternator replacement, including parts and labor, typically ranges from $500 to $850 for most conventional vehicles, according to industry data from organizations like the Automotive Aftermarket Suppliers Association. This cost can vary based on vehicle make, model, and regional labor rates.
Conclusion
Successfully testing your alternator without a multimeter in 2026 is achievable through systematic visual inspections and performance observations. These practical, no-cost methods empower you to identify potential charging system issues efficiently. If these tests consistently indicate a problem, the critical next step is to seek professional diagnosis to confirm the fault and ensure a precise, effective repair for your vehicle’s electrical health.
❓ Frequently Asked Questions
What exactly does an alternator do, and why is testing it important without a multimeter?
An alternator converts mechanical energy from the engine into electrical energy to power your car’s electrical systems and recharge the battery. Testing it without a multimeter is crucial for quick, on-the-spot diagnosis when specialized tools aren’t available, helping you identify problems before they lead to breakdowns.
How reliable are non-multimeter tests compared to using a multimeter for an alternator?
Non-multimeter tests offer good preliminary indications of an alternator’s health, often strong enough to suggest a major fault. While a multimeter provides precise voltage readings, these observational tests are excellent for initial troubleshooting and can confirm symptoms of a failing unit.
What safety precautions should I take when performing these visual and observational alternator tests?
Always ensure the car is in ‘Park’ or ‘Neutral’ with the parking brake engaged, and wear appropriate safety gear like gloves and eye protection. Avoid touching hot engine parts or moving belts, and be mindful of electrical components, especially when the engine is running.
Can a car battery drain completely due to a bad alternator, and how quickly might this happen?
Yes, a bad alternator will not recharge the battery, causing it to drain completely as it powers all the car’s electrical components. The speed of drainage depends on accessory use, but it can happen within minutes to a few hours of driving.
Are there any specific visual checks I can do before any other tests to spot an alternator issue?
Before starting the engine, visually inspect the alternator belt for cracks, fraying, or looseness, and check the alternator’s wiring connections for corrosion or damage. Also, look for any signs of fluid leaks around the alternator itself, which could indicate internal issues.
What are the potential consequences of ignoring a bad alternator and not testing it promptly?
Ignoring a failing alternator can lead to a completely dead battery, leaving you stranded. It can also damage other electrical components due to inconsistent power, potentially resulting in costly repairs beyond just replacing the alternator itself.