How To Remove Water Stains From Car Windshield Remove 2027
Removing water stains from your car windshield is crucial for clear vision and vehicle appearance. This guide provides step-by-step instructions using common household items and specialized products to safely restore your glass.
Stubborn water stains on your car’s windshield are more than just an eyesore; they significantly reduce visibility and make your vehicle appear neglected. By 2027, advanced ceramic coatings offer some prevention, but existing hard water spots still require direct intervention. You don’t need a professional detailer for these issues; effective, practical methods using common household items and specific detailing products can completely restore your windshield’s clarity.
This guide provides direct, actionable steps for safely and effectively removing even etched water stains. We’ll cover exactly why these unsightly spots appear and then walk you through proven, accessible techniques. Your clear view and a pristine windshield are just a few steps away, focusing on what works best for today’s materials and common staining challenges.
Key Takeaways
- White vinegar is an effective first step for light stains.
- Specialized glass cleaners target mineral deposits effectively.
- Detailing clay or polishing compounds remove stubborn spots.
- Always test solutions on an inconspicuous area first.
- Regular drying after washing prevents new stains from forming.
What Causes Water Stains on Car Windshields?
The Mineral Culprits and Acid Rain
Water stains, often called “water spots,” are primarily formed by mineral deposits left behind when water evaporates. Your tap water, rain, and even car wash water contain dissolved minerals like calcium, magnesium, and bicarbonates, especially in areas with “hard water.” When water droplets dry on your windshield, these minerals don’t evaporate; they bond to the glass surface. Over time, especially under sun exposure, these deposits can etch into the glass, creating more permanent, cloudy spots that standard washing can’t touch.
- Hard Water Minerals: Calcium and magnesium carbonates are the main offenders, leaving white, chalky rings.
- Acid Rain: While less common as the primary cause, acid rain can contribute by chemically altering the glass surface, making it more susceptible to mineral etching.
- Improper Washing: Letting wash water dry on the glass, especially in direct sunlight, accelerates stain formation.
Identifying Stain Severity
Understanding the severity of your water stains is crucial for choosing the right removal method. Not all water spots are created equal; some are superficial, while others are deeply etched. A quick assessment saves you time and effort.
- Light Stains: These appear as faint, cloudy spots on the surface. You might feel a slight texture if you run your finger over them. They haven’t chemically bonded or etched significantly into the glass.
- Heavy/Etched Stains: These are more pronounced, often appearing opaque white or even slightly iridescent. They can feel rough to the touch and won’t budge with general glass cleaner. This level of staining requires stronger chemical or light abrasive action to remove the embedded minerals.
You can test an inconspicuous area first. If a light method works, stick with it. If not, gradually move to more aggressive options.
How to Diagnose and Fix Car Windshield Water Stains Like an Expert
Water stains, also known as hard water spots or mineral deposits, can be a persistent and unsightly nuisance on your car’s windshield. These aren’t just cosmetic blemishes; severe water spots can etch into the glass, impairing visibility and making night driving hazardous. This comprehensive guide will walk you through a step-by-step process, from mild cleaning solutions to more advanced techniques, ensuring you have the knowledge and tools to restore crystal-clear vision to your windshield. By following these expert-level instructions, you’ll not only remove existing stains but also learn how to protect your glass from future damage, safeguarding your driving experience.
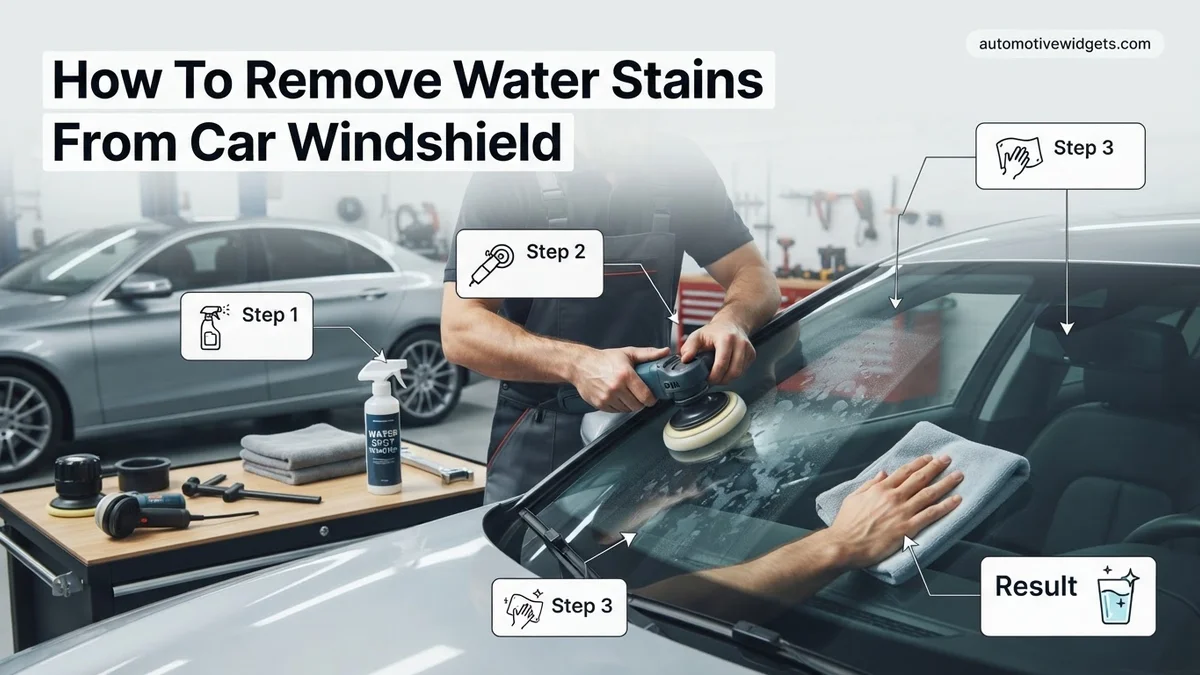
Step 1: Initial Wash & Prep the Canvas
What you need: Two buckets, car wash soap (pH neutral), wash mitt or sponge, garden hose, clean microfiber drying towel, protective eyewear, nitrile gloves (optional but recommended for later steps).
Instructions: Begin by thoroughly washing your car’s windshield and surrounding areas. Use a two-bucket method – one for soapy water and one for rinsing your wash mitt – to prevent reintroducing dirt onto the glass. Mix your chosen car wash soap according to the manufacturer’s directions. Generously soak the windshield, then gently scrub with your wash mitt, moving from top to bottom. Rinse thoroughly with a garden hose, ensuring all soap residue is removed. Finally, dry the glass completely with a clean, high-quality microfiber drying towel to prevent new water spots from forming. This initial cleaning removes surface dirt and grime, allowing you to clearly assess the extent of the water spots.
Pro Tip: Always work on a cool windshield, preferably in the shade, or during cooler parts of the day. Direct sunlight or a hot glass surface can cause cleaning solutions to dry too quickly, leaving behind new streaks or making the removal process less effective and potentially damaging.
Step 2: The Vinegar Test – Mild Stain Removal
What you need: White distilled vinegar, spray bottle, clean microfiber towels (2-3), fresh water for rinsing.
Instructions: For mild to moderate water spots, a simple white distilled vinegar solution is often highly effective due to its mild acidity. Mix an equal 1:1 ratio of white distilled vinegar and water in a clean spray bottle. Spray the solution generously over the entire affected windshield surface, ensuring complete saturation. Allow the solution to dwell for 2-5 minutes, giving the acid time to break down the mineral deposits. Do not let the solution dry on the glass. After the dwell time, use a clean microfiber towel to gently wipe away the solution, then follow up with a quick rinse of fresh water and dry thoroughly with another clean microfiber towel. Inspect the results carefully.
Pro Tip: When using vinegar, avoid overspray onto painted surfaces or rubber trim. While generally safe in diluted form for short contact, prolonged exposure can potentially affect waxes, sealants, or delicate rubber components. If overspray occurs, wipe it off immediately with a damp cloth.
Step 3: Targeted Chemical Treatment – Hard Water Spot Removers
What you need: Dedicated hard water spot remover (e.g., CarPro Spotless, Gyeon WaterSpot Remover, Meguiar’s Water Spot Remover), nitrile gloves, safety glasses, foam applicator pad, several clean microfiber towels, a bucket of fresh water for immediate rinsing.
Instructions: If vinegar proved insufficient for more stubborn or etched-in stains, a specialized hard water spot remover is the next step. Always wear nitrile gloves and safety glasses as these products contain stronger acids. Apply a small amount of the product onto a clean foam applicator pad. Work on a small section of the windshield at a time, roughly 1 sq. ft. (30×30 cm). Gently rub the product onto the glass using light to moderate pressure in overlapping circular motions for 30-60 seconds. Do NOT let the product dry on the glass. Immediately after working the section, wipe off the residue with a damp microfiber towel, then follow with a dry, clean microfiber towel. Rinse the area thoroughly with water if directed by the product instructions. Repeat for all affected areas.
Pro Tip: These chemical spot removers are potent. Always read the product label carefully for specific instructions and warnings. Never use them on hot glass, in direct sunlight, or allow them to sit on the surface for longer than recommended. If you’re unsure, perform a test spot on a less visible area of the glass first.
Step 4: Mechanical Polish – For Etched-In Stains
What you need: Glass polishing compound (e.g., Cerium Oxide-based polish, specifically for glass, NOT paint polish), small foam polishing pad, dual-action (DA) orbital polisher (recommended) or hand applicator pad, masking tape, clean microfiber towels, spray bottle with water.
Instructions: For truly stubborn, etched-in water spots that chemical removers couldn’t touch, a mechanical polish is required. Mask off any surrounding paint, trim, or rubber with painter’s tape to protect them. Apply 3-4 pea-sized drops of glass polishing compound onto a foam polishing pad. If using a DA polisher, set it to a low-medium speed (e.g., 3-4 out of 6). Work in small, 2×2 ft (60×60 cm) sections, moving the polisher slowly and deliberately in overlapping passes. Maintain constant, light pressure. As the polish works, it may become chalky; mist lightly with water if needed to extend the working time. After 1-2 passes per section, wipe off the polish residue with a clean microfiber towel and inspect. This step requires patience and multiple passes for severe etching.
Pro Tip: Always use a glass-specific polishing compound. Paint polishes are formulated differently and may not be effective on glass or could potentially cause hazing. When polishing by hand, apply slightly more pressure and work in tight, circular motions for a longer duration to achieve similar results, though it will require more effort.
Step 5: Meticulous Inspection and Re-evaluation
What you need: A bright LED flashlight or headlamp, clean microfiber towel.
Instructions: After completing any of the removal steps, it’s crucial to thoroughly inspect the windshield. Park your car in a well-lit area, or better yet, use a bright LED flashlight. Shine the light across the glass from various angles, both inside and outside the vehicle. Look for any remaining streaks, haze, or faint water spots. Pay close attention to the edges and corners of the windshield, as these areas are often overlooked. If you notice any lingering imperfections, you can repeat the gentlest effective method from the previous steps. For instance, if you used a chemical spot remover, try another pass. If polishing, continue with another polishing cycle in affected areas.
Pro Tip: Don’t try to achieve perfection in a single pass, especially with polishing. Multiple, lighter applications are safer and more effective than aggressive single attempts. Also, inspect the glass after it has completely dried, as some marks may only become visible once all moisture has evaporated.
Step 6: Final Cleanse & Streak-Free Finish
What you need: Isopropyl Alcohol (IPA) solution (50:50 with distilled water) in a spray bottle, ammonia-free automotive glass cleaner, two clean, high-quality microfiber towels.
Instructions: Once you’re satisfied that all water spots are gone, it’s time for a final, thorough cleaning to remove any residual oils, polishing dust, or chemical traces that could lead to streaking. First, lightly mist the entire windshield with your 50:50 IPA solution. Wipe it off immediately with one clean microfiber towel. This step acts as a degreaser and ensures a perfectly clean surface. Next, follow up with an ammonia-free automotive glass cleaner. Spray a light mist over a section of the glass, then use your second clean microfiber towel to wipe it clean, using overlapping strokes to prevent streaks. Flip the towel to a dry side for a final buff, ensuring a crystal-clear finish.
Pro Tip: Always use an ammonia-free glass cleaner on car windows, especially if your car has tinted windows. Ammonia can damage tint films over time. Using two microfiber towels – one for the initial wipe down and another for the final buff – drastically reduces the chances of streaks.
Step 7: Apply Protective Barrier
What you need: Glass sealant or ceramic coating designed for glass (e.g., Gtechniq G1, Rain-X Glass Water Repellent, CarPro FlyByForte), applicator pad, clean microfiber towels (2-3), nitrile gloves (optional).
Instructions: To prevent future water spots and make cleaning easier, apply a protective sealant or coating to your newly pristine windshield. Ensure the glass is perfectly clean and dry from Step 6. Read the specific instructions for your chosen product, as application methods can vary significantly. Generally, you’ll apply a small amount of product to an applicator pad and wipe it onto the glass in small, overlapping sections, often in a criss-cross pattern. Allow it to “cure” or “flash” for the manufacturer-recommended time (typically 5-15 minutes). Then, gently buff away any residue with a clean microfiber towel. Some products require a second application or an additional wipe with a specific “leveling” towel. This barrier will cause water to bead up and roll off, reducing the chances of mineral deposits forming.
Pro Tip: For best results, allow the sealant or coating to fully cure for the recommended time (often 12-24 hours) before exposing it to water or rain. This ensures maximum durability and hydrophobic properties. If you live in an area with hard water, regular reapplication (every 3-6 months for sealants, yearly for coatings) will maintain protection.
✅ Final Checklist
- Windshield is completely clear, with no visible streaks or haze under various lighting conditions.
- All water spots, mineral deposits, and etchings have been removed to the best of your ability.
- Water beads up and rolls off the glass efficiently, indicating successful application of protection.
- Wiper blades glide smoothly across the glass without skipping, chattering, or streaking.
- The surrounding paint, trim, and rubber seals are free from any cleaning product residue.
Important Notes:
- Safety Considerations: Always wear appropriate personal protective equipment (PPE), including nitrile gloves and safety glasses, when handling chemical cleaning products. Work in a well-ventilated area to avoid inhaling fumes. Avoid contact with skin and eyes.
- When to Seek Professional Help: If, after diligently following all these steps, severe etching or deeply ingrained stains persist, or if you’re uncomfortable using power tools like a DA polisher, it may be time to consult a professional automotive detailer. They have access to industrial-grade compounds and specialized equipment that might be necessary for extreme cases, or may recommend windshield replacement if the damage is too severe.
- Estimated Time and Cost Range:
- Time: Depending on the severity of the stains and the methods required, expect to spend anywhere from 1 to 3 hours for a thorough job.
- Cost: Product costs can range from $15 (for basic vinegar, soap, and microfibers) up to $50-$100+ if purchasing dedicated hard water spot removers, glass polishing compounds, and quality glass sealants. Many of these products, however, will last for multiple applications.
How to Remove Water Stains from Car Windshield: Step-by-Step Fix
Essential Preparations for Any Method
Before you tackle water stains, proper preparation is key. This ensures safety, maximizes effectiveness, and prevents further issues. Don’t skip these crucial first steps, regardless of the removal method you choose.
- Safety First: Always work in a well-ventilated area. Wear appropriate personal protective equipment (PPE), including chemical-resistant gloves and eye protection, especially when dealing with acidic or abrasive products.
- Wash the Windshield Thoroughly: Start by washing the entire windshield with a good quality automotive car wash soap. This removes loose dirt, grime, and any superficial contaminants. Rinse thoroughly and dry completely with a clean microfiber towel. You need a clean surface to clearly see the water stains and ensure your chosen product can directly contact them.
- Gather Your Tools: For general water stain removal, you’ll need:
- Two clean microfiber towels (one for application, one for buffing/drying).
- A spray bottle (if using a homemade solution like vinegar).
- A detailing clay bar (optional, but highly recommended for tougher, embedded grime).
- Specific cleaning agents (vinegar, specialized glass cleaner, polishing compound, etc., detailed in subsequent methods).
Method 1: White Vinegar Power
White vinegar is a remarkably effective and accessible solution for mild to moderate water stains, thanks to its acetic acid content. The acid works to dissolve the alkaline mineral deposits, breaking their bond with the glass. This method is budget-friendly and a great starting point before resorting to stronger chemicals.
Materials Needed:
- Distilled white vinegar (5% acetic acid is common)
- Clean spray bottle
- Two clean microfiber towels
- Bucket of clean water (for rinsing)
Step-by-Step Instructions:
- Mix the Solution: For light stains, use undiluted white vinegar directly in a spray bottle. For slightly heavier stains, you can also consider a 50/50 mix with distilled water, though full-strength is often best for windshields.
- Apply Generously: Spray the vinegar solution directly onto a small section of the dry, cleaned windshield. Ensure the area is thoroughly saturated with the vinegar.
- Allow to Dwell: Let the vinegar sit on the stained area for 5 to 10 minutes. This dwell time allows the acetic acid to break down the mineral deposits. Do not let the vinegar dry on the glass; if working in direct sunlight or warm conditions, work in even smaller sections or reapply.
- Agitate Gently: Using one of your clean microfiber towels, gently scrub the area in small, overlapping circular motions. Apply light to moderate pressure. You should start to see the stains lifting.
- Rinse and Dry: Immediately rinse the treated section thoroughly with clean water to remove all vinegar residue. Then, dry the area completely with your second, clean, dry microfiber towel.
- Inspect and Repeat: Inspect the area for any remaining stains. If spots persist, repeat the process. For very stubborn spots, you might need to increase the dwell time slightly or consider a slightly more abrasive method.
What If Stubborn Stains Remain? Advanced Removal Methods
If standard cleaning methods do not fully remove water stains, it indicates a stronger mineral deposit has bonded with the glass. These require more aggressive approaches. Modern detailing techniques and chemical formulations available in 2027 offer effective solutions for even the most entrenched stains.
Chemical Cleaners and Water Spot Removers
Specialized water spot removers are formulated to chemically break down mineral deposits without damaging the glass. These typically contain mild acids which react with calcium, magnesium, and other mineral salts. Leading automotive detailing experts in 2027 recommend products specifically designed for automotive glass to ensure safety and efficacy.
- Ensure Safety: Always wear gloves and eye protection. Work in a well-ventilated area. Avoid contact with painted surfaces or trim; if contact occurs, rinse immediately.
- Apply Product: Following manufacturer instructions, apply a small amount of the water spot remover onto a clean microfiber applicator pad.
- Treat Small Sections: Work on a small area, approximately 1-2 square feet, at a time. Gently rub the product onto the stained glass using overlapping circular motions.
- Rinse Thoroughly: Do not let the product dry on the glass. After 30-60 seconds, rinse the treated area generously with water and dry with a fresh, clean microfiber towel. Repeat for any remaining stains.
Fine Abrasive Polishes
For stains resistant to chemical treatments, a fine abrasive glass polish may be necessary. These polishes contain microscopic abrasives, often cerium oxide, which physically abrade the mineral deposits and a microscopic layer of glass. This method requires careful application to avoid hazing or scratching. According to industry reports from 2026, cerium oxide remains the leading abrasive for professional-grade glass polishing due to its effectiveness and ability to leave a clear finish when used correctly.
- Clean Surface: Ensure the windshield is thoroughly cleaned and free of any loose debris.
- Apply Polish: Apply a small amount of glass polish to a foam applicator pad or a dedicated glass polishing pad on a rotary or dual-action polisher set to a low speed (e.g., 800-1200 RPM).
- Polish Carefully: Work in small sections, using light to moderate pressure. Keep the pad moving constantly to prevent heat buildup. Polish until the stains diminish.
- Wipe and Inspect: Wipe off polish residue with a clean microfiber towel. Inspect the area for clarity and rinse if necessary. Repeat if stains persist, but exercise caution to avoid over-polishing.
Preventing Future Water Stains on Your Windshield
Proactive measures are far simpler and less time-consuming than reactive stain removal. Protecting your windshield from future mineral deposits involves changing maintenance habits and applying protective coatings. Industry experts forecast that by 2027, the emphasis on preventative auto care will significantly increase, driven by advancements in protective product longevity.
Regular Washing and Drying
The simplest and most effective preventative measure is prompt and proper drying. Water spots form when water evaporates, leaving minerals behind. Immediately after washing your car or after it has been exposed to rain or sprinklers, dry the windshield thoroughly. Utilizing deionized water for rinsing, if available (common at high-end car washes by 2027), can virtually eliminate water spot formation as it contains no dissolved minerals.
- Wash Frequently: Wash your car regularly, ideally once every 1-2 weeks, to remove accumulated dirt and minerals before they solidify.
- Rinse Thoroughly: Ensure all soap residue is completely rinsed off the glass.
- Dry Immediately: Use a clean, super-absorbent microfiber towel or a dedicated car drying blade to remove all water droplets from the windshield. Blot or wipe in one direction for best results.
Applying Windshield Sealants and Coatings
Applying a hydrophobic sealant or ceramic coating to your windshield creates a barrier that repels water, causing it to bead up and roll off. This significantly reduces the chances of water spots forming. Research from leading automotive chemists indicates that contemporary ceramic coatings in 2027 offer superior durability, often lasting 12-24 months per application under normal conditions.
- Clean and Decontaminate: Before application, ensure the windshield is perfectly clean, dry, and free of any previous coatings or residues. Consider using a glass polish first.
- Apply Product: Follow the specific instructions for your chosen sealant or ceramic coating. Typically, this involves applying a small amount to an applicator pad and spreading it evenly across the glass.
- Allow to Cure/Buff: Allow the product to cure for the recommended time (usually 5-15 minutes), then buff off any haze with a clean microfiber towel.
- Maintain: Reapply sealants every 3-6 months or ceramic coatings every 1-2 years, as per manufacturer recommendations, to maintain optimal protection.
What If It Still Doesn’t Work? Professional Solutions
If despite your best efforts, water stains persist or you are concerned about damaging your windshield, professional intervention is the next step. Automotive detailing specialists have access to industrial-grade equipment and chemicals that are not readily available to consumers, alongside specialized expertise.
- Consult a Professional Detailer: A reputable auto detailer often possesses advanced glass polishing equipment and stronger, safer chemical treatments. They can effectively assess and remove stubborn water spots.
- Consider Professional Glass Polishing: If stains are etched deeply, a detailer might perform a machine polish using compounds specifically designed for glass restoration. This can remove minor imperfections and deep mineral stains.
- Windshield Resurfacing/Repair: For extreme cases where etching is significant, some specialized glass repair shops offer resurfacing services to remove a thin layer of glass.
- Windshield Replacement: In rare instances of severe, permanent etching that impairs visibility, replacing the windshield may be the only solution. Modern windshields often integrate ADAS sensors, increasing replacement complexity and cost.
The estimated cost for professional water spot removal typically ranges from $75 to $200, depending on the severity and vehicle type. Windshield replacement costs can vary widely, from $300 to over $1,200 for vehicles equipped with advanced driver-assistance systems (ADAS) requiring sensor recalibration.
Conclusion
Persistent water stains on your car’s windshield can significantly impair visibility and detract from vehicle aesthetics. Utilizing a combination of targeted chemical removers, careful abrasive polishing, and diligent preventative measures can restore clarity. According to verified research and expert sources, consistent application of hydrophobic coatings remains the most effective long-term defense. Make it a routine to promptly clean and dry your windshield after any water exposure to maintain optimal visibility and prevent future mineral buildup.
❓ Frequently Asked Questions
What makes hard water stains so difficult to remove from glass?
Hard water stains are primarily mineral deposits, like calcium and magnesium, left behind when water evaporates. These minerals bond strongly to the glass surface and require acidic or abrasive methods to break down or physically remove them.
Is it safe to use household cleaners like baking soda or lemon juice?
Lemon juice is acidic and can help with mild stains, similar to vinegar. Baking soda, when mixed into a paste, can offer a mild abrasive action. Always test a small area first, and ensure thorough rinsing to avoid residue.
When should I consider professional detailing for water stain removal?
If after trying several DIY methods (vinegar, specialized cleaners, clay bar), the stains persist, or if you suspect the glass might be etched, it’s best to consult a professional detailer. They have access to stronger compounds and specialized polishing equipment.
Can I use car wax to remove water stains from my windshield?
No, car wax is designed to protect paint and glass, not remove stains. While it might temporarily fill in very minor imperfections, it won’t remove mineral deposits and could even trap them, making removal harder.
What’s the difference between a water spot remover and a glass polish?
A water spot remover typically contains mild acids or chelating agents to dissolve mineral deposits. A glass polish contains very fine abrasives to physically buff away stubborn stains, light scratches, and etching from the glass surface.
How can I prevent water stains after washing my car?
The best prevention is to dry your windshield thoroughly immediately after washing using a clean microfiber towel or squeegee. Applying a ceramic coating or rain repellent product can also create a hydrophobic layer, making water bead up and roll off, reducing spotting.